

Hands-On With Adobe Document Generation API
source link: https://dzone.com/articles/hands-on-with-adobe-document-generation-api
Go to the source link to view the article. You can view the picture content, updated content and better typesetting reading experience. If the link is broken, please click the button below to view the snapshot at that time.

Hands-On With Adobe Document Generation API
Adobe Document Generation API will take your Word document template, inject your data, and then output a Word document (or PDF) as the result. How about a simple demo?
Join the DZone community and get the full member experience.
Join For FreeThis week Adobe is proud to announce the availability of the Document Generation API as part of Adobe Document Services. This is a powerful new service that enables developers to generate both Word and PDF documents from a template and dynamic data. This new API is fully supported by our Java, .Net, and Node SDKs already and can be used in any other language via a REST API. Let’s take a look at how this works.
Document generation is done by combining a Word document that acts as a template along with your data. This data could be hard-coded in a JSON file or fetched on the fly from another API. Adobe Document Generation API will take your Word document template, inject your data, and then output either a Word document or PDF as the result. How about a simple demo?
Getting Started
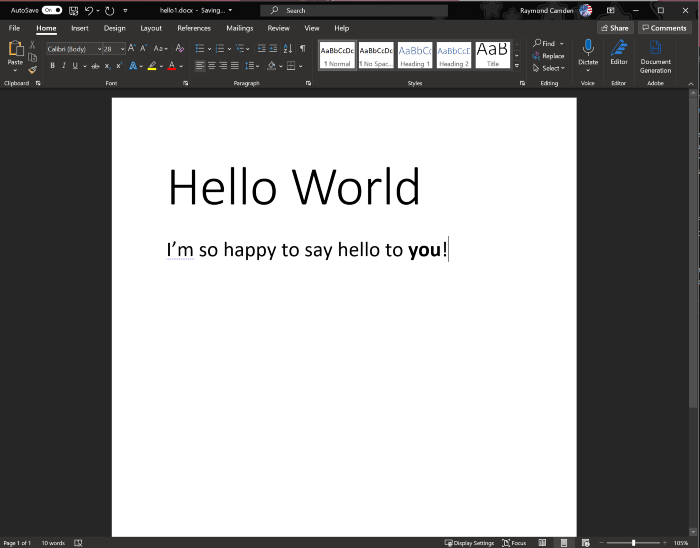
Let’s begin with a Word document. I fired up Microsoft Word and did a tiny bit of typing and styling to create a header and one short sentence of text:
To make this a template, we need to insert tags that will be replaced by our data during the generation process. These tags can be simple variable substitutions (insert a value from our data) or more complex operations including conditionals and loops. You can even embed expressions that act much like formulas from Excel.
You’ve got two ways of adding these expressions to your document. One is to simply do it by hand. For developers, this may be the simplest solution. (For me, I was very much reminded of the Liquid template language.)
The other method is by installing the Adobe Document Generation Tagger 'add-in' to Microsoft Word. I’ve been using Word for probably a few decades but this was the first time I’ve seen something added that was more interesting than just a button. The add-in adds an interactive editor to your editor that makes it simpler to insert the proper tokens.
Our first demo is going to be pretty simple so we’ll do it the manual way (ala, uphill, both ways, in the snow). I’m going to edit my Word document to add a name token:

In the screenshot above, you can see brackets used for both tokens: {{name}}. Now we have a Word document that can be used with the generation service. Let's look at a simple Node script to demonstrate creating a new Word document based on the template. (The following code is based on our quick start, be sure to check it out for examples in other languages.)
const PDFToolsSdk = relanguagesobe/documentservices-pdftools-node-sdk');
const fs = require('fs');

const inputFile = './hello1.docx';
const outputFile = './helloWorld.docx';const data = {
    name: "Raymond Camden"
};

//remove output if exists
if(fs.existsSync(outputFile)) fs.unlinkSync(outputFile);

// Initial setup, create credentials instance.
const credentials =  PDFToolsSdk.Credentials
      .serviceAccountCredentialsBuilder()
      .fromFile("pdftools-api-credentials.json")
      .build();

// Create an ExecutionContext using credentials.
const executionContext = PDFToolsSdk.ExecutionContext.create(credentials);

// Create a new DocumentMerge options instance.
const documentMerge = PDFToolsSdk.DocumentMerge,
      documentMergeOptions = documentMerge.options,
      options = new documentMergeOptions.DocumentMergeOptions(data, documentMergeOptions.OutputFormat.DOCX);

// Create a new operation instance using the options instance.
const documentMergeOperation = documentMerge.Operation.createNew(options);

// Set operation input document template from a source file.
const input = PDFToolsSdk.FileRef.createFromLocalFile(inputFile);
documentMergeOperation.setInput(input);

// Execute the operation and Save the result to the specified location.
documentMergeOperation.execute(executionContext)
.then(result => result.saveAsFile(outputFile))
.catch(err => {
    if(err instanceof PDFToolsSdk.Error.ServiceApiError
        || err instanceof PDFToolsSdk.Error.ServiceUsageError) {
        console.log('Exception encountered while executing operation', err);
    } else {
        console.log('Exception encountered while executing operation', err);
    }
});
The script begins by loading in our required libraries, including the Adobe PDF Tools SDK. I then define my input and output files. Next, I define by my data. It’s relatively simple (and hardcoded), but again this could be loaded from the file system or fetched via an API call.
The rest of the template comes from our Quick Start but boils down to setting up the credentials, defining the type of generation we want (Word), and then performing the operation.
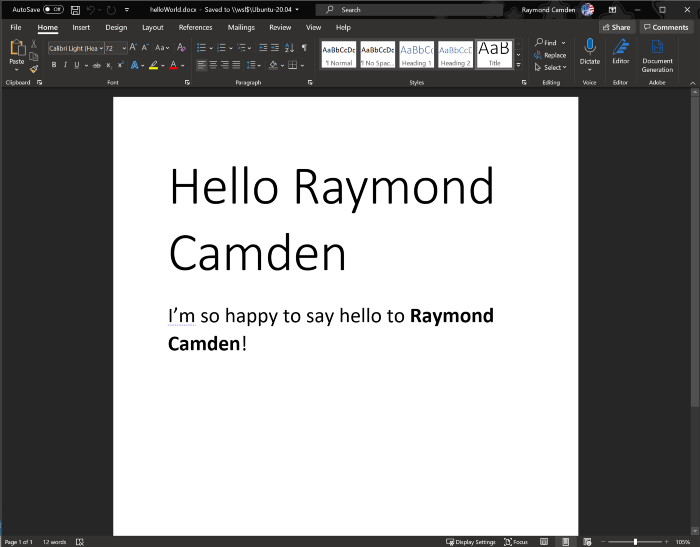
Once run, we end up with this new Word doc:
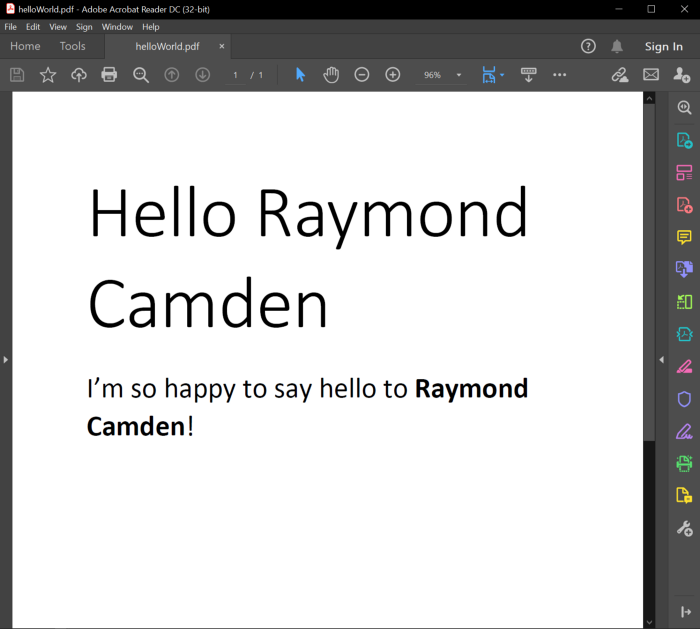
How about PDF support? We can simply change the name of the output file:
const outputFile = './helloWorld.pdf';
And change the options variable:
options = new documentMergeOptions.DocumentMergeOptions(data, documentMergeOptions.OutputFormat.PDF);
Once run we get:
As a quick note, the scripts above, and the source Word docs, may all be found on my GitHub repo here: https://github.com/cfjedimaster/document-services-demos/tree/main/docgen
Going Advanced
Alright, so let’s kick it up a notch with some data is a bit more complex. Imagine a veterinary clinic that needs to create documents for clients. These documents will include information about the client as well as information about their animals. Since the only proper pet is a cat, we will just assume they have cats. Here’s how this data may look:
{
    "name":"Raymond Camden",
    "email":"[email protected]",
    "address":"1313 Mockingbird Lane, Lafayette, LA",
    "cell":"337-555-5555",
    "cats":[
        {"name":"Luna", "gender": "female", "breed": "something", "weight": 4},
        {"name":"Pig", "gender": "female", "breed": "something else", "weight": 8},
        {"name":"Cracker", "gender": "male", "breed": "large", "weight": 10}
    ]
}
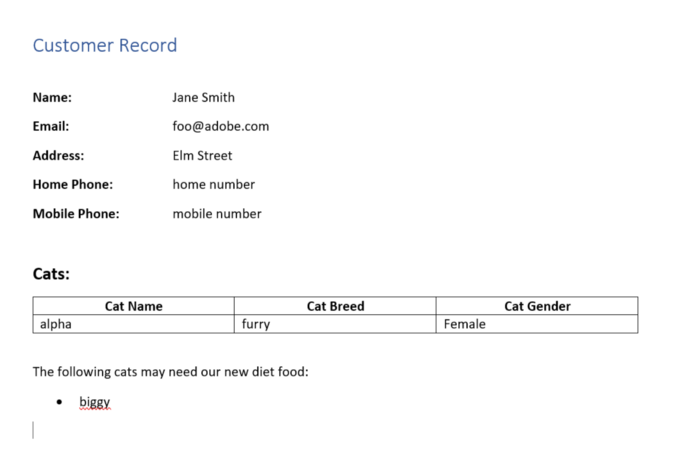
We’ve got basic customer information on top (name, email, address, and a mobile number) and then an array of cats where each cat has a name, gender, breed, and weight. We want to create a document that has the following features:
- On top, we show the customer’s name, and then as much information about them as can. So for example, not every customer record may have the address. We can use conditional tags for this.
- Display a table of cats, showing their name, gender, and breeds.
- Optionally display a list of cats that are overweight.
This is somewhat more complex than our initial demo, so this would be a good time to use the Word Add-In to help with the template. I began by creating the template with static values:
If you’ve installed the add-in, you should see this button in your top ribbon:
Clicking this will open a new panel to the right of your document:
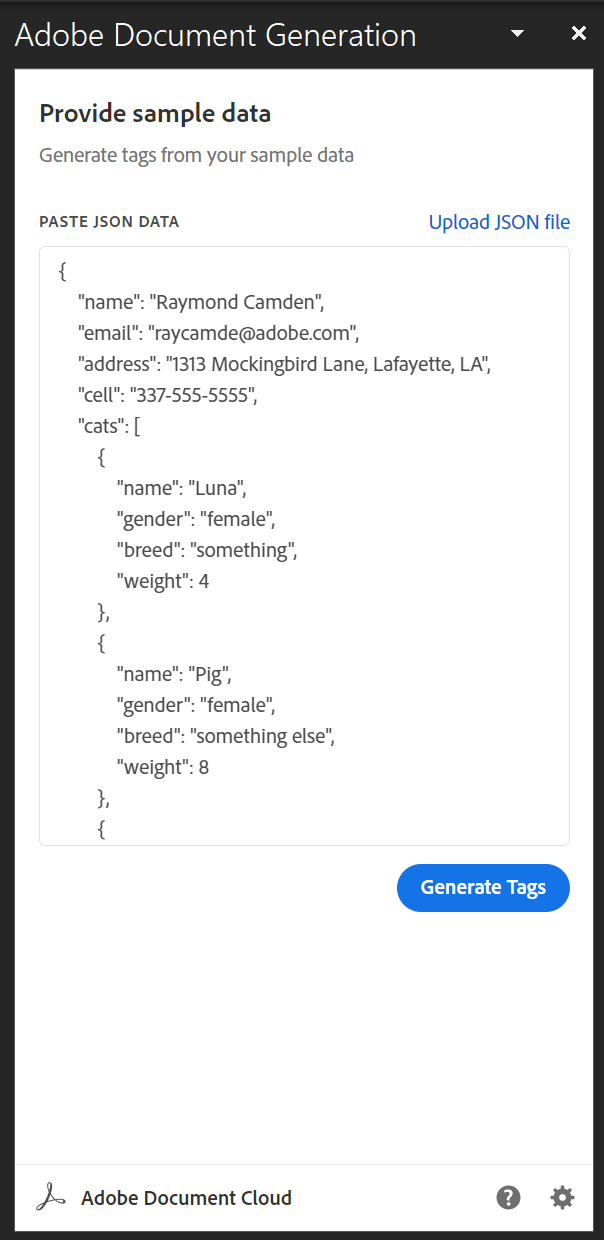
If you click Get Started, you will then be prompted to paste in your JSON or upload a JSON file:
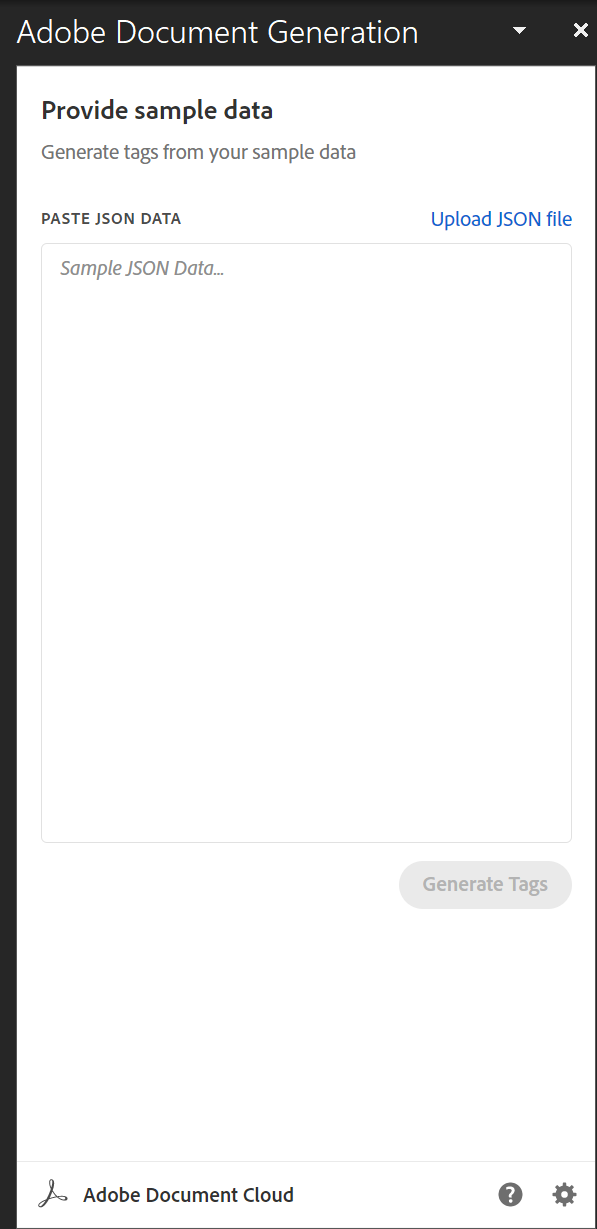
Notice that it’s asking you for sample data. In our imaginary application, you could imagine our customer and pet data being stored in a database. To get started building your template, you could need to generate at least one JSON file, or output, of data to provide to the Word Add-In so it can help you design the template. I went ahead and used the JSON data earlier in the example.
If you hit Generate Tags, the Add-In will then be able to help you insert tokens. You’ll notice two tabs, Basic and Advanced:
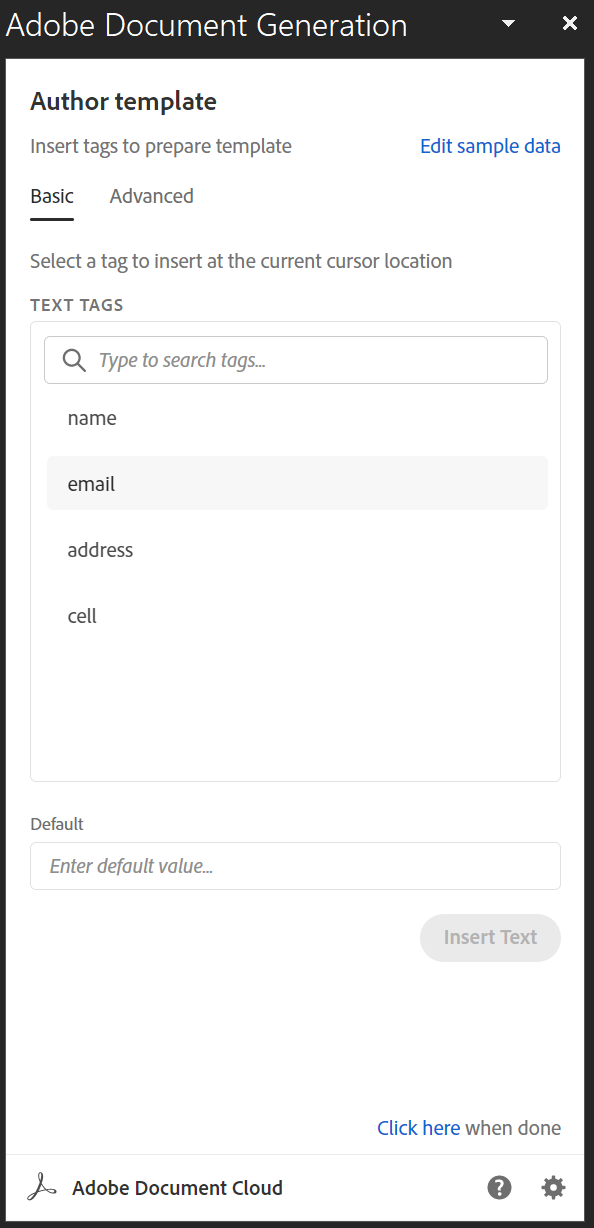
Let’s start by adding in the simple data. In my Word document, I selected my default text, Jane Smithand in the Add-In panel, I selected name and then clicked the Insert Text button. Doing so replaced the default text with the tag.
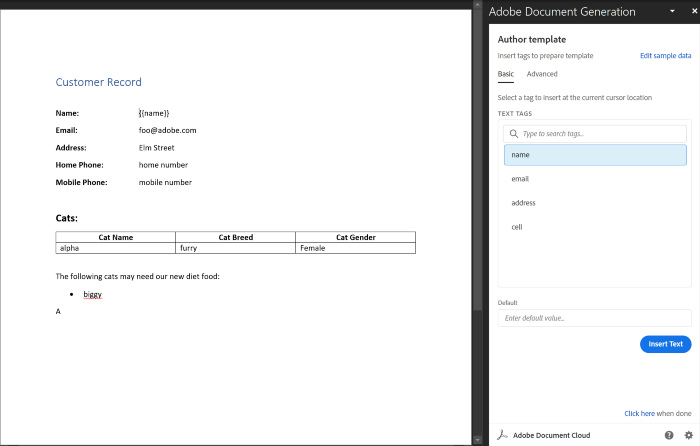
Easy, right? I went ahead and replaced email, address, and mobile phone.
So what about the home number? As we said above, we expect that some customers may not have a home number (our test data did not). Some may not have a cell (or may not want to share it with their friendly neighborhood vet). Luckily we can add conditionals to our templates.
I began by selecting the entire line with 'Mobile phone,' and then switched to the Advanced tab. In there is a 'Conditional content' section you can expand.
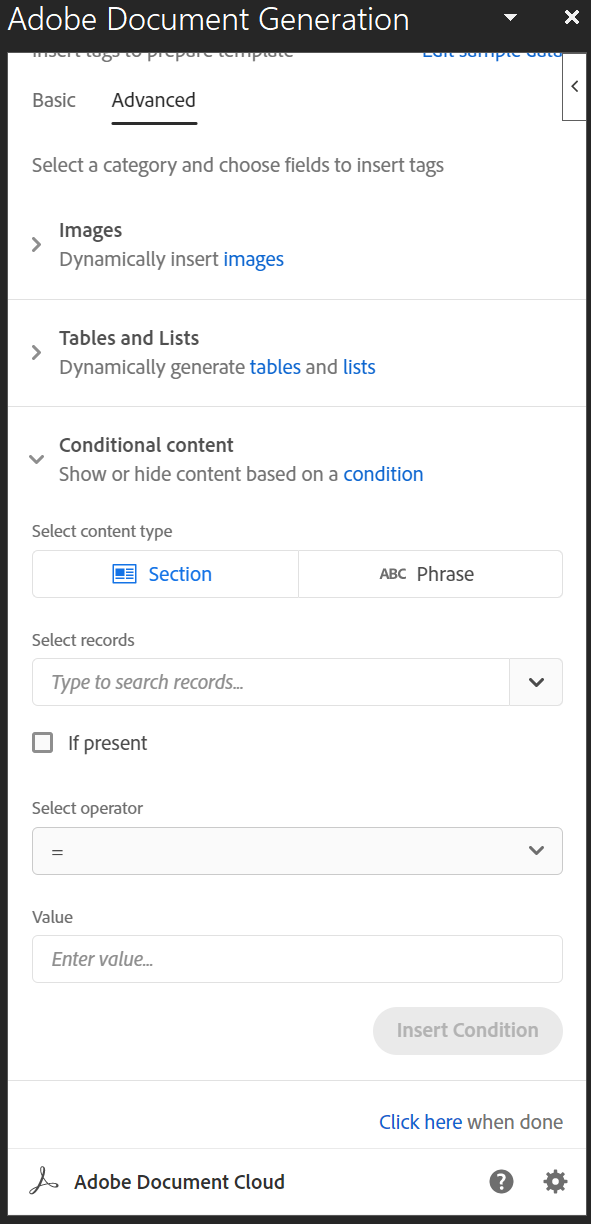
In the 'Select records,' you can either type or use the dropdown. I selected 'cell' and then hit the 'if present' button. Next, I clicked Insert Condition.
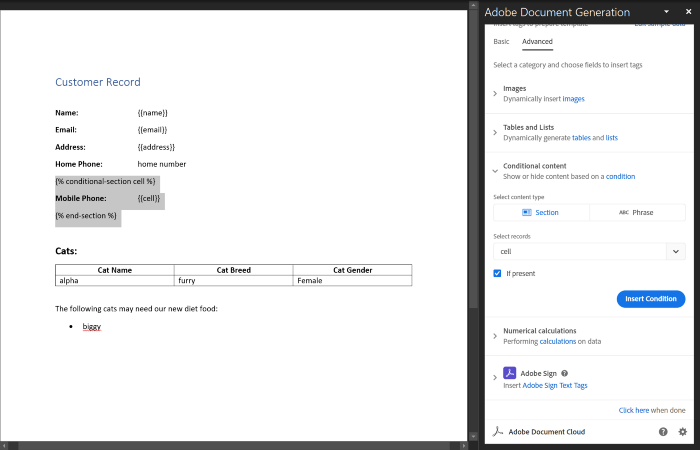
The {% conditional-section cell %} tag wraps our entire line and will only display in the final result if cell exists. We don't have a value for our home phone number but we can copy and paste the same tags by hand. (If I were building this with a non-technical user, I would have supplied an empty value so the Add-In would recognize it as a possibility.) We will assume that if the customer has a home number, it will be provided in a value named homenumber.
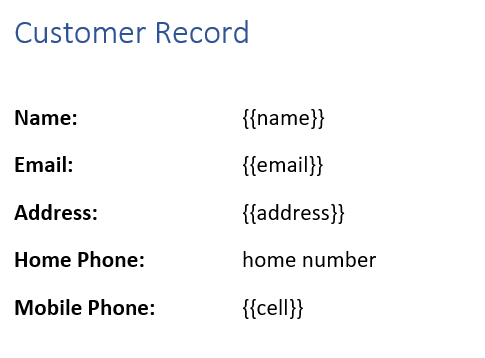
Here’s the final version of the top part of our template:

Now let’s add our list of cats. Still in the Advanced section of the Add-In, go into Tables and Lists. Table is selected by default. First, you need to select the array data to iterate over. The Add-In was smart enough to look at your data and realize that cats was the only array therefore it's the only option in the dropdown under 'Table records.' Next, you need to specify which columns to use. If you begin typing in 'Select column records,' once again the Add-In is smart enough to suggest only the keys it found in the array. I entered name, breed, and gender.
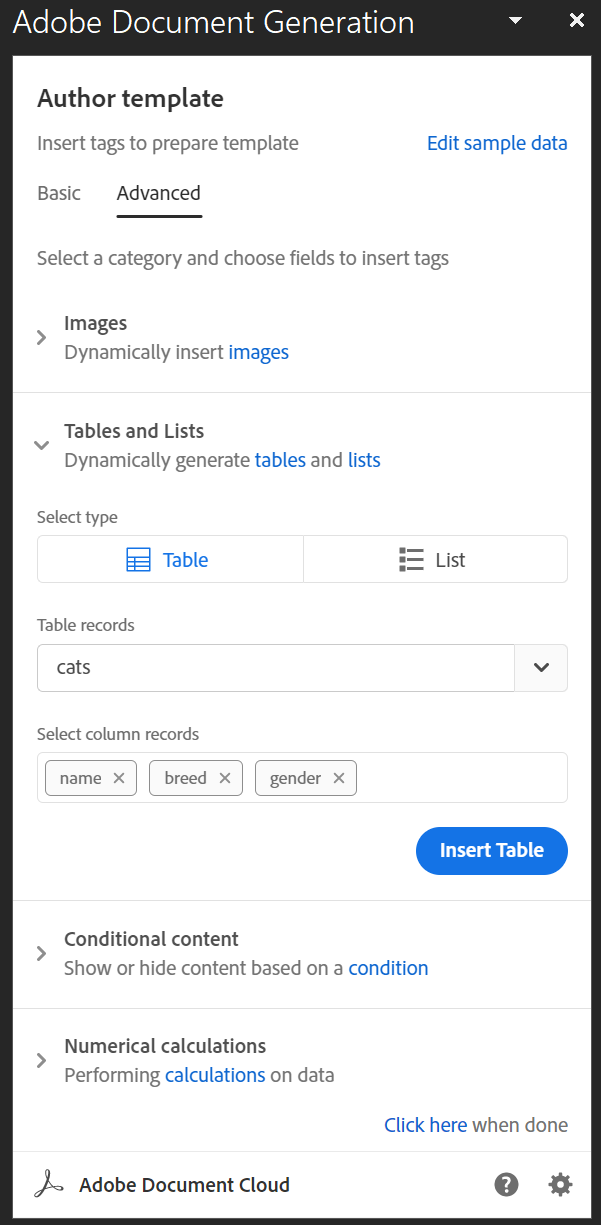
This time we’re not going to select the existing table. Instead, I ensured my cursor was right after the table and hit 'Insert Table.'
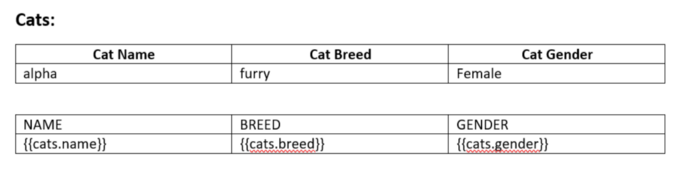
As you can see, it created a new table with headers. Now we just need to edit the new table to re-apply the formatting used before (a simple bold and center). I also kept out the “Cat” before each column name as that was redundant.

This is a good illustration of how the Add-In can simply adding in your tags, but you still may have to do a bit of clean up, styling, and so forth, after you’re done.
Speaking of — the final feature was a list of cats that may be overweight. For that, we’ll switch back to editing by hand. I modified the list at the bottom with a bit of logic:
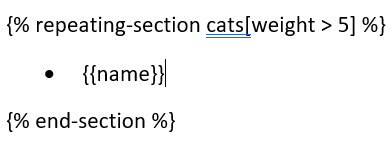
How did I figure this out? Our documentation generation logic uses JSONata for token parsing and I spent some time on their site looking at their docs. It’s a fascinating system and may take a bit of trial and error, but you can get the hang of it pretty quickly.
With my template done, I created a new script to use and load in my data. As it’s a slight modification from my earlier script, here’s all that I changed:
const inputFile = './catTemplate.docx';
const outputFile = './catCustomer.pdf';const data = require('./catowner.json');
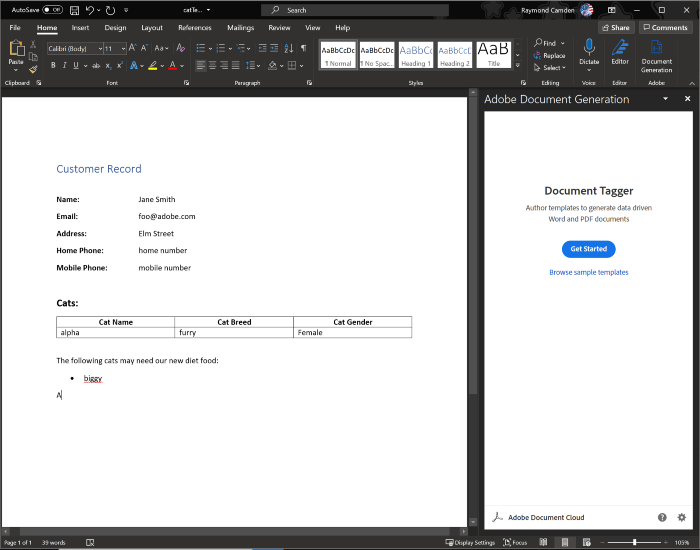
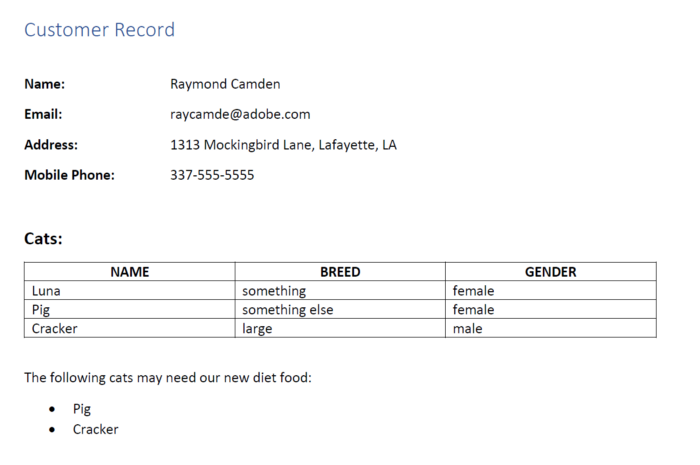
Again, that data value would typically be loaded via an API or database call. You can find the complete file on my GitHub repo. And here's the beautiful dynamic result:
Next Steps
I hope this introduction has gotten you excited about our new Document Generation API. Remember that you can sign up for this and our Adobe PDF Tools API for a free six-month trial. Also, be sure to check our docs and head to the forums with any questions you may have.
Recommend
About Joyk
Aggregate valuable and interesting links.
Joyk means Joy of geeK