

使用容器搭建 APT Cacher NG 缓存代理服务
source link: https://soulteary.com/2021/04/12/use-docker-to-build-apt-cacher-ng-caching-proxy-service.html
Go to the source link to view the article. You can view the picture content, updated content and better typesetting reading experience. If the link is broken, please click the button below to view the snapshot at that time.

最近在对公有云服务器进行梳理和资源整合,难免要进行机器初始化,以及针对部分镜像进行重新构建。
在这个过程中,最浪费时间的莫过于软件包的下载,为了提升整体部署和镜像构建效率,可以搭建一台用于缓存各种常用软件包的缓存代理服务器。
虽然缓存代理服务器对于计算的需求非常低,但是因为考虑到长期维护、后续潜在的数据迁移,服务快速升降级,这里选择使用支持显式声明环境和运行配置的 Docker 方式来搭建,故采取了2核心2GB的虚拟机,如果你的日常 CI 构建、虚拟机数量非常大,可以适当提升机器配置。
基础系统环境准备
既然选择使用 Docker 方式来构建,首先自然是安装容器引擎和基础的编排工具。
apt update && apt upgrade -y && apt install -y apt-transport-https  ca-certificates curl software-properties-common
curl -fsSL https://mirrors.tuna.tsinghua.edu.cn/docker-ce/linux/ubuntu/gpg  | apt-key add -
add-apt-repository "deb http://mirrors.tuna.tsinghua.edu.cn/docker-ce/linux/ubuntu $(lsb_release -cs) stable"
apt install -y docker-ce
curl -L https://github.com/docker/compose/releases/download/1.29.0/docker-compose-`uname -s`-`uname -m` -o /usr/local/bin/docker-compose
chmod +x /usr/local/bin/docker-compose
依次执行上面的命令,等待环境安装完毕,然后检查一下命令是否正常:
# docker -v
Docker version 20.10.5, build 55c4c88
# docker-compose -v
docker-compose version 1.29.0, build 07737305
构建 APT Cacher NG 容器镜像
在构建应用镜像之前,我们需要先准备应用配置文件:
CacheDir: /var/cache/apt-cacher-ng

LogDir: /var/log/apt-cacher-ng

Port:80

Remap-debrep: file:deb_mirror*.gz /debian ; https://mirrors.tuna.tsinghua.edu.cn/debian/ file:backends_debian
Remap-secdeb: security.debian.org ; https://mirrors.tuna.tsinghua.edu.cn/debian-security/ deb.debian.org/debian-security
Remap-uburep: file:ubuntu_mirrors /ubuntu ; https://mirrors.tuna.tsinghua.edu.cn/ubuntu/ file:backends_ubuntu
Remap-cygwin: file:cygwin_mirrors /cygwin
Remap-alpine: /alpine ; https://mirrors.tuna.tsinghua.edu.cn/alpine/
Remap-alpine: /docker-ce ; https://mirrors.tuna.tsinghua.edu.cn/docker-ce/linux/ubuntu/

ReportPage: acng-report.html

UnbufferLogs: 1

VerboseLog: 1

ForeGround: 1

ExThreshold: 4

MaxConThreads: 120

VfilePatternEx: (metalink\?repo=[0-9a-zA-Z-]+&arch=[0-9a-zA-Z_-]+|/\?release=[0-9]+&arch=|repodata/.*\.(xml|sqlite)\.(gz|bz2)|APKINDEX.tar.gz|filelists\.xml\.gz|filelists\.sqlite\.bz2|repomd\.xml|packages\.[a-zA-Z][a-zA-Z]\.gz)
PfilePatternEx: (/dists/.*/by-hash/.*|\.tgz|\.tar|\.xz|\.bz2|\.rpm|\.apk)$

Debug:3

LocalDirs: acng-doc /usr/share/doc/apt-cacher-ng

FreshIndexMaxAge: 300

RedirMax: 5

VfileUseRangeOps: 0

PassThroughPattern: .*
你可以将上面配置中的软件源进行按需替换,我这里使用清华源来替换默认的软件源。如果你想了解更多配置相关的信息,可以翻阅这里。将修改好的内容保存为 acng.conf ,我们稍后使用。然后接着编写容器配置文件,内容十分简单:
FROM ubuntu:20.04
RUN sed -i 's/http:\/\/.*.ubuntu.com/http:\/\/mirrors.tuna.tsinghua.edu.cn/' /etc/apt/sources.list
RUN apt-get update && \
    apt-get install apt-cacher-ng -y && \
    ln -sf /dev/stdout /var/log/apt-cacher-ng/apt-cacher.log && \
    ln -sf /dev/stderr /var/log/apt-cacher-ng/apt-cacher.err && \
    apt-get clean all && \
    rm -rf /var/lib/apt/lists/*
COPY acng.conf /etc/apt-cacher-ng/acng.conf
EXPOSE 80
VOLUME ["/var/cache/apt-cacher-ng"]
ENTRYPOINT ["/usr/sbin/apt-cacher-ng"]
CMD ["-c","/etc/apt-cacher-ng"]
将上面的内容保存为 Dockerfile 后,我们执行 docker build -t apt-cacher-ng:ubuntu-20-04 进行镜像构建。
启动缓存服务
将下面的内容保存为 docker-compose.yml :
version: "3.0"
services:
  acng:
    container_name: cache.lab.com
    image: apt-cacher-ng:ubuntu-20-04
    restart: always
    expose:
      - 80
    ports:
      - 80:80
    volumes:
      - /etc/localtime:/etc/localtime:ro
      - /etc/timezone:/etc/timezone:ro
      - ./data:/var/cache/apt-cacher-ng:rw
    logging:
        driver: "json-file"
        options:
            max-size: "1m"
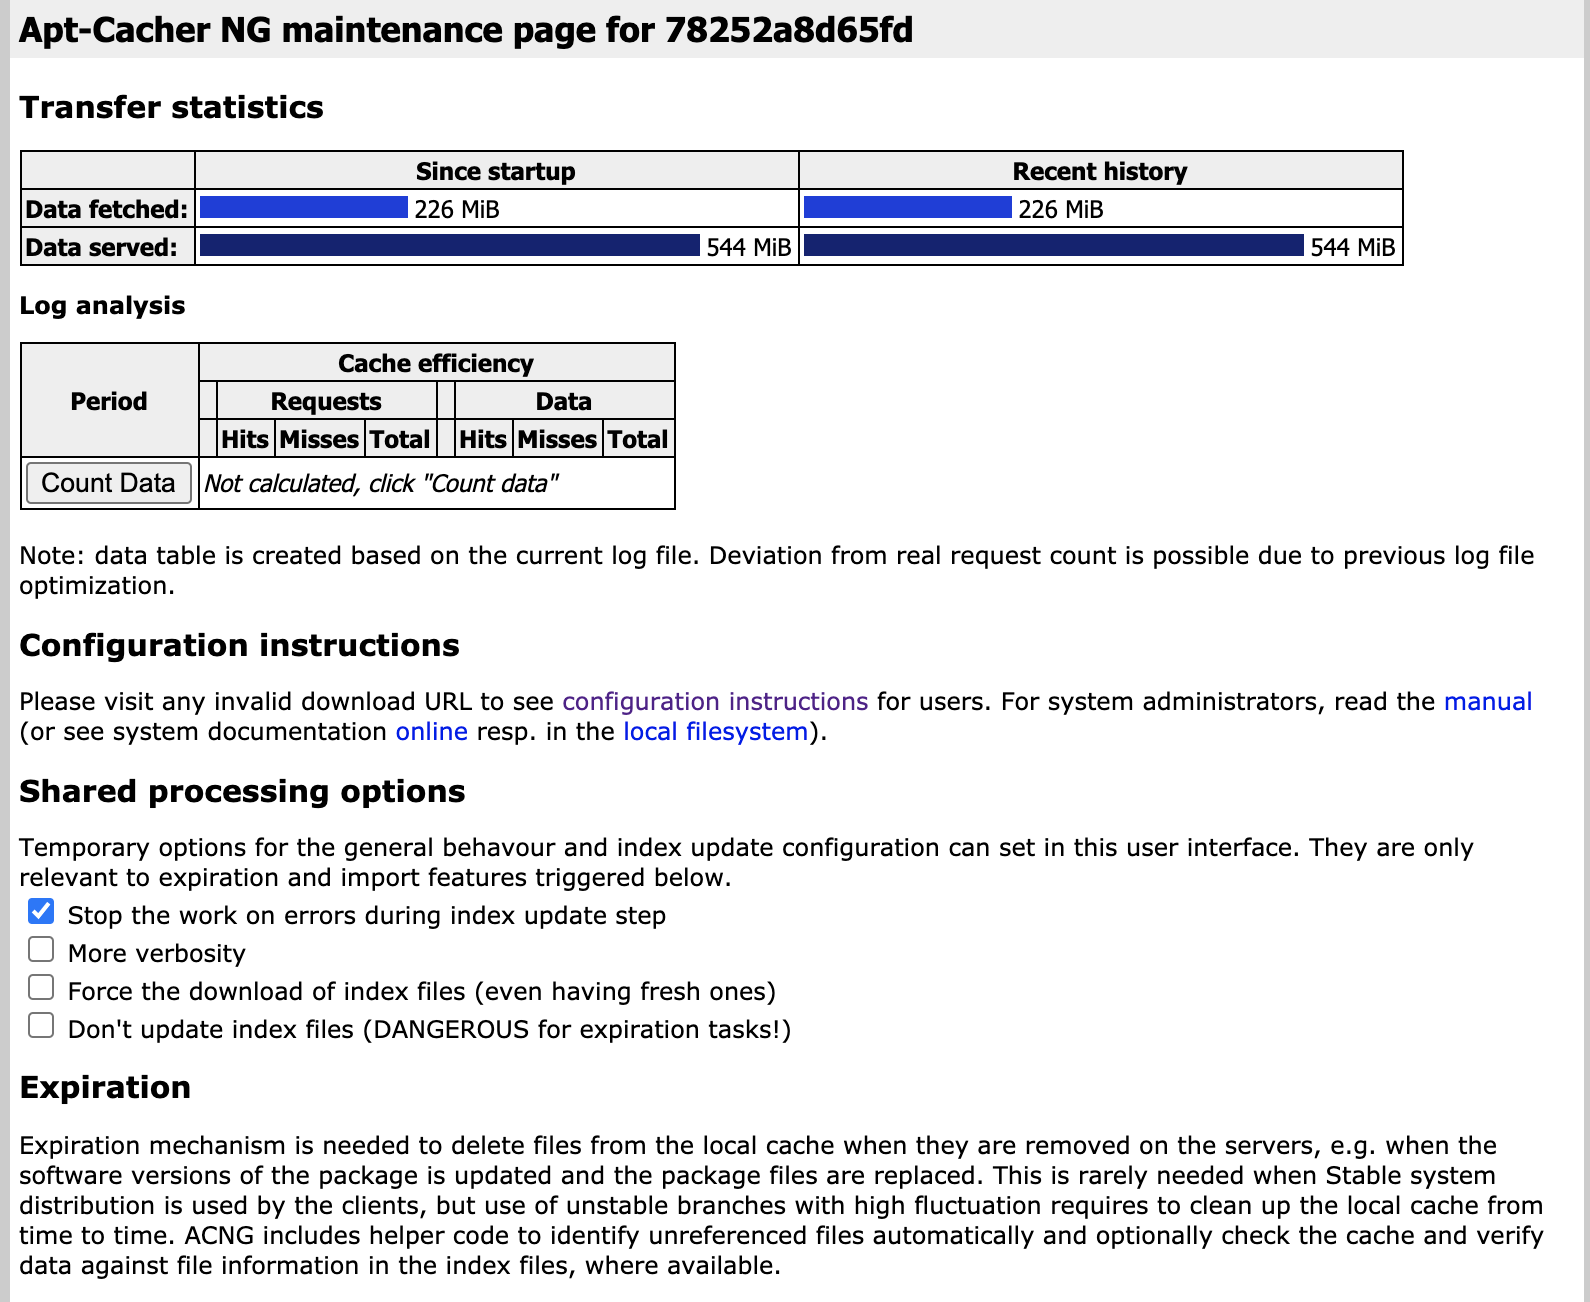
然后执行 docker-compose up -d,将服务运行起来,稍等片刻,访问 80 端口,便能看到下面的界面。

因为我们使用容器进行部署,所以可以忽略图中的IP地址(容器内部地址)。服务运行起来后,我们来看看如何使用这个服务。
为了行文方便,我们假设这个服务对外公开地址为:YOUR_HOST_DOMAIN_OR_IP,你可以想象这个字符串代表的是某一个域名或者某一个可被其他机器访问到的 IP 地址。
使用缓存服务
下面来聊聊如何使用缓存服务。
在 Ubuntu 中使用缓存服务
对于 Ubuntu / Debian 系统,通过设置 APT 配置即可开启服务的使用:
echo "Acquire::http::proxy \"http://YOUR_HOST_DOMAIN_OR_IP\";" > /etc/apt/apt.conf.d/00aptproxy
接着便可以参考“基础系统环境准备”小节中的命令进行软件表的正常下载,系统会将流量地址和下载命令自动转发到我们启动的缓存服务中,首次使用的时候,因为没有缓存,下载速度可能并不会感到有多快,但是在初始化完第一次之后,你会发现其他的机器、容器几乎都可以秒级完成下载。
在容器构建过程中使用缓存服务
如果你想在容器环境中使用服务,尤其是构建阶段使用缓存代理,其实不必设置 APT 代理,只需要在启动容器的时候将http_proxy 变量设置为代理服务器的访问地址即可。
docker run --rm -it -e http_proxy=http://YOUR_HOST_DOMAIN_OR_IP ubuntu:20.04 bash
sed -i 's/http:\/\/.*.ubuntu.com/http:\/\/mirrors.tuna.tsinghua.edu.cn/' /etc/apt/sources.list
apt update && apt upgrade -y && apt install -y apt-transport-https  ca-certificates curl software-properties-common
curl -fsSL https://mirrors.tuna.tsinghua.edu.cn/docker-ce/linux/ubuntu/gpg  | apt-key add -
add-apt-repository "deb http://mirrors.tuna.tsinghua.edu.cn/docker-ce/linux/ubuntu $(lsb_release -cs) stable"
apt install -y docker-ce
查看服务状况
在服务使用了一段时间后,我们想要了解服务运行状况,可以通过访问缓存服务的 /acng-report.html 地址来简单查看流量使用状况。
使用 Nginx 作为缓存服务器能力补充
在“基础系统环境准备”小节中,我们提到的命令有一部分并非 apt 命令,而是类似 curl、wget 之类的常规 URI 地址,类似下面这样:
curl -fsSL https://mirrors.tuna.tsinghua.edu.cn/docker-ce/linux/ubuntu/gpg  | apt-key add -
curl -L https://github.com/docker/compose/releases/download/1.29.0/docker-compose-`uname -s`-`uname -m` -o /usr/local/bin/docker-compose
为了能够让这类内容能够也完成缓存分发、提升部署效率和可维护性,我们可以启动一个简单的 Nginx 服务,来完成这类内容的缓存。
version: '3.6'

services:

  nginx:
    image: nginx:1.19.6-alpine
    restart: always
    ports:
      - 8080:80
    volumes:
      - ./public:/usr/share/nginx/html
将上面的内容保存为 docker-compose.yml,然后执行 docker-compose up -d,一个监听 8080 端口的 Nginx 服务就启动起来了。
接着将上面的内容保存到 public 目录,就可以对外提供服务了。
curl -fsSL https://mirrors.tuna.tsinghua.edu.cn/docker-ce/linux/ubuntu/gpg  -o docker.gpg
curl -L https://github.com/docker/compose/releases/download/1.29.0/docker-compose-`uname -s`-`uname -m` -o docker-compose
初始化脚本示例
如果你也考虑使用 Nginx 作为缓存服务器的补充,那么初始化服务器的脚本则可以改写成类似下面这样:
echo "Acquire::http::proxy \"http://YOUR_HOST_DOMAIN_OR_IP\";" > /etc/apt/apt.conf.d/00aptproxy

sed -i 's/http:\/\/.*.ubuntu.com/http:\/\/mirrors.tuna.tsinghua.edu.cn/' /etc/apt/sources.list

apt update && apt upgrade -y && apt install -y apt-transport-https  ca-certificates curl software-properties-common

curl http://YOUR_HOST_DOMAIN_OR_IP:8080/docker.gpg | apt-key add -

add-apt-repository "deb http://mirrors.tuna.tsinghua.edu.cn/docker-ce/linux/ubuntu $(lsb_release -cs) stable"

apt install -y docker-ce

curl http://YOUR_HOST_DOMAIN_OR_IP:8080/docker-compose -o /usr/local/bin/docker-compose

chmod +x /usr/local/bin/docker-compose
将上面的内容命名为 01.init.sh ,并保存到 Nginx 的 public 目录后,执行 curl http://YOUR_HOST_DOMAIN_OR_IP:8080/01.init.sh | bash 即可开启快速的环境初始化。
关于缓存代理服务器的基础部分,就先聊到这里吧。
接下来如果有机会,我们再深入的聊一些使用技巧,比如在运行中的容器环境中使用的一些细节。
Recommend
About Joyk
Aggregate valuable and interesting links.
Joyk means Joy of geeK