

深度分析前端构建工具:Vite2 v.s Snowpack3 v.s. Webpack5
source link: https://segmentfault.com/a/1190000039370642
Go to the source link to view the article. You can view the picture content, updated content and better typesetting reading experience. If the link is broken, please click the button below to view the snapshot at that time.

Vite一经发布就吸引了很多人的关注,NPM下载量一路攀升:

而在Vite之前,还有Snowpack也同样采用了No-Bundler构建方案。那么No-Bundler模式与传统老牌构建工具Webpack孰优孰劣呢?能否实现平滑迁移和完美取代?
下面就带着问题一起分析一下Vite2、Snowpack3和Webpack5吧!
Webpack
Webpack是近年来使用量最大,同时社区最完善的前端打包构建工具,5.x版本对构建细节进行了优化,某些场景下打包速度提升明显,但也没能解决之前一直被人诟病的大项目编译慢的问题,这也和Webpack本身的机制相关。
已经有很多文章讲解Webpack的运行原理了,本文就不再赘述,我们着重分析一下后起之秀。
Snowpack
什么是Snowpack?
首次提出利用浏览器原生ESM能力的工具并非是Vite,而是一个叫做Snowpack的工具。前身是@pika/web,从1.x版本开始更名为Snowpack。
Snowpack在其官网是这样进行自我介绍的:“Snowpack是一种闪电般快速的前端构建工具,专为现代Web设计。 它是开发工作流程较重,较复杂的打包工具(如Webpack或Parcel)的替代方案。Snowpack利用JavaScript的本机模块系统(称为ESM)来避免不必要的工作并保持流畅的开发体验”。
Snowpack的理念是减少或避免整个bundle的打包,每次保存单个文件时,传统的JavaScript构建工具(例如Webpack和Parcel)都需要重新构建和重新打包应用程序的整个bundle。重新打包时增加了在保存更改和看到更改反映在浏览器之间的时间间隔。在开发过程中, Snowpack为你的应用程序提供unbundled server。每个文件只需要构建一次,就可以永久缓存。文件更改时,Snowpack会重新构建该单个文件。在重新构建每次变更时没有任何的时间浪费,只需要在浏览器中进行HMR更新。
再了解一下发明Snowpack的团队Pika,Pika团队有一个宏伟的使命:让Web应用提速90%:

为此,Pika团队开发并维护了两个技术体系:构建相关的Snowpack和造福大众的Skypack。
在这里我们简单聊一下Skypack的初衷,当前许多Web应用都是在不同NPM包的基础上进行构建的,而这些NPM包都被Webpack之类的打包工具打成了一个bundle,如果这些NPM包都来源于同一个CDN地址,且支持跨域缓存,那么这些NPM包在缓存生效期内都只需要加载一次,其他网站用到了同样的NPM包,就不需要重新下载,而是直接读取本地缓存。
例如,智联的官网与B端都是基于vue+vuex开发的,当HR在B端发完职位后,进入官网预览自己的公司对外主页都不用重新下载,只需要下载智联官网相关的一些业务代码即可。为此,Pika专门建立了一个CDN(Skypack)用来下载NPM上的ESM模块。
后来Snowpack发布的时候,Pika团队顺便发表了一篇名为《A Future Without Webpack》 的文章,告诉大家可以尝试抛弃Webpack,采用全新的打包构建方案,下图取自其官网,展示了bundled与unbundled之间的区别。

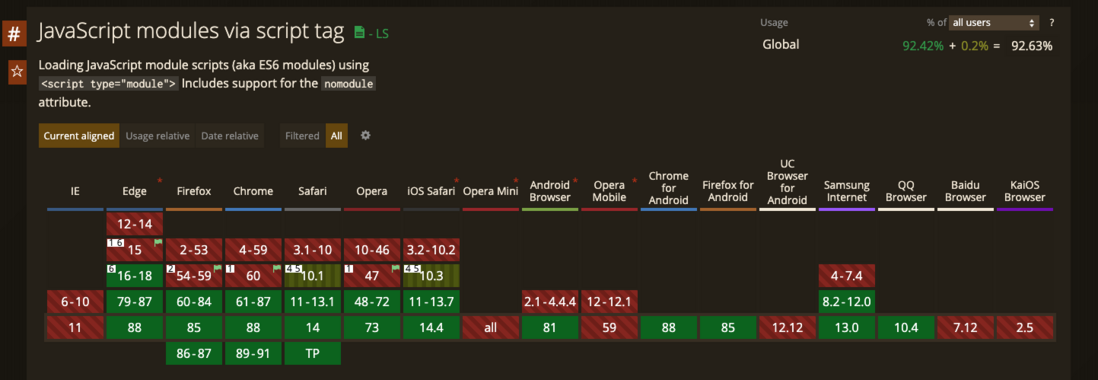
在HTTP/2和5G网络的加持下,我们可以预见到HTTP请求数量不再成为问题,而随着Web领域新标准的普及,浏览器也在逐步支持ESM(<script module>)。
启动构建时会调用源码src/index.ts中的cli方法,该方法的代码删减版如下:
import {command as buildCommand} from './commands/build';

export async function cli(args: string[]) {
  const cliFlags = yargs(args, {
    array: ['install', 'env', 'exclude', 'external']
  }) as CLIFlags;

  if (cmd === 'build') {
    await buildCommand(commandOptions);
    return process.exit(0);
  }
}
进入commands/build文件,执行大致逻辑如下:
export async function build(commandOptions: CommandOptions): Promise<SnowpackBuildResult> {
  // 读取config代码
  // ...
  for (const runPlugin of config.plugins) {
    if (runPlugin.run) {
      // 执行插件
    }
  }

  // 将 `import.meta.env` 的内容写入文件
  await fs.writeFile(
    path.join(internalFilESbuildLoc, 'env.js'),
    generateEnvModule({mode: 'production', isSSR}),
  );

  // 如果 HMR,则加载 hmr 工具文件
  if (getIsHmrEnabled(config)) {
    await fs.writeFile(path.resolve(internalFilESbuildLoc, 'hmr-client.js'), HMR_CLIENT_CODE);
    await fs.writeFile(
      path.resolve(internalFilESbuildLoc, 'hmr-error-overlay.js'),
      HMR_OVERLAY_CODE,
    );
    hmrEngine = new EsmHmrEngine({port: config.devOptions.hmrPort});
  }

  // 开始构建源文件
  logger.info(colors.yellow('! building source files...'));
  const buildStart = performance.now();
  const buildPipelineFiles: Record<string, FileBuilder> = {};

  // 根据主 buildPipelineFiles 列表安装所有需要的依赖项,对应下面第三部
  async function installDependencies() {
    const scannedFiles = Object.values(buildPipelineFiles)
      .map((f) => Object.values(f.filesToResolve))
      .reduce((flat, item) => flat.concat(item), []);

    // 指定安装的目标文件夹
    const installDest = path.join(buildDirectoryLoc, config.buildOptions.metaUrlPath, 'pkg');

    // installOptimizedDependencies 方法调用了 esinstall 包,包内部调用了 rollup 进行模块分析及 commonjs 转 esm
    const installResult = await installOptimizedDependencies(
      scannedFiles,
      installDest,
      commandOptions,
    );

    return installResult
  }

  // 下面因代码繁多,仅展示源码中的注释
  // 0. Find all source files.
  // 1. Build all files for the first time, from source.
  // 2. Install all dependencies. This gets us the import map we need to resolve imports.
  // 3. Resolve all built file imports.
  // 4. Write files to disk.
  // 5. Optimize the build.

  // "--watch" mode - Start watching the file system.
  // Defer "chokidar" loading to here, to reduce impact on overall startup time
  logger.info(colors.cyan('watching for changes...'));
  const chokidar = await import('chokidar');

  // 本地文件删除时清除 buildPipelineFiles 对应的文件
  function onDeleteEvent(fileLoc: string) {
    delete buildPipelineFiles[fileLoc];
  }

  // 本地文件创建及修改时触发
  async function onWatchEvent(fileLoc: string) {
    // 1. Build the file.
    // 2. Resolve any ESM imports. Handle new imports by triggering a re-install.
    // 3. Write to disk. If any proxy imports are needed, write those as well.

    // 触发 HMR
    if (hmrEngine) {
      hmrEngine.broadcastMessage({type: 'reload'});
    }
  }

  // 创建文件监听器
  const watcher = chokidar.watch(Object.keys(config.mount), {
    ignored: config.exclude,
    ignoreInitial: true,
    persistent: true,
    disableGlobbing: false,
    useFsEvents: isFsEventsEnabled(),
  });
  watcher.on('add', (fileLoc) => onWatchEvent(fileLoc));
  watcher.on('change', (fileLoc) => onWatchEvent(fileLoc));
  watcher.on('unlink', (fileLoc) => onDeleteEvent(fileLoc));

  // 返回一些方法给 plugin 使用
  return {
    result: buildResultManifest,
    onFileChange: (callback) => (onFileChangeCallback = callback),
    async shutdown() {
      await watcher.close();
    },
  };
}

export async function command(commandOptions: CommandOptions) {
  try {
    await build(commandOptions);
  } catch (err) {
    logger.error(err.message);
    logger.debug(err.stack);
    process.exit(1);
  }

  if (commandOptions.config.buildOptions.watch) {
    // We intentionally never want to exit in watch mode!
    return new Promise(() => {});
  }
}
所有的模块会经过install进行安装,此处的安装是将模块转换成ESM放在pkg目录下,并不是npm包安装的概念。
在Snowpack3中增加了一些老版本不支持的能力,如:内部默认集成Node服务、支持CSS Modules、支持HMR等。
什么是Vite?
Vite(法语单词“ fast”,发音为/vit/)是一种构建工具,旨在为现代Web项目提供更快,更精简的开发体验。它包括两个主要部分:
- 开发服务器,它在本机ESM上提供了丰富的功能增强,例如,极快的Hot Module Replacement(HMR)。
- 构建命令,它将代码使用Rollup进行构建。
随着vue3的推出,Vite也随之成名,起初是一个针对Vue3的打包编译工具,目前2.x版本发布面向了任何前端框架,不局限于Vue,在Vite的README中也提到了在某些想法上参考了Snowpack。
在已有方案上Vue本可以抛弃Webpack选择Snowpack,但选择开发Vite来造一个新的轮子也有Vue团队自己的考量。
在Vite官方文档列举了Vite与Snowpack的异同,其实本质是说明Vite相较于Snowpack的优势。
相同点,引用Vite官方的话:
Snowpack is also a no-bundle native ESM dev server that is very similar in scope to Vite。
- Snowpack的build默认是不打包的,好处是可以灵活选择Rollup、Webpack等打包工具,坏处就是不同打包工具带来了不同的体验,当前ESbuild作为生产环境打包尚不稳定,Rollup也没有官方支持Snowpack,不同的工具会产生不同的配置文件;
- Vite支持多page打包;
- Vite支持Library Mode;
- Vite支持CSS代码拆分,Snowpack默认是CSS in JS;
- Vite优化了异步代码加载;
- Vite支持动态引入 polyfill;
- Vite官方的 legacy mode plugin,可以同时生成 ESM 和 NO ESM;
- First Class Vue Support。
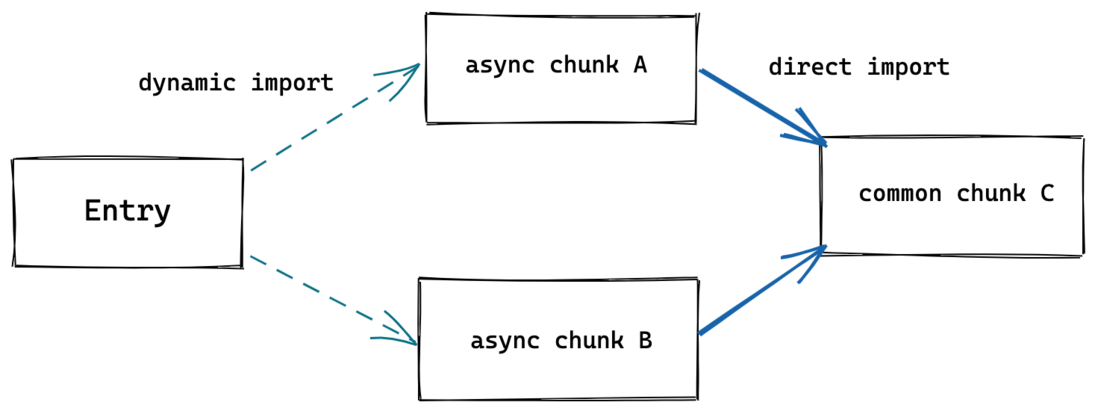
第5点Vite官网有详细介绍,在非优化方案中,当A导入异步块时,浏览器必须先请求并解析,A然后才能确定它也需要公共块C。这会导致额外的网络往返:
Entry ---> A ---> C Vite通过预加载步骤自动重写代码拆分的动态导入调用,以便在A请求时并行C获取:
Entry ---> (A + C) 可能C会多次导入,这将导致在未优化的情况下发出多次请求。Vite的优化将跟踪所有import,以完全消除重复请求,示意图如下:
第8点的First Class Vue Support,虽然在列表的最后一项,实则是点睛之笔。
Vite在启动时,如果不是中间件模式,内部默认会启一个http server。
export async function createServer(
  inlineConfig: InlineConfig = {}
): Promise<ViteDevServer> {
  // 获取 config
  const config = await resolveConfig(inlineConfig, 'serve', 'development')
  const root = config.root
  const serverConfig = config.server || {}

  // 判断是否是中间件模式
  const middlewareMode = !!serverConfig.middlewareMode
  const middlewares = connect() as Connect.Server

  // 中间件模式不创建 http 服务,允许外部以中间件形式调用:https://Vitejs.dev/guide/api-javascript.html#using-the-Vite-server-as-a-middleware
  const httpServer = middlewareMode
    ? null
    : await resolveHttpServer(serverConfig, middlewares)

  // 创建 websocket 服务
  const ws = createWebSocketServer(httpServer, config)

  // 创建文件监听器
  const { ignored = [], ...watchOptions } = serverConfig.watch || {}
  const watcher = chokidar.watch(path.resolve(root), {
    ignored: ['**/node_modules/**', '**/.git/**', ...ignored],
    ignoreInitial: true,
    ignorePermissionErrors: true,
    ...watchOptions
  }) as FSWatcher


  const plugins = config.plugins
  const container = await createPluginContainer(config, watcher)
  const moduleGraph = new ModuleGraph(container)
  const closeHttpServer = createSeverCloseFn(httpServer)

  const server: ViteDevServer = {
    // 前面定义的常量,包含:config、中间件、websocket、文件监听器、ESbuild 等
  }

  // 监听进程关闭
  process.once('SIGTERM', async () => {
    try {
      await server.close()
    } finally {
      process.exit(0)
    }
  })

  watcher.on('change', async (file) => {
    file = normalizePath(file)

    // 文件更改时使模块图缓存无效
    moduleGraph.onFileChange(file)

    if (serverConfig.hmr !== false) {
      try {
        // 大致逻辑是修改 env 文件时直接重启 server,根据 moduleGraph 精准刷新,必要时全部刷新
        await handleHMRUpdate(file, server)
      } catch (err) {
        ws.send({
          type: 'error',
          err: prepareError(err)
        })
      }
    }
  })

  // 监听文件创建
  watcher.on('add', (file) => {
    handleFileAddUnlink(normalizePath(file), server)
  })

  // 监听文件删除
  watcher.on('unlink', (file) => {
    handleFileAddUnlink(normalizePath(file), server, true)
  })

  // 挂载插件的服务配置钩子
  const postHooks: ((() => void) | void)[] = []
  for (const plugin of plugins) {
    if (plugin.configureServer) {
      postHooks.push(await plugin.configureServer(server))
    }
  }

  // 加载多个中间件,包含 cors、proxy、open-in-editor、静态文件服务等

  // 运行post钩子,在html中间件之前应用的,这样外部中间件就可以提供自定义内容取代 index.html
  postHooks.forEach((fn) => fn && fn())

  if (!middlewareMode) {
    // 转换 html
    middlewares.use(indexHtmlMiddleware(server, plugins))
    // 处理 404
    middlewares.use((_, res) => {
      res.statusCode = 404
      res.end()
    })
  }

  // errorHandler 中间件
  middlewares.use(errorMiddleware(server, middlewareMode))

  // 执行优化逻辑
  const runOptimize = async () => {
    if (config.optimizeCacheDir) {
      // 将使用 ESbuild 将依赖打包并写入 node_modules/.Vite/xxx
      await optimizeDeps(config)
      // 更新 metadata 文件
      const dataPath = path.resolve(config.optimizeCacheDir, 'metadata.json')
      if (fs.existsSync(dataPath)) {
        server._optimizeDepsMetadata = JSON.parse(
          fs.readFileSync(dataPath, 'utf-8')
        )
      }
    }
  }

  if (!middlewareMode && httpServer) {
    // 在服务器启动前覆盖listen方法并运行优化器
    const listen = httpServer.listen.bind(httpServer)
    httpServer.listen = (async (port: number, ...args: any[]) => {
      await container.buildStart({})
      await runOptimize()
      return listen(port, ...args)
    }) as any

    httpServer.once('listening', () => {
      // 更新实际端口,因为这可能与初始端口不同
      serverConfig.port = (httpServer.address() as AddressInfo).port
    })
  } else {
    await runOptimize()
  }

  // 最后返回服务
  return server
}
访问Vite服务的时候,默认会返回index.html:
<!DOCTYPE html>
<html lang="en">
  <head>
    <script type="module" src="/@Vite/client"></script>
    <meta charset="UTF-8" />
    <link rel="icon" href="/favicon.ico" />
    <meta name="viewport" content="width=device-width, initial-scale=1.0" />
    <title>Vite App</title>
  </head>
  <body>
    <div id="app"></div>
    <script type="module" src="/src/main.js"></script>
  </body>
</html>
处理import文件逻辑,在node/plugins/importAnalysis.ts文件内:
export function importAnalysisPlugin(config: ResolvedConfig): Plugin {
const clientPublicPath = path.posix.join(config.base, CLIENT_PUBLIC_PATH)
let server: ViteDevServer
return {
name: 'Vite:import-analysis',
configureServer(_server) {
server = _server
},
async transform(source, importer, ssr) {
const rewriteStart = Date.now()
// 使用 es-module-lexer 进行语法解析
await init
let imports: ImportSpecifier[] = []
try {
imports = parseImports(source)[0]
} catch (e) {
const isVue = importer.endsWith('.vue')
const maybeJSX = !isVue && isJSRequest(importer)
// 判断文件后缀给不同的提示信息
const msg = isVue
? `Install @Vitejs/plugin-vue to handle .vue files.`
: maybeJSX
? `If you are using JSX, make sure to name the file with the .jsx or .tsx extension.`
: `You may need to install appropriate plugins to handle the ${path.extname(
importer
)} file format.`
this.error(
`Failed to parse source for import analysis because the content ` +
`contains invalid JS syntax. ` +
msg,
e.idx
)
}
// 将代码字符串取出
let s: MagicString | undefined
const str = () => s || (s = new MagicString(source))
// 解析 env、glob 等并处理
// 转换 cjs 成 esm
}
}
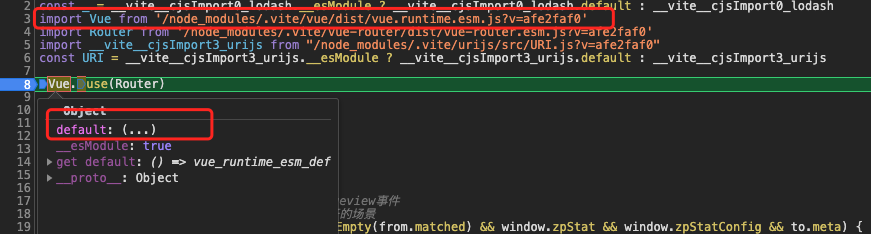
} 拿Vue的NPM包举例经优化器处理后的路径如下:
// before
- import { createApp } from 'vue'
+ import { createApp } from '/node_modules/.Vite/vue.runtime.esm-bundler.js?v=d17c1aa4'
import App from '/src/App.vue'

createApp(App).mount('#app') 
截图中的/src/App.vue路径经过Vite处理发生了什么?
首先需要引用 @Vitejs/plugin-vue 来处理,内部使用Vue官方的编译器@vue/compiler-sfc,plugin处理逻辑同rollup的plugin,Vite在Rollup的插件机制上进行了扩展。
详细可参考:https://Vitejs.dev/guide/api-plugin.html,这里不做展开。
编译后的App.vue文件如下:
import { createHotContext as __Vite__createHotContext } from "/@Vite/client";
import.meta.hot = __Vite__createHotContext("/src/App.vue");
import HelloWorld from '/src/components/HelloWorld.vue'
const _sfc_main = {
expose: [],
setup(__props) {
return { HelloWorld }
}
}
import {
createVNode as _createVNode,
Fragment as _Fragment,
openBlock as _openBlock,
createBlock as _createBlock
} from "/node_modules/.Vite/vue.runtime.esm-bundler.js?v=d17c1aa4"
const _hoisted_1 = /*#__PURE__*/_createVNode("img", {
alt: "Vue logo",
src: "/src/assets/logo.png"
}, null, -1 /* HOISTED */)
function _sfc_render(_ctx, _cache, $props, $setup, $data, $options) {
return (_openBlock(), _createBlock(_Fragment, null, [
_hoisted_1,
_createVNode($setup["HelloWorld"], { msg: "Hello Vue 3 + Vite" })
], 64 /* STABLE_FRAGMENT */))
}
import "/src/App.vue?vue&type=style&index=0&lang.css"
_sfc_main.render = _sfc_render
_sfc_main.__file = "/Users/orange/build/Vite-vue3/src/App.vue"
export default _sfc_main
_sfc_main.__hmrId = "7ba5bd90"
typeof __VUE_HMR_RUNTIME__ !== 'undefined' && __VUE_HMR_RUNTIME__.createRecord(_sfc_main.__hmrId, _sfc_main)
import.meta.hot.accept(({ default: updated, _rerender_only }) => {
if (_rerender_only) {
__VUE_HMR_RUNTIME__.rerender(updated.__hmrId, updated.render)
} else {
__VUE_HMR_RUNTIME__.reload(updated.__hmrId, updated)
}
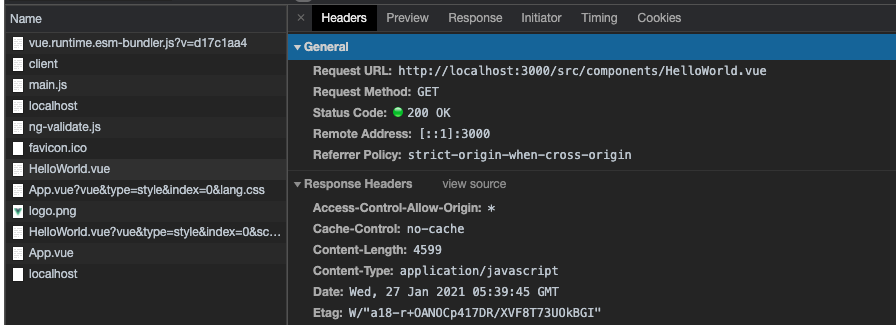
}) 可以发现,Vite本身并不会递归编译,这个过程交给了浏览器,当浏览器运行到import HelloWorld from '/src/components/HelloWorld.vue' 时,又会发起新的请求,通过中间件来编译 vue,以此类推,为了证明我们的结论,可以看到 HelloWorld.vue 的请求信息:
经过分析源码后,能断定的是,Snowpack与Vite在启动服务的时间会远超Webpack,但复杂工程的首次编译到完全可运行的时间需要进一步测试,不同场景下可能产生截然不同的结果。
[email protected]@[email protected]支持Vue2非官方支持: https://github.com/underfin/vite-plugin-vue2支持:vue-loader@^15.0.0非官方支持: https://www.npmjs.com/package/@lepzulnag/Snowpack-plugin-vue-2支持Vue3支持支持:vue-loader@^16.0.0(https://github.com/Jamie-Yang/vue3-boilerplate)支持: https://www.npmjs.com/package/@Snowpack/plugin-vue支持Typescript支持:ESbuild (默认无类型检查)支持:ts-loader支持: https://github.com/Snowpackjs/Snowpack/tree/main/create-Snowpack-app/app-template-vue-typescript支持CSS预处理器支持: https://vitejs.dev/guide/features.html#css-pre-processors支持:https://vue-loader.vuejs.org/guide/pre-processors.html部分支持:官方仅提供了Sass和Postcss,且存在未解决BUG支持CSS Modules支持: https://vitejs.dev/guide/features.html#css-modules支持:https://vue-loader.vuejs.org/guide/css-modules.html支持支持静态文件支持支持支持开发环境no-bundle native ESM(CJS → ESM)bundle(CJS/UMD/ESM)no-bundle native ESM(CJS → ESM)HMR支持支持支持生产环境RollupWebpackWebpack, Rollup, or even ESbuildNode API 调用能力支持支持支持启动时编译速度对比
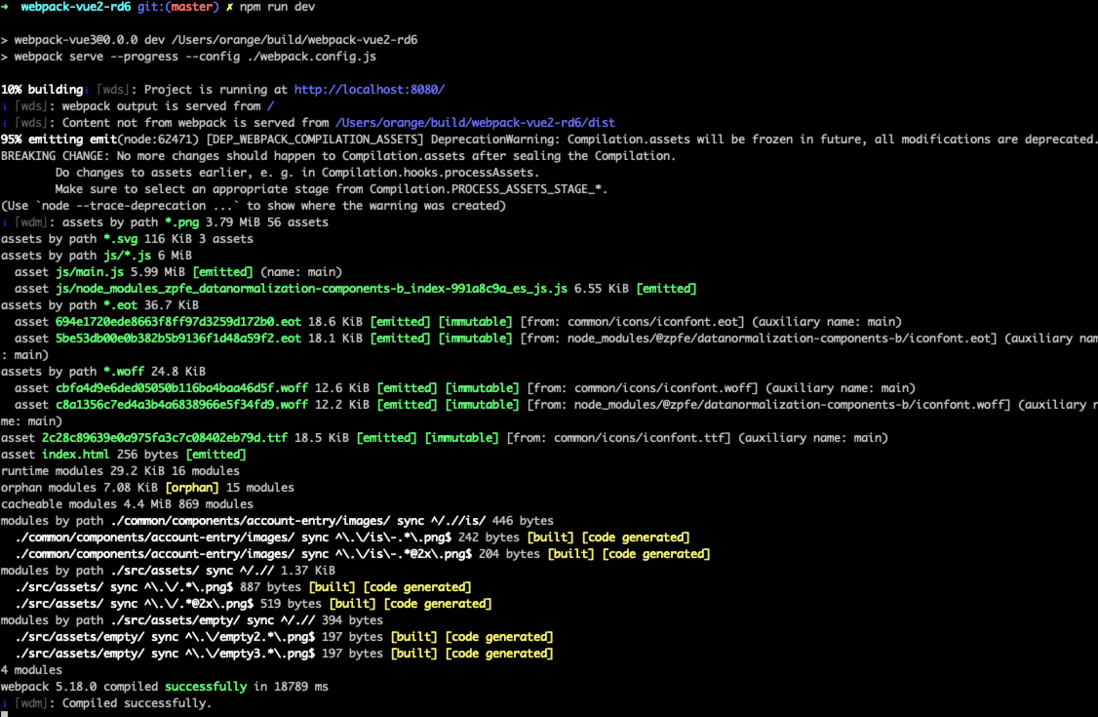
下面一组测试的代码完全相同,都是Hellow World工程,没有任何复杂逻辑,Webpack与Snowpack分别引入了对应的Vue plugin,Vite无需任何插件。
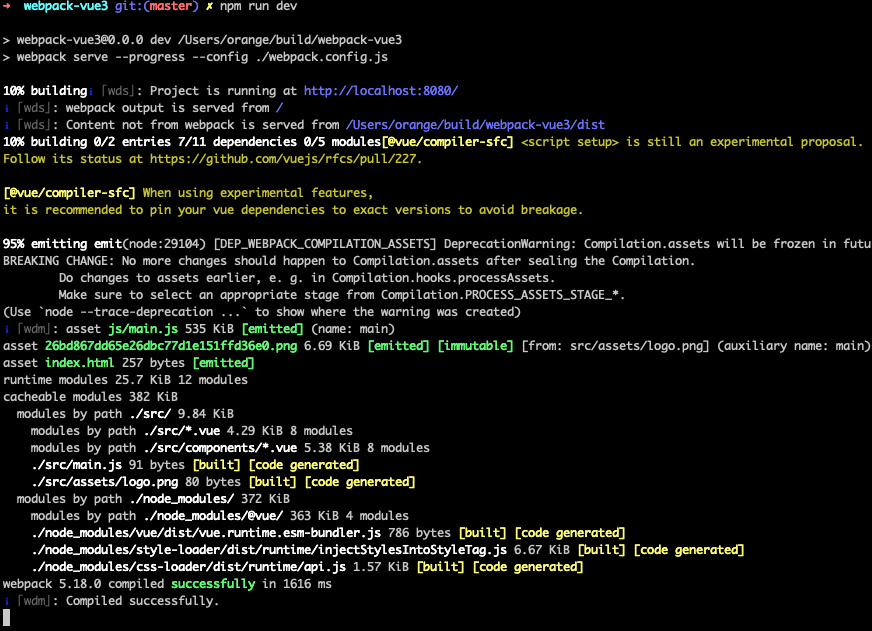
Webpack5 + vue3(1.62s)
工程目录:
控制台输出:
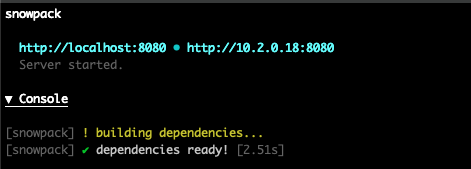
Snowpack3 + vue3(2.51s)
工程目录:

控制台输出:
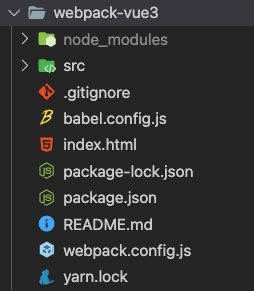
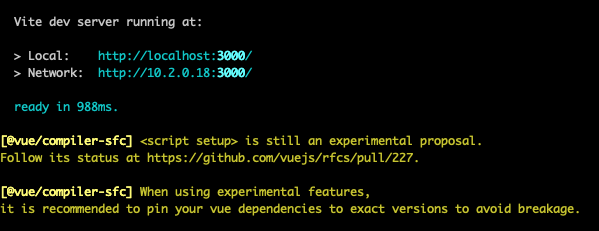
Vite2 + vue3(0.99s)
工程目录:

控制台输出:
真实项目迁移
测试案例:已存在的复杂逻辑vue工程
经过简单的测试及调研结果,首先从生态和性能上排除了Snowpack,下面将测试Webpack5与Vite2。
迁移Vite2遇到的问题:
1.不支持省略.vue后缀,因为此路由机制与编译处理强关联;
2.不支持.vue后缀文件内写jsx,若写jsx,需要改文件后缀为.jsx;
3.不建议import { ... } from "dayjs"与import duration from 'dayjs/plugin/duration'同时使用,从源码会发现在optimizeDeps阶段已经把ESM编译到了缓存文件夹,若同时使用会报错:
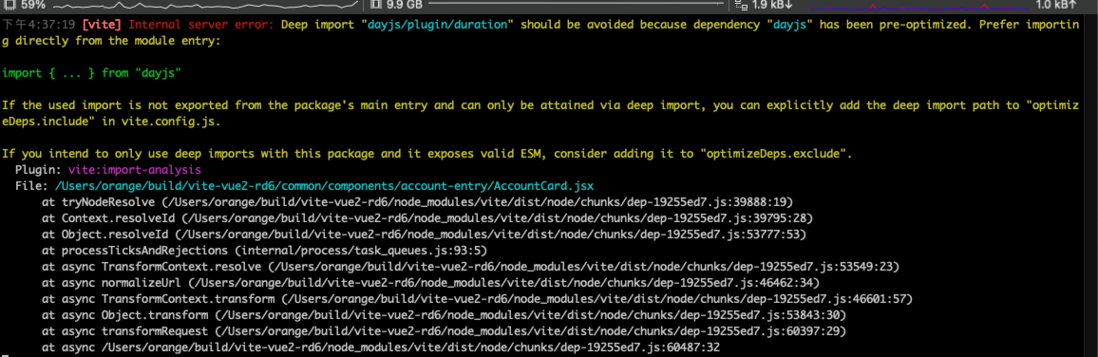
4.当optimizeDeps忽略后文件路径错误,node_modules/dayjs/dayjs.main.js?version=xxxxx,此处不应该在query中添加version;
5.组件库中window.$方法找不到,不能强依赖关联顺序,跟请求返回顺序有关;
6.当dependencies首次未被写入缓存时,补充写入会报错,需要二次重启;

7.在依赖关系复杂场景,Vue被多次cache,会出现ESM二次封装的情况,也就是ESM里面嵌套ESM的情况;

种种原因,调试到这里终结了,结论就是Vite2目前处于初期,尚不稳定,处理深层次依赖就目前的moduleGraph机制还有所欠缺,有待完善。
Webpack5
效果和我们之前测试相同代码在Webpack4下50+秒相比提升明显,实际场景可能存在误差,但WebpackConfig配置细节基本一致。
编译压缩提速
不知大家是否有遇到这个问题:
<--- Last few GCs --->
[59757:0x103000000] 32063 ms: Mark-sweep 1393.5 (1477.7) -> 1393.5 (1477.7) MB, 109.0 / 0.0 ms  allocation failure GC in old space requested
<--- JS stacktrace --->
==== JS stack trace =========================================
Security context: 0x24d9482a5ec1 <JSObject>
...
或者在 92% 的进度里卡很久:
Webpack chunk asset optimization (92%) TerserPlugin 随着产物越来越大,编译上线和CI的时间都越来越长,而其中1/3及更多的时间则是在做压缩的部分。OOM的问题也通常来源于压缩。
如何解决压缩慢和占内存的问题,一直是逃避不开的话题,Vite采用了ESbuild,接下来分析一下ESbuild。
ESbuild
下面是官方的构建时间对比图,并没有说明场景,文件大小等,所以不具备实际参考价值。

之所以快,其中最主要的应该是用go写,然后编译为Native代码。然后npm安装时动态去下对应平台的二进制包,支持Mac、Linux和Windows,比如esbuild-darwin-64。
相同思路的还有es-module-lexer、swc等,都是用编译成Native代码的方式进行提速,用来弥补Node在密集CPU计算场景的短板。
ESbuild有两个功能,bundler和minifier。bundler的功能和babel以及Webpack相比差异很大,直接使用对现有业务的风险较大;而minifier可以尝试,在Webpack和babel产物的基础上做一次生产环境压缩,可以节省terser plugin的压缩时间。
同时针对Webpack提供了esbuild-webpack-plugin,可以在Webpack内直接使用ESbuild。
优缺点及总结
Snowpack
- 社区不够完善,无法支撑我们后续的业务演进;
- 编译速度提效不明显。
- 因其与rollup联合,社区里rolllup的插件基本都可以直接使用,社区相对完善;
- 编译速度快。
- 目前Vite处于2.0初期,BUG比较多;
- 本地的 ESbuild 与生产环境的babel编译结果差距较大,可能会导致功能差异。
Webpack5
- 从实际测试要比Webpack4快许多;
- 可借助ESbuild的代码压缩机制。
- 相较 Vite 的本地开发编译速度有写不足(其实算不上缺点,因为解决了生产环境差异)。
回到我们文章开始的问题,经过上文的迁移测试环节,我们需要调整大量代码进行Vite迁移适配,由于原有Vue工程未遵循Vite的开发范式,迁移过程比较坎坷,新工程只要遵循Vite官方的开发文档,会规避上文提到的大部分问题。
所以已有Webpack工程迁移成本还是较大的,另一方面也是需要重点关注的就是本地开发与生产环境的差异问题,如果本机开发环境采用No-Bundle机制,而生产发布环境采用Bundle机制,这种不一致性会给测试和排查问题带来困扰和风险,在生态尚未齐备之前,建议审慎尝试。
Recommend
About Joyk
Aggregate valuable and interesting links.
Joyk means Joy of geeK