

Implement Unit Testing in ASP.NET Core
source link: https://procodeguide.com/programming/unit-testing-in-aspnet-core/?utm_campaign=unit-testing-in-aspnet-core
Go to the source link to view the article. You can view the picture content, updated content and better typesetting reading experience. If the link is broken, please click the button below to view the snapshot at that time.

Implement Unit Testing in ASP.NET Core 5 Application – Getting Started
This article will get you started with unit testing in the ASP.NET core application. We will start with creating an ASP.NET Core based application with math operation service and implement xUnit.net to automate testing of the operations available in this service.
This is the first article in the Series: Unit Testing in ASP.NET Core MVC – Design ASP.NET Core 5 Applications for Unit Testability – Ultimate Guide
- Part I – Implement Unit Testing in ASP.NET Core 5 Application – Getting Started
As far as code to be tested is concerned I am keeping our goal simple here that is we will implement automated tests for a Math service, as this is our first article in the series and also so that in this article we can concentrate more on the concepts of unit testing i.e. xUnit.net.
What are Automated Unit Tests?
There is a need to test every software system before we deliver or deploy it to production to ensure the good quality of the product being delivered. Quality means not only it is defect-free but it also meets the user requirements.
Unit Tests is testing which involves rigorous testing of each small independent unit or component in isolation. There shouldn’t be a need to deploy or host a system to perform unit testing. Unit testing is to ensure that all independent small units of a larger software system are performing (in isolations) as per requirements.
Small independent units or components means these test should focus on a single component and should be as small as possible. i.e. don’t test multiple pieces things together instead test one piece at a time. i.e. if you are testing the controller then just focus on testing the controller code and do not test all the services which are being injected into the controller.
Automated unit tests are the automation of these unit test i.e. instead of performing unit test manually it is executed by some testing tool or framework.
This automation initially requires time for the development of these tests but at a later stage when code size grows it can considerably save time in performing unit testing over manual testing.
Automated unit testing in ASP.NET Core is supported by using third-party frameworks
Why Implement Automated Unit Tests?
As your code size increases then the amount of time required to unit test your code also increases. Some projects are so big that it takes weeks/months to perform a full project unit test with 100% code covering. So if you have to deliver something urgently then testing gets compromised i.e. either you perform limited unit testing or you don’t perform unit testing at all.
Also Gone are the days when we used to deploy something on production every 2-3 weeks i.e. at the end of the iteration cycle and wait for results on production. Now requirements are changing every day and for some every hour as well. There are projects which need to deploy changes to production every hour. So automated unit tests in these projects is a must to ensure the good quality of the code being delivered.
No programming work is done till we ensure that we deliver code that is free from defects. So do you think that for delivering on an urgent basis these big projects have all the time to perform manual testing to ensure quality for the product being delivered? The answer is NO, it’s not possible to perform manual testing for all the scenarios within the limited available time.
Before delivery if you know that your code is defect-free or not then it’s easier to decide whether to deliver it or what needs to be fixed before delivery. But if you don’t test well then you don’t know whether your code will run in production or not.
So there is a need to perform automated unit tests to ensure that good coverage of code being tested before delivery to ensure good quality code.
Not only automating unit tests but another type of tests including integration tests is essential in the case of agile methodology where continuous integration with DevOps is core requirements to be implemented.
Implementing unit testing in ASP.NET Core will ensure good quality of the code being delivered.
What is Test-Driven Development (TDD)?
Since we are on automated unit testing and trying to get started with writing unit testing in ASP.NET Core we should also learn about what do you mean by Test-driven development.
Test-driven development is the way how you develop your projects. This process follows the principle that you first write the test and let it fail, then you write your code to make the test pass.
This approach believes in thinking about quality at the beginning of the project rather than bringing in quality at a later stage. i.e. making quality a priority instead of making the quality wait until the end of development.
In this approach test cases for each piece of code or functionality are written and tested first then the new code or functionality is written to make the test pass. i.e. we write automated tests before the development of the actual code hence the name test-driven development also it can be called test-first development.
So this approach is about software requirement in the form of test cases and writing code against these test cases instead of software being developed first and then getting into the testing phase.
Introduction to xUnit.net
xUnit.net is a free, open-source, community-focused unit testing tool for the .NET Framework. Written by the original inventor of NUnit v2, xUnit.net is the latest technology for unit testing C#, F#, VB.NET and other .NET languages. xUnit.net works with ReSharper, CodeRush, TestDriven.NET and Xamarin.
source – xUnit.net
xUnit.net is the newest unit testing framework for .NET projects and gained lots of popularity when Microsoft started using it for ASP.NET Core.
xUnit.net can be used to implement unit testing in ASP.NET Core & .NET Full framework as well.
XUnit.net is a testing framework that provides a set of attributes or decorators, for testing methods, using which we can write testing code to test software components or units. Attributes available in xUnit.net are as follows
[Fact] – If you want a method to be part of unit testing and to be executed during the test run then it should be decorated with this attribute. You cannot specify parameters with this attribute.
[Theory] – If you want to send some parameters to the test method then you need to specify this attribute to the method. It is similar to Fact in a way that test runner will execute this method but it also specifies that we will be sending parameters to the test data.
[InlineData] – This attribute is a way to provide parameters to the test method. This is used along with Theory attribute.
Any method will be part of test runner provided that it should be public & xUnit.net attribute should be used on the Method. Also name your methods well enough to explain the functionality on which test is being performed.
xUnit.net also provides assertions methods using which can validate our code for unit testing.
Implement Unit Testing in ASP.NET Core
Here is short & quick video on implementation of unit testing in ASP.NET Core
Create ASP.NET Core Web API Project
For Implementation of unit testing in ASP.NET Core, I will be using Visual Studio 2019 Community Edition and .NET 5 to create a new project of type ASP.NET Core Web API
1. Launch Visual Studio 2019
2. Select Create a new project on the initial screen as shown below
3. Next select ASP.NET Core Web Application from the displayed project types template list and click on the Next button as shown in the screenshot below
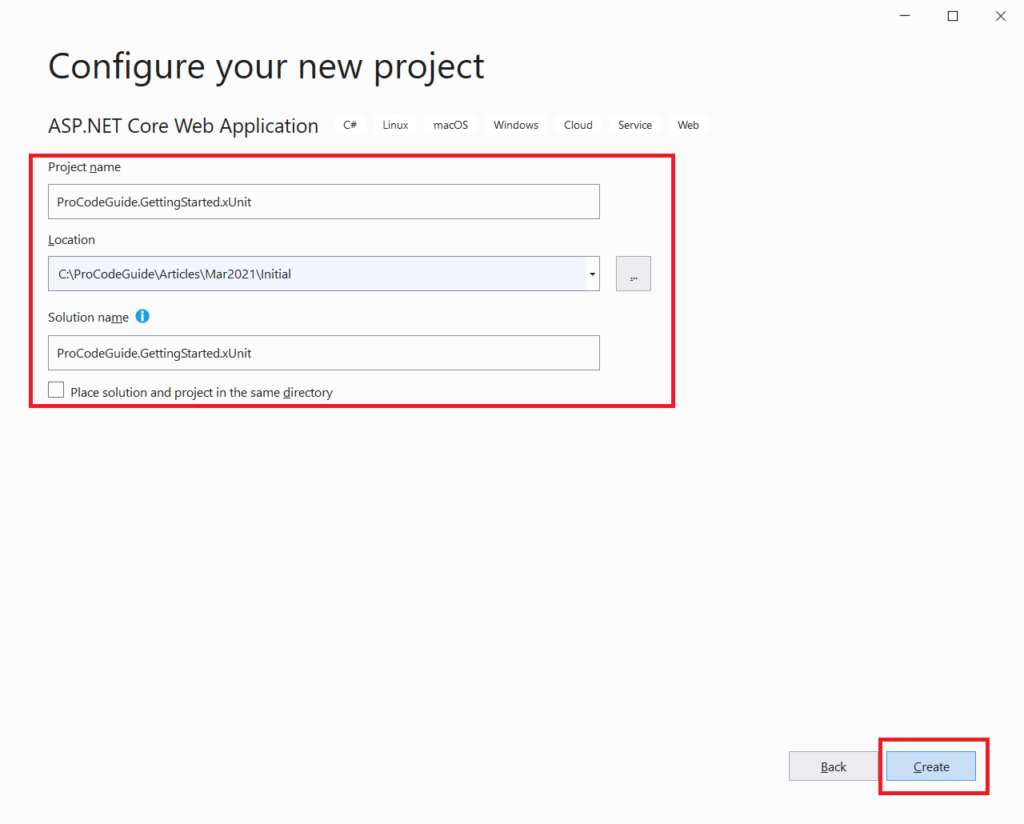
4. After that enter name for the project\solution as ProCodeGuide.GettingStarted.xUnit, provide a path of the project where it will be saved on the local disk & click on create button as shown below
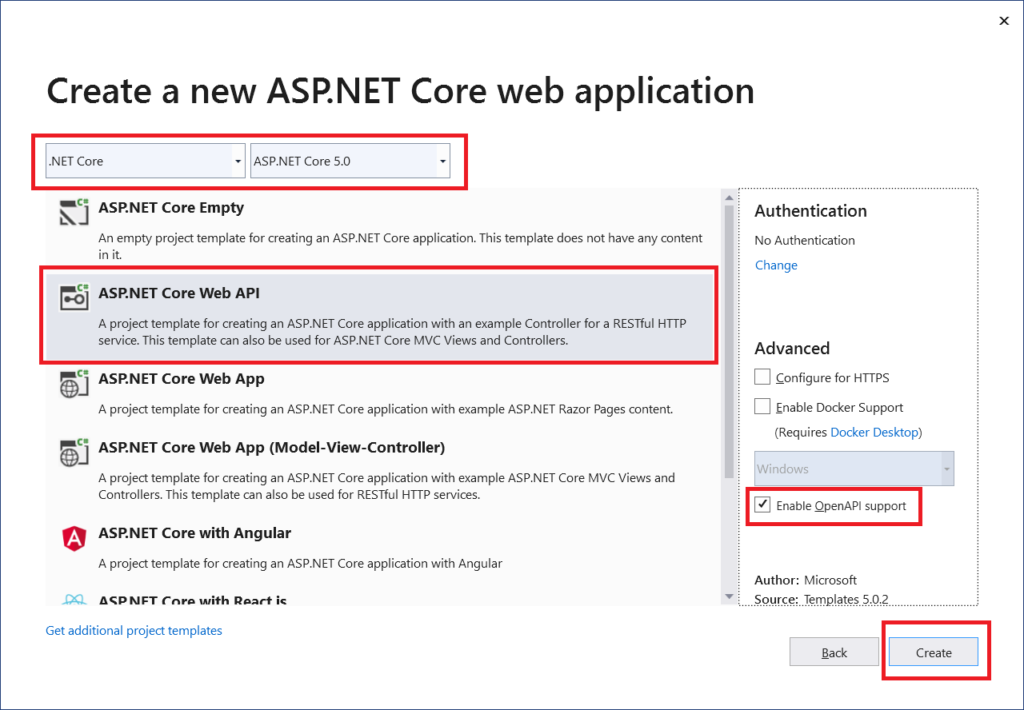
5. Finally select .NET Core Framework as ASP.NET Core 5.0, application type as ASP.NET Core Web API, Enable OpenAPI Support for testing purpose & click on Create button as shown below
Add interface & class for Maths Service
Let’s add an interface for math operations service in Services/IMathsService.cs as shown below
public interface IMathsService
{
    double Add(double x1, double x2);
    double Subtract(double x1, double x2);
    double Multiply(double x1, double x2);
    double Divide(double x1, double x2);
}
Now we will add class for math service that will implement interface IMathsService in Services/MathService.cs as shown below
public class MathsService : IMathsService
{
    public double Add(double x1, double x2)
    {
        throw new NotImplementedException();
    }

    public double Divide(double x1, double x2)
    {
        throw new NotImplementedException();
    }

    public double Multiply(double x1, double x2)
    {
        throw new NotImplementedException();
    }

    public double Subtract(double x1, double x2)
    {
        throw new NotImplementedException();
    }
}
I have not implemented the functions in Maths Service as we will write Unit Tests first allow those test to fail before we add implementation of these function to make the unit tests pass
Register Maths Service in Startup
We have added the Maths service so now lets register this service in the dependency injection container so that we can inject this service into the controller using the constructor of the controller. To register Maths service we will add the below line of code in the ConfigureServices method in the startup class
public void ConfigureServices(IServiceCollection services)
{
    //Remaining code has been removed
    services.AddTransient<IMathsService, MathsService>();
}
Add a controller for Maths operations
Let’s add Controllers\MathsController.cs to implement endpoints for Maths operations and in this, we will inject this Math Service and use this service to implement actions as shown below
[Route("api/[controller]")]
[ApiController]
public class MathsController : ControllerBase
{
    private IMathsService _mathService = null;
    public MathsController(IMathsService mathService)
    {
        _mathService = mathService;
    }

    [HttpPost]
    [Route("Add")]
    public double Add(double x1, double x2)
    {
        return _mathService.Add(x1 , x2);
    }

    [HttpPost]
    [Route("Divide")]
    public double Divide(double x1, double x2)
    {
        return _mathService.Divide(x1, x2);
    }

    [HttpPost]
    [Route("Multiply")]
    public double Multiply(double x1, double x2)
    {
        return _mathService.Multiply(x1, x2);
    }

    [HttpPost]
    [Route("Subtract")]
    public double Subtract(double x1, double x2)
    {
        return _mathService.Subtract(x1, x2);
    }
}
Now that our demo project is ready lets implement automated unit testing in ASP.NET Core for service MathsService.cs.
Again reiterating that this being a getting started article on xUnits I am keeping the task at hand simple by selecting to write unit tests for MathsService instead of MathsController. If I select to write tests for MathsController then I will have to test MathsController independently in isolation and not test MathsService along with it. To achieve this we will have to provide a mock service for Maths and use it for unit testing of the controller.
So lets keep things simple and write tests for Maths Service
Setup Unit Testing in ASP.NET Core
We will add a new project of the type ‘xUnit Test Project’ for .NET Core to the solution. This project will hold the automated units tests for the MathsService and will be used to code unit testing in ASP.NET Core
Add a new project for xUnit
- Right-click on solution file in solution explorer and select Add->New Project
- Select the project type as ‘xUnit Test Project’ and click on the Next button (you can use the search option to filter the project of type xUnit as shown below)
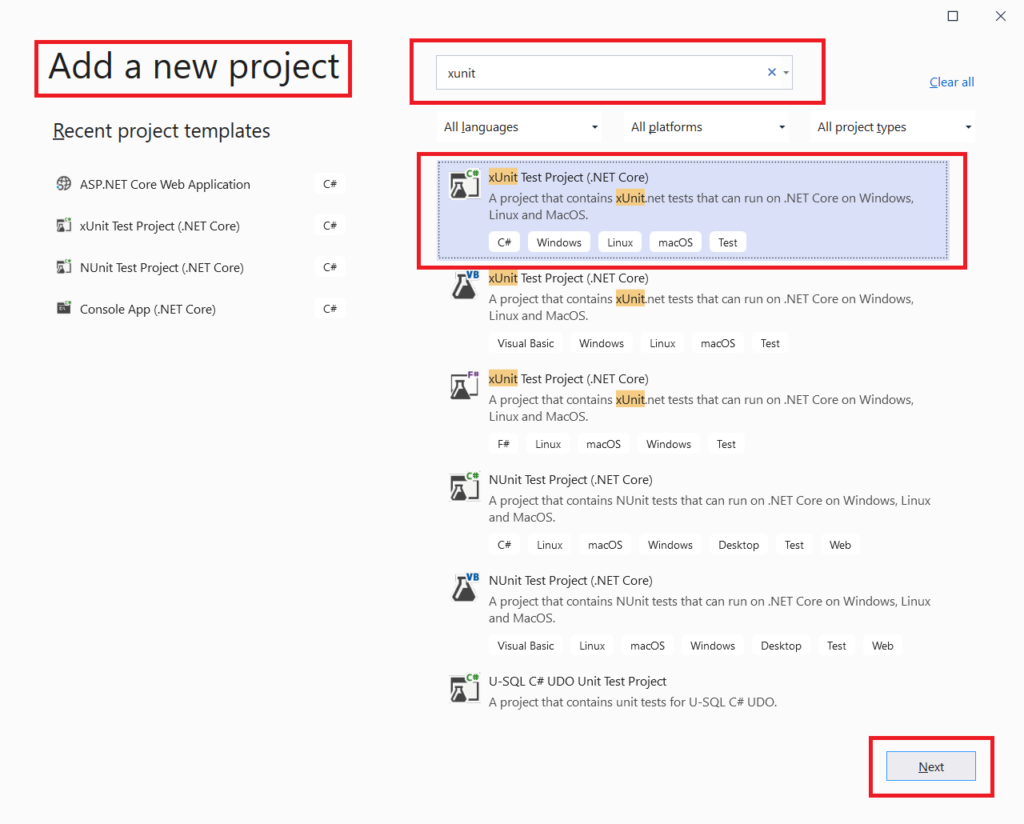
3. Add configuration for the new project i.e. name of the project and location for the project and click on the Create button.

New project of type xUnit test project will be created and added to the solution.
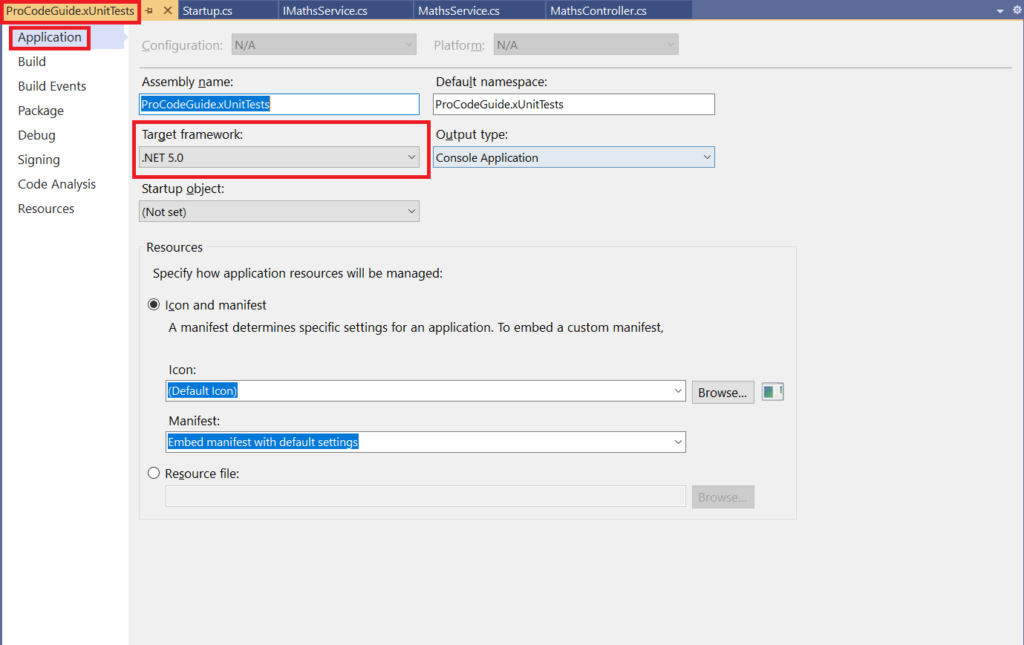
This new project gets created with the target framework as .NET Core 3.1 change it to .NET 5 by right-clicking on the project file in Solution Explorer and select properties. In properties, you will be able to configure Target Framework under the Application Tab as shown below.
The test class is a blank class in which you will have to create test methods. In xUnit.net no attribute is required at the class level to make it part of text classes. Normally you should create one class for each unit/component being tested. In this test class, you will have to add a test method and these methods will be responsible for testing the condition coded in actually implemented components.
These test method normally consists of 3 logical parts to test the conditions.
- Arrange – prepare the data which will be required for testing i.e. data used to test scenario along with the expected result.
- Act – call the method which is being tested making use of the data prepared in Arrange & this should return the actual result
- Assert – Compare expected result & actual result to decide if the test passed for failed.
The unit test project will have a dependency on the project that is being tested so you will have to add a reference to the project being tested in the unit test project.
To demonstrate unit testing in ASP.NET Core let’s add the test class to this project as MathServiceTest.cs and write code to test the MathsService Maths operations as shown below. Also, as explained above you will have to add a project reference of the project which contains MathsService class to this xUnit Test Project to be able to test the MathService class.
public class MathServiceTests
{
    private MathsService _unitUnderTesting = null;
    public MathServiceTests()
    {
        if (_unitUnderTesting == null)
        {
            _unitUnderTesting = new MathsService();
        }
    }

    [Fact]
    public void Add()
    {
        double x1 = 5;
        double x2 = 8;
        double expected = 13;

        var actual = _unitUnderTesting.Add(x1, x2);

        Assert.Equal(expected, actual, 0);
    }

    [Fact]
    public void Substract()
    {
        double x1 = 10;
        double x2 = 8;
        double expected = 2;

        var actual = _unitUnderTesting.Subtract(x1, x2);

        Assert.Equal(expected, actual, 0);
    }

    [Fact]
    public void Multiply()
    {
        double x1 = 5;
        double x2 = 8;
        double expected = 40;

        var actual = _unitUnderTesting.Multiply(x1, x2);

        Assert.Equal(expected, actual, 0);
    }

    [Fact]
    public void Divide()
    {
        double x1 = 100;
        double x2 = 10;
        double expected = 10;

        var actual = _unitUnderTesting.Divide(x1, x2);

        Assert.Equal(expected, actual, 0);
    }
}
Code Explanation
- Line 8 – In the constructor, we are creating an instance of class MathsService and making it available globally withing the test class MathServiceTests
- Line 13, 25, 37, 49 – We have declared four methods (Add, Subtract, Multiply & Divide) with the attribute [Fact] that will make these method part of unit testing and execute these methods during each test run.
- Line 21, 33, 45, 57 – Assert.Equal is used to compare the expected result with the actual result to verify if the test was successful or not.
Run the unit tests & let them fail
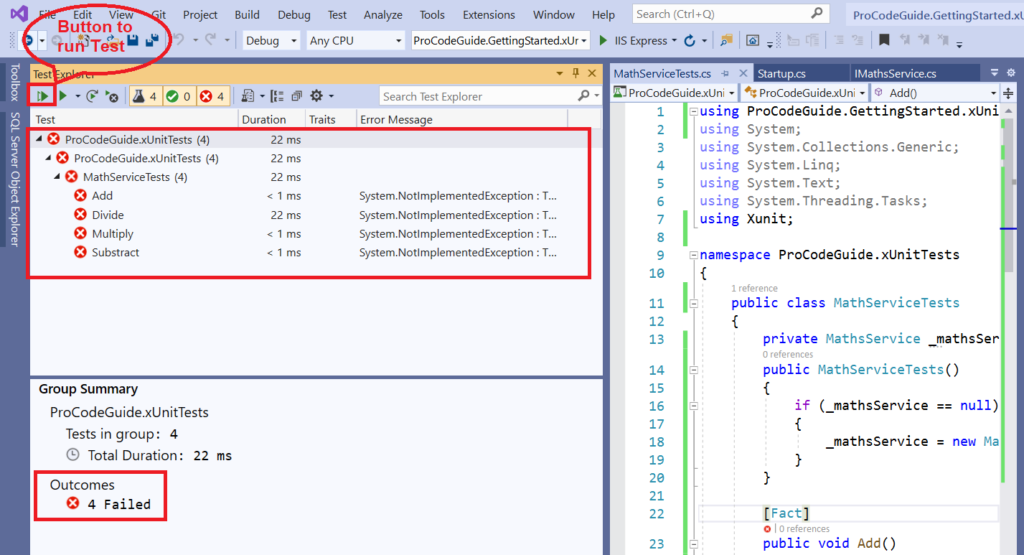
To test unit testing in ASP.NET Core let’s execute the unit test using Test Explorer in Visual Studio. If this run all test will fail as we have still not implemented the MathService class. Below is the screenshot of test results from Test Explorer showing that all 4 unit tests have failed with the error message System.NotImplementedException
Add Code to MathsService for Unit Tests to Pass
All the 4 unit tests failed as we have not implemented functions in MathsService class so let’s now write the required code in MathsService class for unit tests to pass. Add below code to MathsService.cs file
public class MathsService : IMathsService
{
public double Add(double x1, double x2)
{
return (x1 + x2);
}
public double Divide(double x1, double x2)
{
if (x2 == 0)
{
throw new DivideByZeroException("x2 cannot be zero");
}
return (x1 / x2);
}
public double Multiply(double x1, double x2)
{
return (x1 * x2);
}
public double Subtract(double x1, double x2)
{
return (x1 - x2);
}
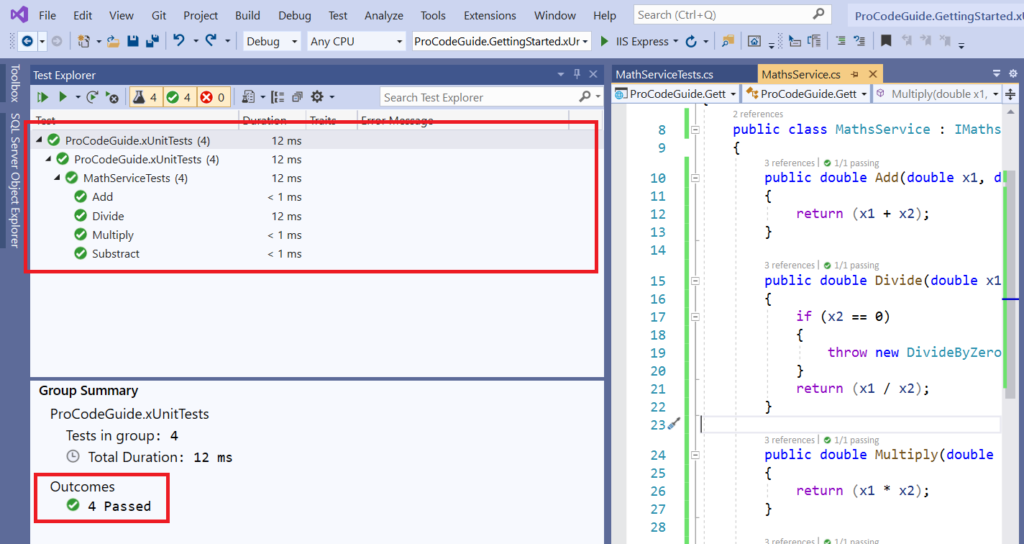
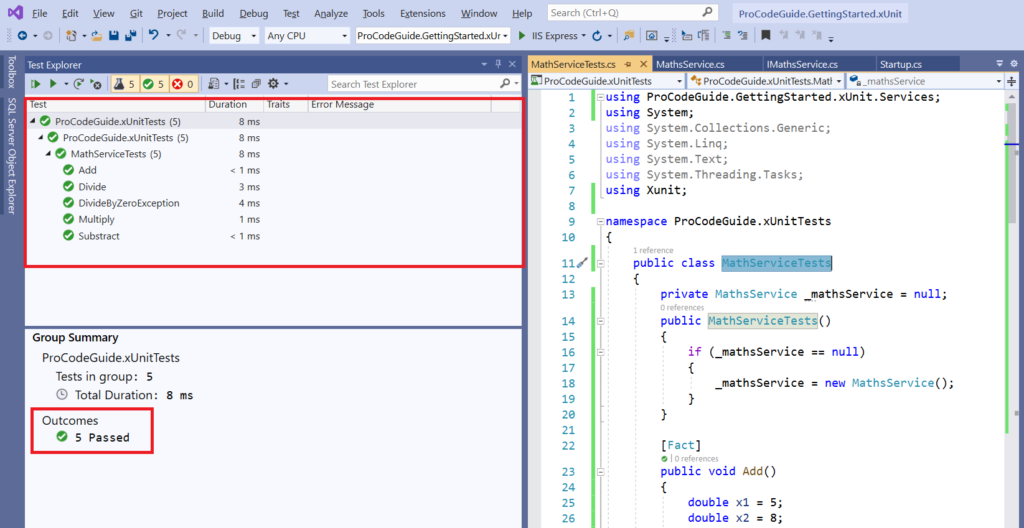
}After adding the above code to MathsService class run all the unit tests again from Test Explorer and this time all the tests will pass as shown below.
So all our test have passed so is our code bug-free now? But the fact is tests written by us has passed and we need to access how reliable or good are tests i.e. have we missed anything which needs te tested? i.e. to access whether we have tested the complete code i.e. all lines of code have been tested or not. For this, we can use the Code Coverage Report to access whether unit test cases for complete code has been written or not.
Code Coverage Report
This report is used to check whether we have covered complete code of system under test in unit cases or not. i.e. our unit cases are able to test all the functionality provided in system under test (in this case MathsService) or not.
The code coverage report is directly available in Test Explorer in Visual Studio Enterprise edition but since I am using Visual Studio Community edition code coverage tool is not part of Test Explorer. We will have to generate a code coverage report using the command-line tool and we can view the same in the browser as we will generate html based report.
To run all the command mentioned below open the visual studio command-line tool and change the current directory to the path of the xUnit Test Project and then execute all the commands
To be able to use code coverage report we need to install tool reportgenerator using the command as shown below
dotnet tool install -g dotnet-reportgenerator-globaltool
To capture data for the code coverage report we need to run the below command from the command-line tool. This command will generate an XML file named coverage.cobertura.xml on path TestResults\guid\.
dotnet test --collect:"XPlat Code Coverage"
After the above XML file has been generated run the below command to generate a code coverage report, in this command you need to specify the path to coverage.cobertura.xml and also specify the report type which has been set to Html in the below command.
reportgenerator "-reports:path\to\TestResults\guid\coverage.cobertura.xml" "-targetdir:coveragereport" -reporttypes:Html
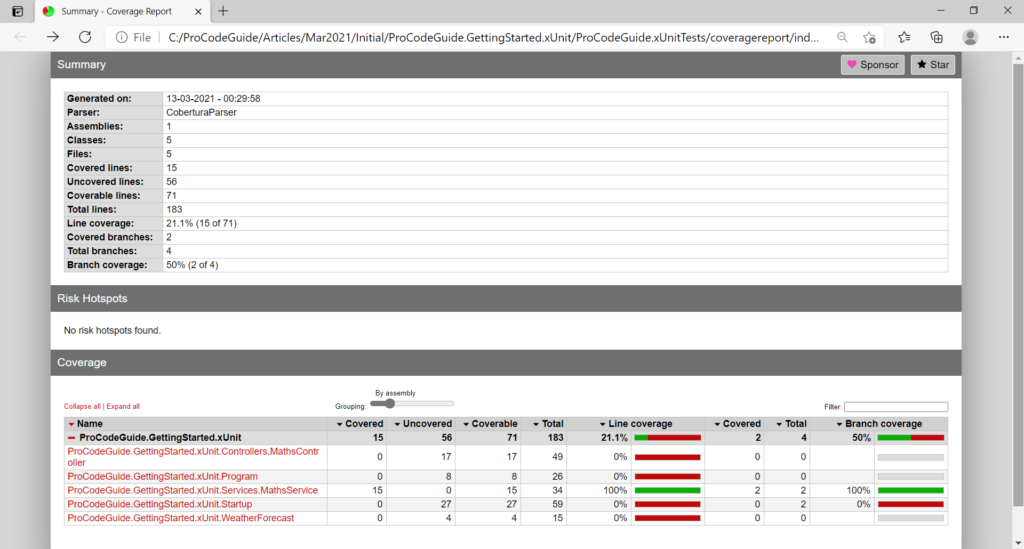
After running all the above commands it will generate a report in the coveragereport folder as we have specified this folder name in the argument targetdir. Now open the index.html file generated in that folder in any browser, you should be able to view the code coverage report as shown below
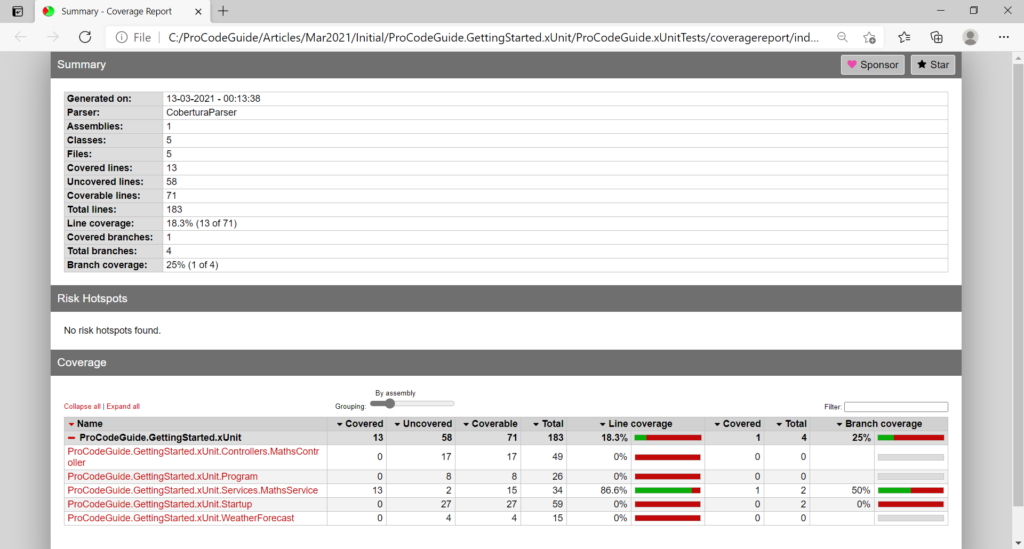
We can see from the above report that code coverage is 0% for all the types other than MathsService that is obvious as we have not written any unit tests for these types. But the problem is though we have written unit test for all the functions in type MathsService still code coverage for MathsService is 86.6% i.e. it’s not 100%. We need to dive deeper and check why code coverage is not 100% for MathsService.
After clicking on type MathService in the report we get the below details
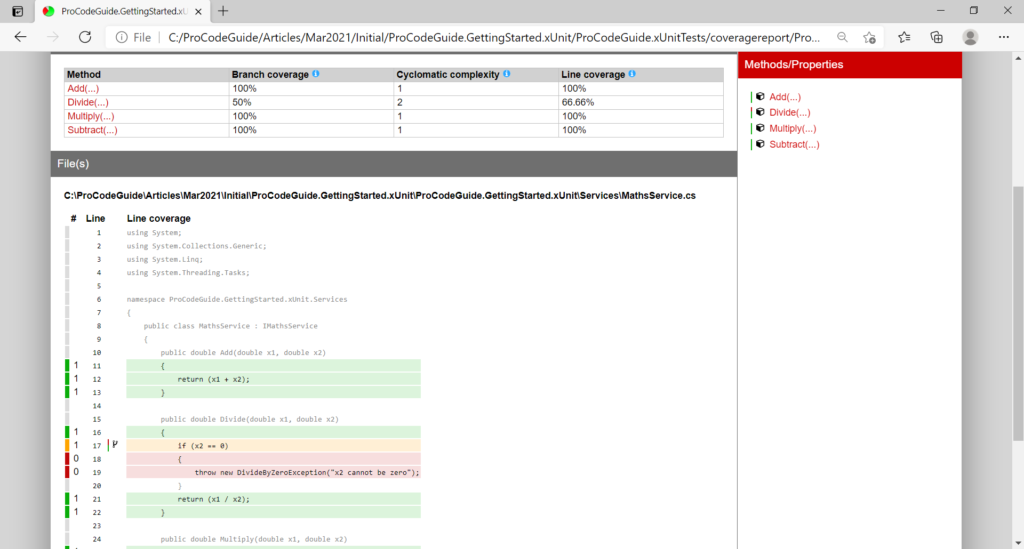
From above screen we can see that code coverage for all functions is 100% except Divide function which branch coverage is 50% and line coverage is 66.6.6%. Also from Line coverage details we can see that Divide function throws an exception in case x2 is 0 and this functionality has not been covered in unit tests due to which code coverage is not 100%
So now lets write unit test for this exception and then again regenerate the code coverage report to verify if code coverage for MathsService is 100% or not.
Let’s add below function with [Fact] attribute in unit test class MathServiceTests that will test the dividebyzero exception which is thrown by Divide function in case value of x2 is 0
[Fact]
public void DivideByZeroException()
{
double x1 = 100;
double x2 = 0;
Action act = () => _unitUnderTesting.Divide(x1, x2);
Assert.Throws<DivideByZeroException>(act);
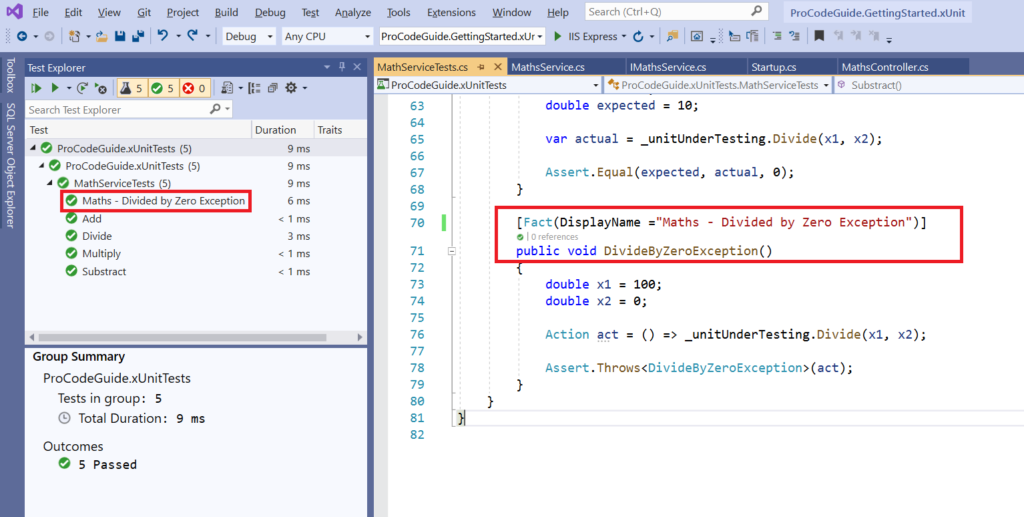
}Let’s run the unit test in Test Explorer and check the result of the Unit Test. We can see from the below screen that on running all the test passed for MathsService
Now again we will regenerate the code coverage report as per the command explained above.
We can see in the above report that now code coverage for type MathsService is 100%. So this way we can check whether unit test cases have been written for all the lines of code or not.
Change Test Display Name in Test Explorer
You would have observed that name for the test in test explorer is the name of the test method. i.e. Test Explorer is using the name of the method as the name of the test that is being performed. Now if you want to change this name then you can use the property DisplayName in the attribute for the test method as shown below
[Fact(DisplayName ="Maths - Divided by Zero Exception")]
public void DivideByZeroException()
{
    double x1 = 100;
    double x2 = 0;

    Action act = () => _unitUnderTesting.Divide(x1, x2);

    Assert.Throws<DivideByZeroException>(act);
}
We have used the DisplayName property of fact attribute to specify the descriptive name for the test. This description will be used by test explorer for Test Name as shown below
Skip test method in the test run
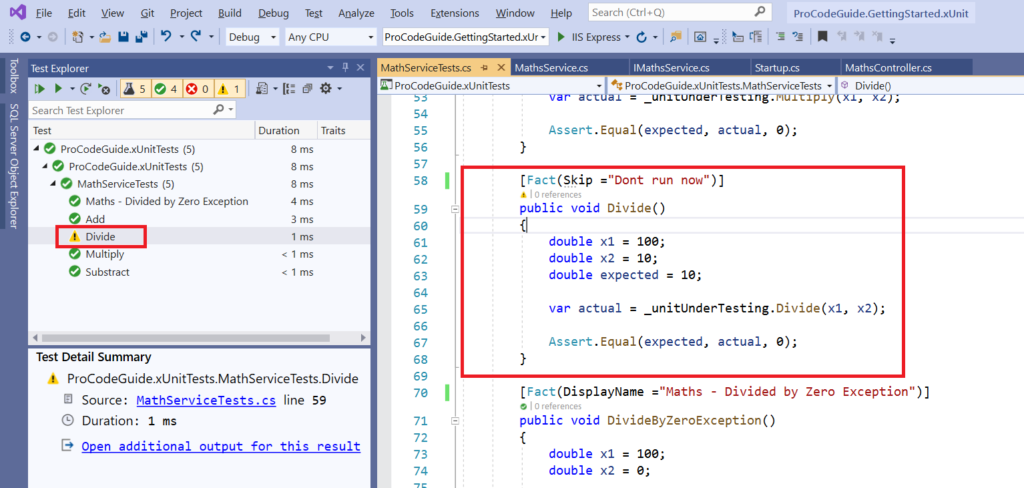
Sometimes there is a need to skip a test method from running in situations like you are in the middle of writing a test method and don’t want to execute it as of now or some code changes in the unit under testing have broken some tests method. So you don’t want these test methods to be executed and break your test.
If you want to skip any test method from running you can use the property skip in the attribute for the test method as shown below
[Fact(Skip ="Dont run now")]
public void Divide()
{
    double x1 = 100;
    double x2 = 10;
    double expected = 10;

    var actual = _unitUnderTesting.Divide(x1, x2);

    Assert.Equal(expected, actual, 0);
}
We have used the skip property of fact attribute to specify that skip this test from the test run. Now when you run the tests then this test won’t be execute as shown below
Usage of Theory & InlineData attributes
We used the [Fact] attribute in our above examples & we know that fact attributes doesn’t allow any parameters in the test method. If you want to provide parameters to the test method then you will have to use the [Therory] attribute. [Therory] attribute is followed by [InlineData] attribute that will contain the argument values for each parameter of the test method.
[Theory(DisplayName = "Maths - Divided with Parameters")]
[InlineData(40, 20, 2)]
public void DivideWithParameter(double value1, double value2, double ExpectedValue)
{
    double x1 = value1;
    double x2 = value2;
    double expected = ExpectedValue;

    var actual = _unitUnderTesting.Divide(x1, x2);

    Assert.Equal(expected, actual, 0);
}
Code Explanation
Theory attribute will allow parameters to test the method. Now if you would have used the Fact attribute for the test method with parameters then it would have given an error. Also, DisplayName is used in Theory to provide some description for the method.
InlineData attribute is used to specify values for the parameters in test method for unit testing in ASP.NET Core
- value1 – 40
- value2 – 20
- ExpectedValue – 2
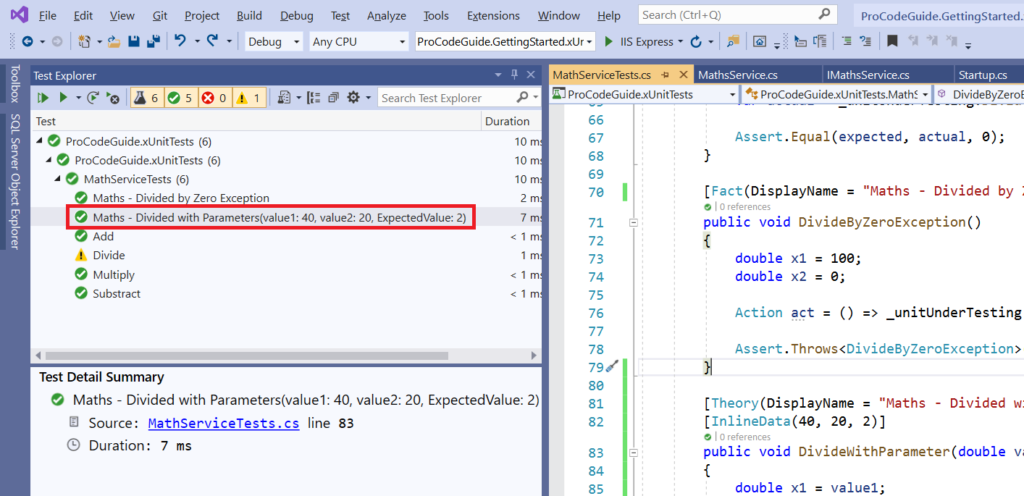
We can see from the above screen that the test method DivideWithParameter is displayed in Test Explorer with the display name that is specified in Theory Attribute i.e. ‘Maths – Divided with Parameters’ and is passed parameter values from the InlineData attribute.
Running Tests in Parallel in xUnit.net
As code size increases so the number of unit test cases will also increase along with it. Considering big projects where unit test cases take days to execute it will always be required to run unit cases in parallel instead of running them serially to save time.
It is possible to run unit tests in parallel in xUnit.net. running unit tests in parallel were introduced on xUnit.net from version 2 onwards.
If you want to run unit tests in parallel then you need to split the test across classes. All the unit tests within the same class will run sequentially.
It is also possible to configure unit testing in ASP.NET Core to run either parallelly or sequentially by using the ways discussed below.
Run tests parallelly
In the example shown below tests in TestClass01 & TestClass02 will run parallelly and tests within those classes will run sequentially.
public class TestClass01
{
    [Fact]
    public void Test1()
    {
        Assert.True(true);
    }

    [Fact]
    public void Test2()
    {
        Assert.True(true);
    }
}
public class TestClass02
{
[Fact]
public void Test1()
{
Assert.True(true);
}
[Fact]
public void Test2()
{
Assert.True(true);
}
}Run tests sequentially
It is also possible to run a test across different test classes sequentially. For this, you will have to make test classes part of the same collection.
In the example shown below tests in TestClass03 & TestClass04 will run sequentially as if they are part of the same test class.
[Collection("SingleRun")]
public class TestClass03
{
    [Fact]
    public void Test1()
    {
        Assert.True(true);
    }

    [Fact]
    public void Test2()
    {
        Assert.True(true);
    }
}
[Collection("SingleRun")]
public class TestClass04
{
[Fact]
public void Test3()
{
Assert.True(true);
}
[Fact]
public void Test4()
{
Assert.True(true);
}
}Summary
In this article we learned about what are automated tests, the need for automated tests, an introduction to xUnit.net and how to use xUnit.net to implement automated unit testing in ASP.NET Core.
I have tried to cover all the basic concepts which you will need to get started with the implementation of xUnit.net for unit testing in ASP.NET Core.
If you have any suggestions or feedback then please provide it in the comments section below.
In the next part of this series, we will look at how to perform unit testing in ASP.NET Core MVC User Interface code in isolation. i.e. Unit Testing of the User Interface in ASP.NET Core using xUnit.net
Download Source Code
Download sample source code for unit testing in ASP.NET Core
References – Implement Unit Testing in ASP.NET Core
Hope this article helped. Your help is appreciated!Recommend
About Joyk
Aggregate valuable and interesting links.
Joyk means Joy of geeK