

How to Create a Copper Foil Texture Text Effect in Adobe Photoshop
source link: https://design.tutsplus.com/tutorials/copper-foil-text-effect--cms-27888
Go to the source link to view the article. You can view the picture content, updated content and better typesetting reading experience. If the link is broken, please click the button below to view the snapshot at that time.

This tutorial will show you a simple way to create a foil texture text effect, using filters, adjustments, and layer styles. Let's get started!
This text effect was inspired by the many copper texture text effects available on Envato Elements, including The Ultimate 1001 Text Effects pack.
Tutorial Assets
The following assets were used during the production of this tutorial:
- Hensa font
- Black Paper Texture by abstraktpattern
- Free Pack 6000 photoshop gradients by Supertuts007 (Load the CHROMES.grd file.)
What You'll Learn in This Foil Lettering Photoshop Tutorial
- How to load a default pattern set
- How to create a foil texture using filters
- How to convert a texture into a seamless copper texture
- How to create and define a seamless pattern
- How to create a text layer
- How to create frame shapes
- How to style a foil effect
- How to create a subtle embossed effect
Follow along with us over on our Envato Tuts+ YouTube channel:
1. How to Load a Default Pattern Set
Step 1
Go to Edit > Presets > Preset Manager, and choose Patterns from the Preset Type drop-down menu.
Then, click the little arrow to the right of the Preset Type drop-down menu, and click the Nature Patterns set. When the dialog box appears after that, just click Append.

Step 2
Create a new 1000 x 1000 px document, and duplicate the Background layer.
Rename the copy layer to Texture, and then right-click it and choose Convert to Smart Object.

2. How to Create a Foil Texture Using Filters
Step 1
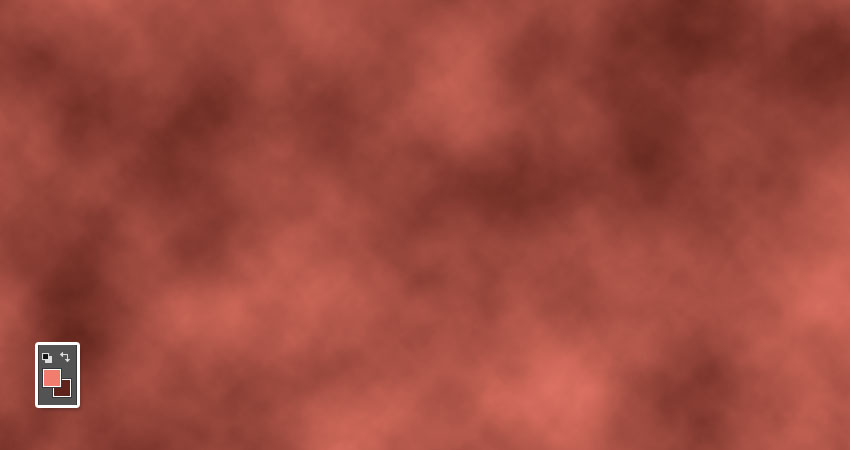
Set the Foreground Color to #f07d6d and the Background Color to #5e231b, and go to Filter > Render > Clouds.
These colors will help create a copper texture, but you can choose other colors if you'd like to get different results as well.
Step 2
Go to Filter > Filter Gallery > Distort > Glass, and use these settings:
- Distortion: 15
- Smoothness: 3
- Texture: Frosted
- Scaling: 100

Step 3
Click the New effect layer icon at the bottom right corner of the Filter Gallery window.

Step 4
Choose the Glass filter again, but this time, use these settings:
- Distortion: 20
- Smoothness: 3
- Texture: Canvas
- Scaling: 100

3. How to Adjust a Texture's Coloring
Step 1
If you're working with older versions of Photoshop, you'll need to add adjustment layers by clicking the Create new fill or adjustment layer icon at the bottom of the Layers panel.

Step 2
For newer versions, however, you can apply the adjustments directly to the smart object layer. So go to Image > Adjustments > Hue/Saturation, and change the Hue to 15.

Step 3
Go to Image > Adjustments > Levels, and change the Highlights to 13 and the Shadows to 201.
You can save this file to keep a copy of the original texture.

4. How to Convert a Texture Into a Pattern
Step 1
Right-click the Texture layer and choose Rasterize Layer.

Step 2
Pick the Rectangular Marquee Tool, and then create a selection that covers about 1/3 to 1/2 of the upper part of the texture.

Step 3
Press the Command-Shift-J keys to cut and paste the selected area on a new layer.

Step 4
Use the Move Tool to place the duplicated part right below the original. You can hold the Shift key while doing so to avoid moving the rectangle to the sides.

Step 5
Go to Image > Reveal All, and make sure that there are no spaces between the two rectangles.

Step 6
Go to Image > Trim, and then choose the Top Left Pixel Color option under the Based On tab, check all the Trim Away tab boxes, and click OK.

Step 7
Press Command-E to merge both layers together.

5. How to Create and Define a Seamless Pattern
Step 1
Pick the Healing Brush Tool, and then hold the Option key to sample an area near the line where both rectangles meet.
Then use a round brush tip, with Size and Hardness values depending on the result you want, and paint over the line to get rid of it.
It is better to keep sampling and painting over small portions of the line, to make sure you get a neater result.

Step 2
You can use any other healing tools you like. Just make sure to stay as close to the line as possible, and don't alter the texture to the point where it gets blurry and pixelated.

Step 3
Repeat the same steps for the vertical side of the texture.
So create a selection that covers about 1/3 to 1/2 of the left side of the texture, press Command-Shift-J, move the duplicated part until it meets the right side's edge, and then Reveal All, Trim, and merge.

Step 4
Use the healing tools to make the edge seamless.

Step 5
Go to Edit > Define Pattern, and type Foil for the Name. Our copper foil swatch is ready now!

6. How to Create Text
Step 1
Create a new 1000 x 1000 px document, and then place the Black Paper Texture image on top of the Background layer, and resize it as needed.

Step 2
Create the text using the font Hensa, and set the Size to 150 pt.

Step 3
If you have more than one line of text, you might need to adjust the Leading values for each of the lines to get evenly spaced text.

Step 4
Duplicate the text layer, and change the copy's Fill value to 0.

7. How to Create Frame Shapes
Step 1
Pick the Rectangle Tool, and then create a rectangle or a square around the text you have.

Step 2
In the Options bar, set the Fill to None and the Stroke Size to 7. Then, click the Set shape stroke type icon, and change the Align to Center.

Step 3
Duplicate the rectangle shape layer, and then press Command-T to enter Free Transform Mode, and scale the copy rectangle up to create an outer frame.
When done, hit the Return key to accept the changes.

Step 4
Rename the original rectangle layer to Inner, and the copy's to Outer.

Step 5
Duplicate both shape layers, and change the copies' Fill value to 20.

8. How to Style a Foil Effect
Double-click the original text layer to apply the following layer style:
Step 1
Add a Bevel and Emboss with these settings:
- Style: Emboss
- Size: 0
- Check the Anti-aliased box
-
Highlight Mode: Linear Light
- Opacity: 20%
-
Shadow Mode:
- Opacity: 0%

Step 2
Add a Contour with these settings:
- Contour: Cone
- Check the Anti-aliased box.
- Range: 100%

Step 3
Add a Texture with these settings:
- Pattern: Spiky Bush
- Depth: 50%

Step 4
Let's add a copper gradient effect to our layer. Hit Gradient Overlay and add the following settings:
- Check the Dither box
- Blend Mode: Multiply
- Opacity: 20%
- Angle: 22
- Use the aluminum 130 gradient fill

Step 5
Add a Pattern Overlay with these settings:
- Pattern: Foil
- Scale: 50%

Step 6
This will style the main foil effect.
Right-click the styled text layer and choose Copy Layer Style. Then select the Inner and Outer shape layers, right-click any of them, and choose Paste Layer Style.

9. How to Create a Subtle Embossed Effect
Step 1
Double-click the copy text layer to apply a Bevel and Emboss effect with these settings:
- Size: 1
- Check the Anti-aliased box
-
Highlight Mode: Overlay
- Opacity: 50%
-
Shadow Mode:
- Opacity: 30%

Step 2
Copy and paste the layer style to the copy Inner and Outer layers.

Congratulations! You're Done
In this tutorial, we used a couple of filters and adjustments to create a foil texture. Then, we worked on turning the texture into a seamless pattern, using healing tools. Finally, we created text and frame layers and styled them to achieve the foil effect.
Please feel free to leave your comments, suggestions, and outcomes below.

If you are looking for more copper foil designs and foil font layer styles, try Envato Elements! Here you will find tons of copper foil swatch packages and all kinds of foil lettering Photoshop effects. Let's take a look at a collection of the best copper foil text effects:
The Ultimate 1001 Text Effects (PSD)
Want to add a copper gradient to your lettering? Or maybe convert a simple text layer to 3D? This amazing package of effects is the best solution! In the package you will find a lot of different Photoshop effects, from foil text effects for creating cool copper foil designs to wood and even pen drawing effects. With the instruction file included in the product, you will create amazing projects with almost no effort.
Hot Foil Logo Mock Up (PSD)
If you need to add texture to the text effect or if you want to see how your logo will look with a hot foil effect applied to it, try Hot Foil Logo Mock Up! This package gives you eight different logotype effects and two paper textures, and the effect is extremely easy to use with the instructions included.
Silver and Gold Styles (ASL)
Looking for a seamless copper texture or hot foil patterns? This pack contains 24 Photoshop styles such as gold, silver, hologram, etc. All the layers styles are made from real high-resolution photos. Simply add the pattern to your text or shape layers and adjust the size and lighting. Add the texture to a text effect and get an amazing result!
Goldish Kit for Photoshop + Extras (EPS, ASL, AI, PNG)
Want to create foil font effects in a few clicks? With this amazing kit, which provides you with 28 seamless gold layer styles, eight patterns, and a lot of textures and extra elements, you could easily create amazing hot foil designs with great-looking details. The pack also contains detailed instructions for a quick start.
Golden Planet for Photoshop (ABR, ASL, PAT, PDF, EPS)
Last but not least, check out Golden Planet. This huge pack contains more than 150 gold and silver styles, 46 different brushes, and tons of PNG textures. The styles and textures will help you to create your own home decoration design, typography, lettering, or any other kind of project. All the textures and patterns come in high resolution for both web and print design.
If you want to learn more about foil lettering Photoshop text effects or other text effects, check out these amazing tutorials:
Recommend
About Joyk
Aggregate valuable and interesting links.
Joyk means Joy of geeK