

BGP 基本配置实验
source link: http://www.dengfm.com/15252609074562.html
Go to the source link to view the article. You can view the picture content, updated content and better typesetting reading experience. If the link is broken, please click the button below to view the snapshot at that time.

BGP 基本配置实验
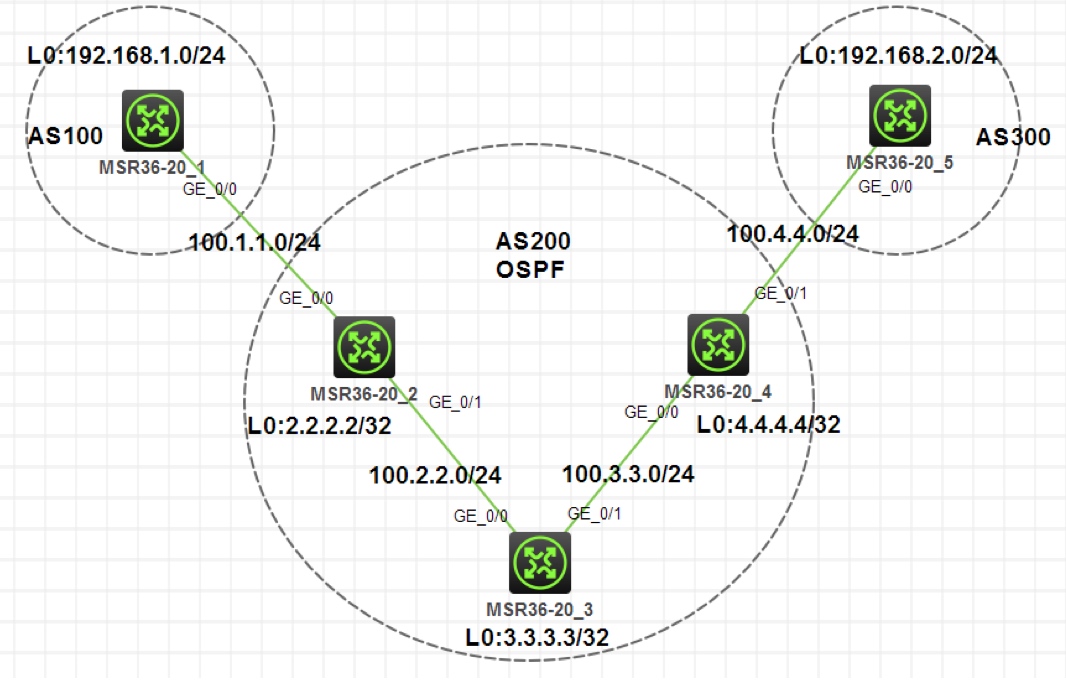
图 1-1
注:如无特别说明,描述中的 R1 或 SW1 对应拓扑中设备名称末尾数字为 1 的设备,R2 或 SW2 对应拓扑中设备名称末尾数字为 2 的设备,以此类推;另外,同一网段中,IP 地址的主机位为其设备编号,如 R3 的 g0/0 接口若在
192.168.1.0/24网段,则其 IP 地址为192.168.1.3/24,以此类推
- 按照图示配置 IP 地址,R1 和 R5 上使用环回口模拟业务网段,R2,R3,R4 的环回口用于配置 Router-id 和建立 IBGP 邻居
- AS 200 运行 OSPF 实现内部网络互通
- R1,R2,R4,R5 运行 BGP,R1 和 R2 建立 EBGP 邻居,R4 和 R5 建立 EBGP 邻居,R2 和 R4 建立 IBGP 邻居。要求 EBGP 邻居使用直连接口建立邻居,IBGP 邻居使用环回口建立邻居
- R1 和 R5 把业务网段宣告进 BGP
- 在 R2 和 R4 上把 BGP 引入到 IGP 解决 BGP 路由黑洞问题
- 业务网段可以互通
配置 IP 地址略
配置 OSPF 部分略
R1,R2,R4,R5 运行 BGP,R1 和 R2 建立 EBGP 邻居,R4 和 R5 建立 EBGP 邻居,R2 和 R4 建立 IBGP 邻居。要求 EBGP 邻居使用直连接口建立邻居,IBGP 邻居使用环回口建立邻居
分析:IBGP 邻居要求使用环回口建立,根据 BGP 邻居建立条件,需要修改 IBGP 邻居更新源为对应环回口
由于 R2 和 R4 既有 EBGP 邻居,又有 IBGP 邻居,为了使从 EBGP 邻居学习的路由传递至 IBGP 邻居时下一跳可达,需要修改 IBGP 邻居下一跳为本机步骤 1:在 R1,R2,R4,R5 上配置 BGP,建立邻居关系
[R1]bgp 100
[R1-bgp-default]peer 100.1.1.2 as-number 200
[R1-bgp-default]address-family ipv4 unicast
[R1-bgp-default-ipv4]peer 100.1.1.2 enable
[R2]bgp 200 [R2-bgp-default]peer 100.1.1.1 as-number 100 [R2-bgp-default]peer 4.4.4.4 as-number 200 [R2-bgp-default]peer 4.4.4.4 connect-interface LoopBack 0 [R2-bgp-default]address-family ipv4 unicast [R2-bgp-default-ipv4]peer 100.1.1.1 enable [R2-bgp-default-ipv4]peer 4.4.4.4 enable [R2-bgp-default-ipv4]peer 4.4.4.4 next-hop-local[R4]bgp 200 [R4-bgp-default]peer 100.4.4.5 as-number 300 [R4-bgp-default]peer 2.2.2.2 as-number 200 [R4-bgp-default]peer 2.2.2.2 connect-interface LoopBack 0 [R4-bgp-default]address-family ipv4 unicast [R4-bgp-default-ipv4]peer 100.4.4.5 enable [R4-bgp-default-ipv4]peer 2.2.2.2 enable [R4-bgp-default-ipv4]peer 2.2.2.2 next-hop-local[R5]bgp 300 [R5-bgp-default]peer 100.4.4.4 as-number 200 [R5-bgp-default]address-family ipv4 unicast [R5-bgp-default-ipv4]peer 100.4.4.4 enable效果测试:使用命令
display bgp peer ipv4检查邻居是否正确建立,步骤略R1 和 R5 把业务网段宣告进 BGP
步骤 1:在 R1 和 R5 上把业务网段宣告进 BGP 的 IPv4 地址族模式
[R1-bgp-default-ipv4]network 192.168.1.0 24[R5-bgp-default-ipv4]network 192.168.2.0 24在 R2 和 R4 上把 BGP 引入到 IGP 解决 BGP 路由黑洞问题
分析:由于 R3 没有运行 BGP ,无法学习到业务网段路由,然而业务网段之间通讯的数据包会经过 R3 转发,所以造成 R3 上存在 BGP 路由黑洞
这里通过把 BGP 引入到 OSPF,使 R3 可以通过 OSPF 学习到业务网段的路由,来解决 BGP 路由黑洞问题
步骤 1:在 R2 和 R4 上分别把 BGP 引入到 OSPF[R2-ospf-1]import-route bgp[R4-ospf-1]import-route bgp效果测试:在 R3 上查看 IP 路由表,发现已经学习到业务网段的路由,来源为 OSPF 外部路由
<R3>display ip routing-table

    Destinations : 21       Routes : 21

Destination/Mask   Proto   Pre Cost        NextHop         Interface
……
192.168.1.0/24     O_ASE2  150 1           100.2.2.2       GE0/0
192.168.2.0/24     O_ASE2  150 1           100.3.3.4       GE0/1
……
业务网段可以互通
分析:由于 BGP 只传递了业务网段路由,所以必须使用带源 PING,才能测试是否连通
[R1]ping -a 192.168.1.1 192.168.2.1

56 bytes from 192.168.2.1: icmp_seq=0 ttl=252 time=37.000 ms
56 bytes from 192.168.2.1: icmp_seq=1 ttl=252 time=55.000 ms
56 bytes from 192.168.2.1: icmp_seq=2 ttl=252 time=29.000 ms
56 bytes from 192.168.2.1: icmp_seq=3 ttl=252 time=48.000 ms
56 bytes from 192.168.2.1: icmp_seq=4 ttl=252 time=46.000 ms
Recommend
About Joyk
Aggregate valuable and interesting links.
Joyk means Joy of geeK