

单臂路由实验
source link: http://www.dengfm.com/15218913624002.html
Go to the source link to view the article. You can view the picture content, updated content and better typesetting reading experience. If the link is broken, please click the button below to view the snapshot at that time.

单臂路由实验
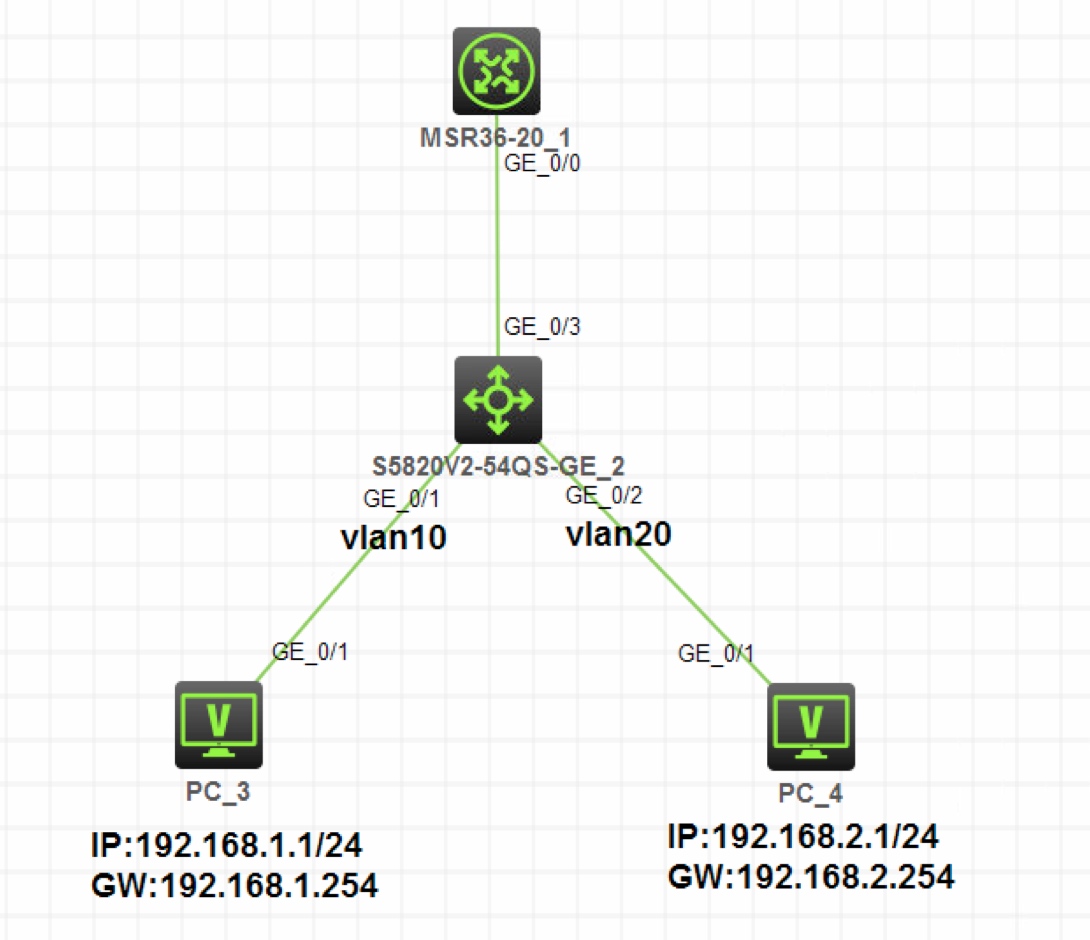
图1-1
注:如无特别说明,描述中的 R1 或 SW1 对应拓扑中设备名称末尾数字为 1 的设备,R2 或 SW2 对应拓扑中设备名称末尾数字为 2 的设备,以此类推
- 按照图示为 PC3 和 PC4 配置 IP 地址和网关
- PC3 属于 Vlan10,PC4 属于 Vlan20,配置单臂路由实现 Vlan10 和 Vlan20 三层互通
- PC3 和 PC4 可以互通
- PC 配置 IP 地址部分略
PC3 属于 Vlan10,PC4 属于 Vlan20,配置单臂路由实现 Vlan10 和 Vlan20 三层互通
分析:用单臂路由实现 Vlan 间三层互通,需要把 SW2 连接 R1 的接口配置为 Trunk,并允许 Vlan10 和 Vlan20 通过
R1 连接 SW2 的接口上要开启子接口,分别作为 Vlan10 和 Vlan20 的网关。这里规划 g0/0.1 子接口作为 Vlan10 的网关,IP 地址就是192.168.1.254/24,g0/0.2 子接口作为 Vlan20 的网关,IP 地址就是192.168.2.254/24
R1 的子接口上为了能够识别 SW2 的 Trunk 端口发送的 802.1Q 帧,还需要开启 dot1q 识别并绑定相应 Vlan。根据上述分析,g0/0.1 子接口绑定 Vlan10,g0/0.2 子接口绑定 Vlan20
步骤 1:在 SW2 上创建 Vlan10 和 Vlan20,并把 g1/0/1 接口加入 Vlan10,把 g1/0/2 接口加入 Vlan20[SW2]vlan 10 [SW2-vlan10]port g1/0/1 [SW2-vlan10]vlan 20 [SW2-vlan20]port g1/0/2步骤 2:把 SW2 的 g1/0/3 接口配置为 Trunk,并允许 Vlan10 和 Vlan20 通过
[SW2]interface g1/0/3
[SW2-GigabitEthernet1/0/3]port link-type trunk
[SW2-GigabitEthernet1/0/3]port trunk permit vlan 10 20
步骤 3:在 R1 上创建子接口 g0/0.1,开启 dot1q 识别,绑定到 Vlan10,并配置 IP 地址
192.168.1.254/24[R1]interface g0/0.1 [R1-GigabitEthernet0/0.1]vlan-type dot1q vid 10 [R1-GigabitEthernet0/0.1]ip address 192.168.1.254 24步骤 4:在 R1 上创建子接口 0/0.2,开启 dot1q 识别,绑定到 Vlan20,并配置 IP 地址
192.168.2.254/24[R1]interface g0/0.2 [R1-GigabitEthernet0/0.2]vlan-type dot1q vid 20 [R1-GigabitEthernet0/0.2]ip address 192.168.2.254 24分析:配置结束后,在 R1 上查看路由表,会发现已经产生了到达
192.168.1.0/24网段和192.168.2.0/24网段的直连路由,出接口分别指向各自子接口,证明路由器已经可以对 Vlan10 和 Vlan20 间的数据进行三层转发了[R1]display ip routing-table Destination/Mask Proto Pre Cost NextHop Interface …… 192.168.1.0/24 Direct 0 0 192.168.1.254 GE0/0.1 …… 192.168.2.0/24 Direct 0 0 192.168.2.254 GE0/0.2 ……测试在 PC3 上 Ping PC4 ,可以 Ping 通 PC4
<H3C>ping 192.168.2.1
Ping 192.168.2.1 (192.168.2.1): 56 data bytes, press CTRL_C to break
56 bytes from 192.168.2.1: icmp_seq=0 ttl=254 time=36.000 ms
56 bytes from 192.168.2.1: icmp_seq=1 ttl=254 time=25.000 ms
56 bytes from 192.168.2.1: icmp_seq=2 ttl=254 time=27.000 ms
56 bytes from 192.168.2.1: icmp_seq=3 ttl=254 time=29.000 ms
56 bytes from 192.168.2.1: icmp_seq=4 ttl=254 time=39.000 ms
Recommend
About Joyk
Aggregate valuable and interesting links.
Joyk means Joy of geeK