

『跟着雨哥学AI』系列:详解飞桨框架数据管道
source link: https://my.oschina.net/u/4067628/blog/4891311
Go to the source link to view the article. You can view the picture content, updated content and better typesetting reading experience. If the link is broken, please click the button below to view the snapshot at that time.

『跟着雨哥学AI』系列:详解飞桨框架数据管道 - 飞桨PaddlePaddle的个人空间 - OSCHINA - 中文开源技术交流社区
下载安装命令

## CPU版本安装命令
pip install -f https://paddlepaddle.org.cn/pip/oschina/cpu paddlepaddle

## GPU版本安装命令
pip install -f https://paddlepaddle.org.cn/pip/oschina/gpu paddlepaddle-gpu
课程简介:
“跟着雨哥学AI”是百度飞桨开源框架近期针对高层API推出的系列课。本课程由多位资深飞桨工程师精心打造,不仅提供了从数据处理、到模型组网、模型训练、模型评估和推理部署全流程讲解;还提供了丰富的趣味案例,旨在帮助开发者更全面清晰地掌握百度飞桨框架的用法,并能够举一反三、灵活使用飞桨框架进行深度学习实践。

本章分别对内置数据集、数据集定义、数据增强、数据采样以及数据加载这几个功能点进行详细的讲解。
在上个月发布的 飞桨开源框架2.0,带你走进全新高层API,十行代码搞定深度学习模型开发 中,已经给大家简单介绍了飞桨高层API的定义、特点、整体框架以及具体API。这节课我们将介绍飞桨高层API的第一个模块--数据管道。俗话说『九层之台,起于垒土』,数据管道是模型训练过程中最重要的前置工作。在飞桨的整个框架中,数据管道包含了五个功能点:内置数据集、数据集定义、数据增强、数据采样以及数据加载。接下来我将分别对这五个功能点进行详细的讲解。好的,那下面就让我们进入今天的内容吧。
什么是数据管道?
在完成深度学习领域的任务时,我们最先面临的挑战就是数据处理,即需要将数据处理成模型能够"看懂"的语言,从而进行模型的训练。比如,在图像分类任务中,我们需要按格式处理图像数据与其对应的标签,然后才能将其输入到模型中,开始训练。在这个过程中,我们需要将图片数据从jpg、png或其它格式转换为numpy array的格式,然后对其进行一些加工,如重置大小、旋转变换、改变亮度等等,从而进行数据增强。所以,数据的预处理和加载方式很大程度上决定了模型最终的性能水平。传统框架常常包含着复杂的数据加载模式,多重的预处理操作常常会劝退许多人。而飞桨框架为了简化数据管道的流程,对数据管道相关的场景进行了高级封装,通过非常少量代码,即可实现数据的处理,更愉快的进行深度学习模型研发。
数据管道详解
在数据管道总共包含5个模块,分别是飞桨框架内置数据集、自定义数据集、数据增强、数据采样以及数据加载5个部分。关系图如下:

下面,让我来一一介绍这些内容。
2.1 内置数据集
内置数据集介绍:
为了节约大家处理数据时所耗费的时间和精力,飞桨框架将一些我们常用到的数据集作为领域API对用户进行开放,用户通过调用paddle.vision.datasets和paddle.text.datasets即可直接使用领域API,这两个API内置包含了许多CV和NLP领域相关的常见数据集,具体如下:
import paddle
import numpy as np

paddle.__version__
'2.0.0-rc1'

print('视觉相关数据集:', paddle.vision.datasets.__all__)
print('自然语言相关数据集:', paddle.text.datasets.__all__)
视觉相关数据集: ['DatasetFolder', 'ImageFolder', 'MNIST', 'FashionMNIST', 'Flowers', 'Cifar10', 'Cifar100', 'VOC2012']
自然语言相关数据集: ['Conll05st', 'Imdb', 'Imikolov', 'Movielens', 'UCIHousing', 'WMT14', 'WMT16']
内置数据集使用:
为了方便大家理解,这里我演示一下如何使用内置的手写数字识别的数据集,其他数据集的使用方式也类似,大家可以动手试一下哦。具体可以见下面的代码,注意,我们通过使用mode参数用来标识训练集与测试集。调用数据集接口后,相应的API会自动下载数据集到本机缓存目录~/.cache/paddle/dataset。
import paddle.vision as vision


print("训练集下载中...")
# 训练数据集
train_dataset = vision.datasets.MNIST(mode='train')
print("训练集下载完成!")
print("测试集下载中...")
# 验证数据集
test_dataset = vision.datasets.MNIST(mode='test')
print("测试集下载完成!")
训练集下载中...
Cache file /home/aistudio/.cache/paddle/dataset/mnist/train-images-idx3-ubyte.gz not found, downloading https://dataset.bj.bcebos.com/mnist/train-images-idx3-ubyte.gz
Begin to download

Download finished
Cache file /home/aistudio/.cache/paddle/dataset/mnist/train-labels-idx1-ubyte.gz not found, downloading https://dataset.bj.bcebos.com/mnist/train-labels-idx1-ubyte.gz
Begin to download
........
Download finished
训练集下载完成!
测试集下载中...
Cache file /home/aistudio/.cache/paddle/dataset/mnist/t10k-images-idx3-ubyte.gz not found, downloading https://dataset.bj.bcebos.com/mnist/t10k-images-idx3-ubyte.gz
Begin to download

Download finished
Cache file /home/aistudio/.cache/paddle/dataset/mnist/t10k-labels-idx1-ubyte.gz not found, downloading https://dataset.bj.bcebos.com/mnist/t10k-labels-idx1-ubyte.gz
Begin to download
..
Download finished
测试集下载完成!
内置数据集可视化:
通过上面的步骤,我们就定义好了训练集与测试集,接下来,让我们来看一下数据集的内容吧。
import numpy as np
import matplotlib.pyplot as plt


train_data_0, train_label_0 = np.array(train_dataset[0][0]), train_dataset[0][1]
train_data_0 = train_data_0.reshape([28, 28])

plt.figure(figsize=(2, 2))
plt.imshow(train_data_0, cmap=plt.cm.binary)
print('train_data0 label is: ' + str(train_label_0))
train_data0 label is: [5]
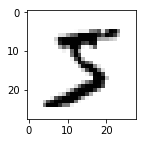
从上例中可以看出,train_dataset 是一个 map-style 式的数据集,我们可以通过下标直接获取单个样本的图像数据与标签,从而进行可视化。
Note: map-style 是指可以通过下标的方式来获取指定样本,除此之外,还有 iterable-style 式的数据集,只能通过迭代的方式来获取样本,具体说明可以见下一节。
2.2 数据集定义
有同学提出虽然飞桨框架提供了许多领域数据集供我们使用,但是在实际的使用场景中,如果我们需要使用已有的数据来训练模型怎么办呢?别慌,飞桨也贴心地准备了 map-style 的 paddle.io.Dataset 基类 和 iterable-style 的 paddle.io.IterableDataset 基类 ,来完成数据集定义。此外,针对一些特殊的场景,飞桨框架也提供了 paddle.io.TensorDataset 基类,可以直接处理 Tensor 数据为 dataset,一键完成数据集的定义。
让我们来看一下它们的使用方式吧~
paddle.io.Dataset的使用方式:
这个是我们最推荐使用的API,来完成数据的定义。使用 paddle.io.Dataset,最后会返回一个 map-style 的 Dataset 类。可以用于后续的数据增强、数据加载等。而使用 paddle.io.Dataset 也非常简单,只需要按格式完成以下四步即可。
class MyDataset(paddle.io.IterableDataset):
    """
    步骤一:继承paddle.io.IterableDataset类
    """
    def __init__(self, mode='train'):
        """
        步骤二:实现构造函数,定义数据读取方式,划分训练和测试数据集
        """
        super(MyDataset, self).__init__()

        if mode == 'train':
            self.data = [
                ['train_image_0.jpg', '1'],
                ['train_image_1.jpg', '2'],
                ['train_image_2.jpg', '3'],
                ['train_image_3.jpg', '4'],
            ]
        else:
            self.data = [
                ['test_image_0.jpg', '1'],
                ['test_image_1.jpg', '2'],
                ['test_image_2.jpg', '3'],
                ['test_image_3.jpg', '4'],
            ]

    def _load_img(self, image_path):
        # 实际使用时使用Pillow相关库进行图片读取即可,这里我们对数据先做个模拟
        image = np.random.randn(32, 32, 3)

        return image

    def __getitem__(self, index):
        """
        步骤三:实现__getitem__方法,定义指定index时如何获取数据,并返回单条数据(训练数据,对应的标签)
        """
        image = self._load_img(self.data[index][0])
        label = self.data[index][1]

        return image, np.array(label, dtype='int64')

    def __len__(self):
        """
        步骤四:实现__len__方法,返回数据集总数目
        """
        return len(self.data)

# 测试定义的数据集
train_dataset = MyDataset(mode='train')
test_dataset = MyDataset(mode='test')

print('=============train dataset=============')
for image, label in train_dataset:
    print('image shape: {}, label: {}'.format(image.shape, label))

print('=============evaluation dataset=============')
for image, label in test_dataset:
    print('image shape: {}, label: {}'.format(image.shape, label))
=============train dataset=============
image shape: (32, 32, 3), label: 1
image shape: (32, 32, 3), label: 2
image shape: (32, 32, 3), label: 3
image shape: (32, 32, 3), label: 4
=============evaluation dataset=============
image shape: (32, 32, 3), label: 1
image shape: (32, 32, 3), label: 2
image shape: (32, 32, 3), label: 3
image shape: (32, 32, 3), label: 4
paddle.io.Dataset实战:
看了上面的例子,你是否想自己动手写一个Dataset呢?就让我用实战来演示一下:
# 下载训练集
!wget http://fashion-mnist.s3-website.eu-central-1.amazonaws.com/train-images-idx3-ubyte.gz
# 下载训练集标签
!wget http://fashion-mnist.s3-website.eu-central-1.amazonaws.com/train-labels-idx1-ubyte.gz
# 下载测试集
!wget http://fashion-mnist.s3-website.eu-central-1.amazonaws.com/t10k-images-idx3-ubyte.gz
# 下载测试集标签
!wget http://fashion-mnist.s3-website.eu-central-1.amazonaws.com/t10k-labels-idx1-ubyte.gz
import os
import gzip
class FashionMNISTDataset(paddle.io.Dataset):
"""
步骤一:继承paddle.io.Dataset类
"""
def __init__(self, path='./', mode='train'):
"""
步骤二:实现构造函数,定义数据读取方式,划分训练和测试数据集
"""
super(FashionMNISTDataset, self).__init__()
images_data_path = os.path.join(path,
'%s-images-idx3-ubyte.gz'
% mode)
labels_data_path = os.path.join(path,
'%s-labels-idx1-ubyte.gz'
% mode)
with gzip.open(labels_data_path, 'rb') as lbpath:
self.labels = np.frombuffer(lbpath.read(), dtype=np.uint8,
offset=8)
with gzip.open(images_data_path, 'rb') as imgpath:
self.images = np.frombuffer(imgpath.read(), dtype=np.uint8,
offset=16).reshape(len(self.labels), 784)
def __getitem__(self, index):
"""
步骤三:实现__getitem__方法,定义指定index时如何获取数据,并返回单条数据(训练数据,对应的标签)
"""
image = self.images[index]
label = self.labels[index]
return image, label
def __len__(self):
"""
步骤四:实现__len__方法,返回数据集总数目
"""
return len(self.images)
# 测试定义的数据集
fashion_mnist_train_dataset = FashionMNISTDataset(mode='train')
fashion_mnist_test_dataset = FashionMNISTDataset(mode='t10k')
# 可视化训练集
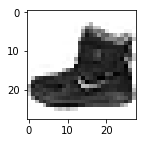
fashion_mnist_train_data_0 = np.array(fashion_mnist_train_dataset[0][0])
fashion_mnist_train_label_0 = fashion_mnist_train_dataset[0][1]
fashion_mnist_train_data_0 = fashion_mnist_train_data_0.reshape([28,28])
plt.figure(figsize=(2,2))
plt.imshow(fashion_mnist_train_data_0, cmap=plt.cm.binary)
print('train_data0 label is: ' + str(fashion_mnist_train_label_0))
train_data0 label is: 9
paddle.io.IterableDataset 的使用方式
使用 paddle.io.IterableDataset,最后会返回一个 iterable-style 的 Dataset 类。而使用 paddle.io.IterableDataset 也非常简单,只需要按格式完成以下两步即可。
import math
import paddle
import numpy as np
from paddle.io import IterableDataset, DataLoader, get_worker_info

class SplitedIterableDataset(IterableDataset):
    """
    步骤一:继承paddle.io.Dataset类
    """
    def __init__(self, start, end):
        self.start = start
        self.end = end

    def __iter__(self):
        """
        步骤二:实现__iter__方法,
        """
        worker_info = get_worker_info()
        if worker_info is None:
            iter_start = self.start
            iter_end = self.end
        else:
            per_worker = int(
                math.ceil((self.end - self.start) / float(
                    worker_info.num_workers)))
            worker_id = worker_info.id
            iter_start = self.start + worker_id * per_worker
            iter_end = min(iter_start + per_worker, self.end)
        for i in range(iter_start, iter_end):
            yield np.array([i])


dataset = SplitedIterableDataset(start=2, end=9)
dataloader = DataLoader(dataset, num_workers=2, batch_size=1, drop_last=True)

for data in dataloader:
    print(data[0].numpy())
[[2]]
[[6]]
[[3]]
[[7]]
[[4]]
[[8]]
[[5]]
paddle.io.TensorDataset的使用方式
上面介绍了两种数据集的定义方式,分别通过继承paddle.io.Dataset与paddle.io.IterableDataset就可以实现。不过,还有一种场景,如果我们已经有了Tensor类型的数据,想要快速、直接的创建Dataset,而不去实现paddle.io.Dataset的各种方法,可以么?这时,我们就可以使用 paddle.io.TensorDataset,直接将 Tensor 类型的 数据与标签传入 TensorDataset 类即可。
快来看看这是怎么实现的吧:
from paddle.io import TensorDataset


input_np = np.random.random([2, 3, 4]).astype('float32')
input_tensor = paddle.to_tensor(input_np)
label_np = np.random.random([2, 1]).astype('int32')
label_tensor = paddle.to_tensor(label_np)

dataset = TensorDataset([input_tensor, label_tensor])

for i in range(len(dataset)):
    input, label = dataset[i]
    print(input, label)
Tensor(shape=[3, 4], dtype=float32, place=CUDAPlace(0), stop_gradient=True,
       [[0.91451722, 0.94088864, 0.52030772, 0.80783033],
        [0.74379814, 0.18669823, 0.41893899, 0.89299613],
        [0.67413408, 0.82801068, 0.02079745, 0.95862854]]) Tensor(shape=[1], dtype=int32, place=CUDAPlace(0), stop_gradient=True,
       [0])
Tensor(shape=[3, 4], dtype=float32, place=CUDAPlace(0), stop_gradient=True,
       [[0.30733261, 0.82390237, 0.99652219, 0.93594497],
        [0.62558615, 0.83836132, 0.34213212, 0.72257715],
        [0.80075997, 0.38913822, 0.25709155, 0.00520579]]) Tensor(shape=[1], dtype=int32, place=CUDAPlace(0), stop_gradient=True,
       [0])
可以看出,我们将Tensor类型的 input 与 label 直接传入TensorDataset中,就可以完成 Dataset 的定义,完全不需要实现上述自定义的那四个步骤。在我们的实际使用中,如果想要简单的做个测试,完全可以直接使用TensorDataset来创建数据集。那么,使用 TensorDataset 有什么要求呢?只有一个要求,就是传入的 Tensor,它们的第一维维度要相同,从上例中可以看出, input 与 label 的第一维都是2,代表数据集的大小。
2.3 数据增强
在训练模型的过程中,我们偶尔会遇到过拟合的问题。这时,最好的做法是增加训练集的数量,以此提升模型的泛化能力。但是,由于获取数据集的成本比较高,所以通常我们都会采用增强训练数据的方式对数据进行处理,从而得到更多不同的数据集。
在计算机视觉领域中,常见的数据增强的方式包括随机裁剪、旋转变换、改变图像亮度、对比度等等。可以看出,这些方法都是对图像的常见处理方式,所以,飞桨框架直接提供了这类的API,定义在paddle.vision.transofrms下,包含了计算机视觉中对图像的各种常用的处理,具体如下:
print("飞桨支持的数据预处理方式:" + str(paddle.vision.transforms.__all__))
飞桨支持的数据预处理方式:['BaseTransform', 'Compose', 'Resize', 'RandomResizedCrop', 'CenterCrop', 'RandomHorizontalFlip', 'RandomVerticalFlip', 'Transpose', 'Normalize', 'BrightnessTransform', 'SaturationTransform', 'ContrastTransform', 'HueTransform', 'ColorJitter', 'RandomCrop', 'Pad', 'RandomRotation', 'Grayscale', 'ToTensor', 'to_tensor', 'hflip', 'vflip', 'resize', 'pad', 'rotate', 'to_grayscale', 'crop', 'center_crop', 'adjust_brightness', 'adjust_contrast', 'adjust_hue', 'normalize']
那么该怎么使用呢?我们这里分两种场景来介绍,一种是飞桨内置数据集使用数据增强,另一种是自定义数据集使用数据增强。
内置数据集使用数据增强:
内置数据集使用数据增强的方式非常简单,我们可以直接定义一个数据预处理的方式,然后将其作为参数,在加载内置数据集的时候,传给 transform 参数即可;而如果我们想对一个数据集进行多个数据预处理的方式,可以先定义一个 transform 的容器 Compose,将我们需要的数据预处理方法以 list 的格式传入 Compose,然后在加载内置数据集的时候,传给 transform 参数即可。
具体可以看下面的例子:
import paddle.vision.transforms as T
# 方式一 只对图像进行调整亮度的操作
transform = T.BrightnessTransform(0.4)
# 通过transform参数传递定义好的数据增方法即可完成对自带数据集的数据增强
train_dataset_without_transform = vision.datasets.Cifar10(mode='train')
train_dataset_with_transform = vision.datasets.Cifar10(mode='train', transform=transform)
index = 10
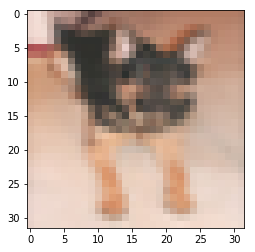
print("未调整亮度的图像")
train_dataset_without_data_0 = np.array(train_dataset_without_transform[index][0])
train_dataset_without_data_0 = train_dataset_without_data_0.astype('float32') / 255.
plt.imshow(train_dataset_without_data_0)
未调整亮度的图像
<matplotlib.image.AxesImage at 0x7fb13e129090>
print("调整亮度的图像")
train_dataset_with_data_0 = np.array(train_dataset_with_transform[index][0])
train_dataset_with_data_0 = train_dataset_with_data_0.astype('float32') / 255.
plt.imshow(train_dataset_with_data_0)
调整亮度的图像
<matplotlib.image.AxesImage at 0x7fb19b1b5f90>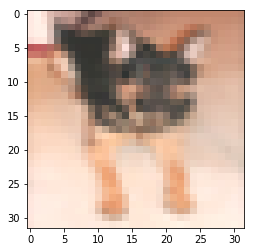
import paddle.vision.transforms as T

# 方式二 对图像进行多种操作
transform = T.Compose([T.BrightnessTransform(0.4), T.ContrastTransform(0.4)])
# 通过transform参数传递定义好的数据增方法即可完成对自带数据集的数据增强
train_dataset_without_compose = vision.datasets.Cifar10(mode='train')
train_dataset_with_compose = vision.datasets.Cifar10(mode='train', transform=transform)

index = 10
print("未调整的图像")
train_dataset_without_compose_data_0 = np.array(train_dataset_without_compose[index][0])
train_dataset_without_compose_data_0 = train_dataset_without_compose_data_0.astype('float32') / 255.
plt.imshow(train_dataset_without_compose_data_0)
未调整的图像
<matplotlib.image.AxesImage at 0x7fb13065fb90>

print("多种调整后的图像")
train_dataset_with_compose_data_0 = np.array(train_dataset_with_compose[index][0])
train_dataset_with_compose_data_0 = train_dataset_with_compose_data_0.astype('float32') / 255.
plt.imshow(train_dataset_with_compose_data_0)
多种调整后的图像
<matplotlib.image.AxesImage at 0x7fb1b818c610>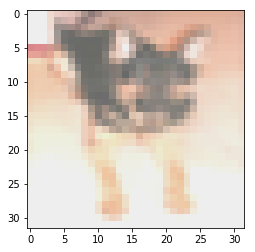
自定义数据集使用数据增强:
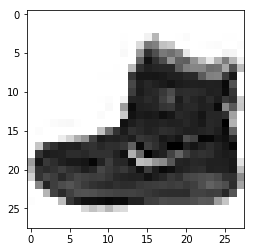
针对自定义数据集使用数据增强的方式, 比较直观的方式是在在数据集的构造函数中进行数据增强方法的定义,之后对__getitem__中返回的数据进行应用。我们以上述中FashionMNIST数据集为例来说明,具体如下:
class FashionMNISTDataset(paddle.io.Dataset):
    """
    步骤一:继承paddle.io.Dataset类
    """
    def __init__(self, path='./', mode='train', transform='None'):
        """
        步骤二:实现构造函数,定义数据读取方式,划分训练和测试数据集
        """
        super(FashionMNISTDataset, self).__init__()

        images_data_path = os.path.join(path,
                               '%s-images-idx3-ubyte.gz'
                               % mode)
        labels_data_path = os.path.join(path,
                               '%s-labels-idx1-ubyte.gz'
                               % mode)
        with gzip.open(labels_data_path, 'rb') as lbpath:
            self.labels = np.frombuffer(lbpath.read(), dtype=np.uint8,
                               offset=8)

        with gzip.open(images_data_path, 'rb') as imgpath:
            self.images = np.frombuffer(imgpath.read(), dtype=np.uint8,
                               offset=16).reshape(len(self.labels), 784)
        self.transform = None
        if transform != 'None':
            self.transform = transform

    def __getitem__(self, index):
        """
        步骤三:实现__getitem__方法,定义指定index时如何获取数据,并返回单条数据(训练数据,对应的标签)
        """
        if self.transform:
            image = self.transform(self.images[index].reshape(28, 28))
        else:
            image = self.images[index]
        label = self.labels[index]

        return image, label

    def __len__(self):
        """
        步骤四:实现__len__方法,返回数据集总数目
        """
        return len(self.images)

# 测试未处理的数据集
fashion_mnist_train_dataset_without_transform = FashionMNISTDataset(mode='train')

# 可视化
fashion_mnist_train_dataset_without_transform = np.array(fashion_mnist_train_dataset_without_transform[0][0])
fashion_mnist_train_dataset_without_transform = fashion_mnist_train_dataset_without_transform.reshape([28, 28])
plt.imshow(fashion_mnist_train_dataset_without_transform, cmap=plt.cm.binary)
<matplotlib.image.AxesImage at 0x7fb130421ed0>
# 测试处理的数据集
from paddle.vision.transforms import RandomVerticalFlip
fashion_mnist_train_dataset_with_transform = FashionMNISTDataset(mode='train', transform=RandomVerticalFlip(0.4))

# 可视化
fashion_mnist_train_dataset_with_transform = np.array(fashion_mnist_train_dataset_with_transform[0][0])
fashion_mnist_train_dataset_with_transform = fashion_mnist_train_dataset_with_transform.reshape([28, 28])
plt.imshow(fashion_mnist_train_dataset_with_transform, cmap=plt.cm.binary)
<matplotlib.image.AxesImage at 0x7fb130367b50>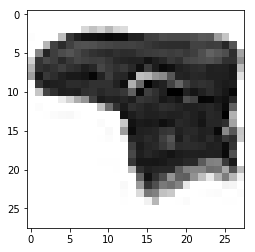
2.4 数据加载
当我们定义了数据集后,就需要加载数据集。我们可以通过 paddle.io.DataLoader 完成数据的加载。
train_loader = paddle.io.DataLoader(train_dataset, batch_size=64, shuffle=True)

for batch_id, data in enumerate(train_loader()):
    x_data = data[0]
    y_data = data[1]
    print(x_data.numpy().shape)
    print(y_data.numpy().shape)
    break
(4, 32, 32, 3)
(4,)
DataLoader 可以加载我们定义好的数据集。虽然看起来很简单是很简单的操作,但是,DataLoader 的参数中包含了许多强大的功能。如 shuffle 设为 True, 可以对下标进行随机打散的操作;drop_last 设为 True 可以丢掉最后一个不满足 batch_size 大小的 batch;num_workers 可以设置多个子进程来加速数据加载。此外,我们还可以针对不同的数据集,设置不同的采样器,来完成数据的采样。
2.5 数据采样
飞桨框架提供了多种数据采样器,用于不同的场景,来提升训练模型的泛化性能。飞桨框架包含的采样器如下:paddle.io.BatchSampler 、 paddle.io.DistributedBatchSampler 、paddle.io.RandomSampler、paddle.io.SequenceSampler 等,接下来来一一介绍。
from paddle.io import SequenceSampler, RandomSampler, BatchSampler, DistributedBatchSampler

class RandomDataset(paddle.io.Dataset):
    def __init__(self, num_samples):
        self.num_samples = num_samples

    def __getitem__(self, idx):
        image = np.random.random([784]).astype('float32')
        label = np.random.randint(0, 9, (1, )).astype('int64')
        return image, label

    def __len__(self):
        return self.num_samples

train_dataset = RandomDataset(100)

print('-----------------顺序采样----------------')
sampler = SequenceSampler(train_dataset)
batch_sampler = BatchSampler(sampler=sampler, batch_size=10)

for index in batch_sampler:
    print(index)

print('-----------------随机采样----------------')
sampler = RandomSampler(train_dataset)
batch_sampler = BatchSampler(sampler=sampler, batch_size=10)

for index in batch_sampler:
    print(index)

print('-----------------分布式采样----------------')
batch_sampler = DistributedBatchSampler(train_dataset, num_replicas=2, batch_size=10)

for index in batch_sampler:
    print(index)

-----------------顺序采样----------------
[0, 1, 2, 3, 4, 5, 6, 7, 8, 9]
[10, 11, 12, 13, 14, 15, 16, 17, 18, 19]
[20, 21, 22, 23, 24, 25, 26, 27, 28, 29]
[30, 31, 32, 33, 34, 35, 36, 37, 38, 39]
[40, 41, 42, 43, 44, 45, 46, 47, 48, 49]
[50, 51, 52, 53, 54, 55, 56, 57, 58, 59]
[60, 61, 62, 63, 64, 65, 66, 67, 68, 69]
[70, 71, 72, 73, 74, 75, 76, 77, 78, 79]
[80, 81, 82, 83, 84, 85, 86, 87, 88, 89]
[90, 91, 92, 93, 94, 95, 96, 97, 98, 99]
-----------------随机采样----------------
[9, 7, 54, 93, 84, 14, 12, 46, 67, 72]
[10, 57, 32, 61, 38, 71, 63, 51, 37, 11]
[21, 76, 69, 22, 48, 88, 19, 59, 47, 60]
[89, 85, 31, 80, 91, 30, 50, 52, 39, 3]
[70, 45, 62, 75, 35, 8, 96, 94, 5, 98]
[49, 33, 28, 13, 18, 42, 90, 0, 36, 79]
[81, 15, 6, 78, 40, 86, 2, 23, 95, 43]
[87, 65, 68, 25, 99, 26, 73, 82, 1, 53]
[77, 29, 17, 44, 55, 4, 56, 64, 97, 83]
[66, 41, 16, 74, 92, 34, 27, 24, 58, 20]
-----------------分布式采样----------------
[0, 1, 2, 3, 4, 5, 6, 7, 8, 9]
[20, 21, 22, 23, 24, 25, 26, 27, 28, 29]
[40, 41, 42, 43, 44, 45, 46, 47, 48, 49]
[60, 61, 62, 63, 64, 65, 66, 67, 68, 69]
[80, 81, 82, 83, 84, 85, 86, 87, 88, 89]
总结
恭喜同学们学会了数据集的下载、数据集的自定义、数据的预处理以及数据的批加载等知识,大家已经可以很好地应对模型训练任务的第一步啦。那么今天的课程到这里就结束了,对课程内容有疑问或者建议的同学可以在评论区留言,看到后我会及时回复哦,最后希望大家fork一下该项目,不然就找不到这个课程了。我是雨哥,下节课见~
下载安装命令

## CPU版本安装命令
pip install -f https://paddlepaddle.org.cn/pip/oschina/cpu paddlepaddle

## GPU版本安装命令
pip install -f https://paddlepaddle.org.cn/pip/oschina/gpu paddlepaddle-gpu
本文同步分享在 博客“飞桨PaddlePaddle”(CSDN)。
如有侵权,请联系 [email protected] 删除。
本文参与“OSC源创计划”,欢迎正在阅读的你也加入,一起分享。
Recommend
About Joyk
Aggregate valuable and interesting links.
Joyk means Joy of geeK