

手写Vue源码(二) - 文本编译
source link: https://zhuanlan.zhihu.com/p/342064915
Go to the source link to view the article. You can view the picture content, updated content and better typesetting reading experience. If the link is broken, please click the button below to view the snapshot at that time.

手写Vue源码(二) - 文本编译
源码地址:传送门
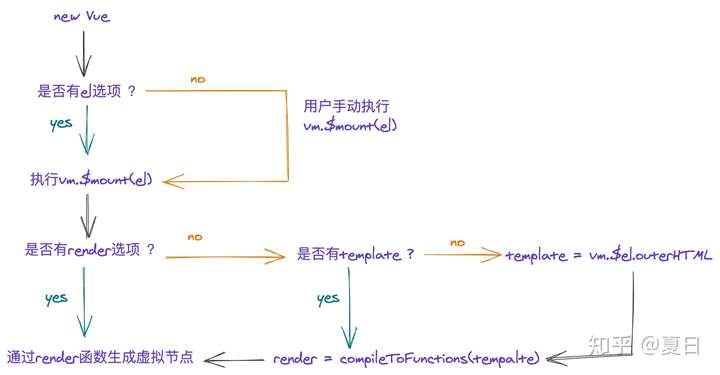
在数据劫持中,我们完成了Vue中data选项中数据的初始操作。这之后需要将html字符串编译为render函数,其核心逻辑如下:
有render函数的情况下会直接使用传入的render函数,而在没有render函数的情况下,需要将template编译为render函数。其具体逻辑如下:
- 获取
template字符串 - 将
template字符串解析为ast抽象语法树 - 将
ast抽象语法树生成代码字符串 - 将字符串处理为
render函数赋值给vm.$options.render
获取template字符串
在进行template解析之前,会进行一系列的条件处理,得到最终的template,其处理逻辑如下:
在src/init.js中书写如下代码:
/**
 * 将字符串处理为dom元素
 * @param el
 * @returns {Element|*}
 */
function query (el) {
  if (typeof el === 'string') {
    return document.querySelector(el);
  }
  return el;
}

function initMixin (Vue) {
  Vue.prototype._init = function (options) {
    const vm = this;
    vm.$options = options;
    initState(vm);
    const { el } = options;
    // el选项存在,会将el通过vm.$mount方法进行挂载
    // el选项如果不存在,需要手动调用vm.$mount方法来进行组件的挂载
    if (el) {
      vm.$mount(el);
    }
  };
  Vue.prototype.$mount = function (el) {
    el = query(el);
    const vm = this;
    const options = vm.$options;
    if (!options.render) { // 有render函数,优先处理render函数
      let template = options.template;
      // 没有template,使用el.outerHTML作为template
      if (!template && el) {
        template = el.outerHTML;
      }
      options.render = compileToFunctions(template);
    }
  };
}
当我们得到最终的template后,需要调用compileToFunctions将template转换为render函数。在compileToFunctions中就是模板编译的主要逻辑。
创建src/compiler/index.js文件,其代码如下:
export function compileToFunctions (template) {
  // 将html解析为ast语法树
  const ast = parseHtml(template);
  // 通过ast语法树生成代码字符串
  const code = generate(ast);
  // 将字符串转换为函数
  return new Function(`with(this){return ${code}}`);
}
解析html
当拿到对应的html字符串后,需要通过正则来将其解析为ast抽象语法树。简单来说就是将html处理为一个树形结构,可以很好的表示每个节点的父子关系。
下面是一段html,以及表示它的ast:
<body>
<div id="app">
  hh
  <div id="aa" style="font-size: 18px;">hello {{name}} world</div>
</div>
<script>
  const vm = new Vue({
    el: '#app',
    data () {
      return {
        name: 'zs',
      };
    },
  });
</script>
</body>
const ast = {
tag: 'div', // 标签名
attrs: [{ name: 'id', value: 'app' }], // 属性数组
type: 1, // type:1 是元素,type: 3 是文本
parent: null, // 父节点
children: [] // 孩子节点
}
html的解析逻辑如下:
- 通过正则匹配开始标签的开始符号、匹配标签的属性、匹配开始标签结束符号、匹配文本、匹配结束标签
while循环html字符串,每次删除掉已经匹配的字符串,直到html为空字符串时,说明整个文本匹配完成- 通过栈数据结构来记录所有正在处理的标签,并且根据标签的入栈出栈顺序生成树结构
代码中通过advance函数来一点点删除被匹配的字符串,其逻辑比较简单,只是对字符串进行了截取:
// 删除匹配的字符串
function advance (length) {
  html = html.slice(length);
}
首先处理开始标签和属性。
以<开头的字符串为开始标签或结束标签,通过正则匹配开始标签,可以通过分组得到标签名。之后循环匹配标签的属性,直到匹配到结尾标签。在这过程中要将匹配到的字符串通过advance进行删除。
export function parseHtml (html) {
  function parseStartTag () {
    const start = html.match(startTagOpen);
    if (start) {
      const match = { tag: start[1], attrs: [] };
      // 开始解析属性,直到标签闭合
      advance(start[0].length);
      let end = html.match(startTagClose);
      let attr = html.match(attribute);
      // 循环处理属性
      while (!end && attr) {
        match.attrs.push({
          name: attr[1],
          value: attr[3] || attr[4] || attr[5]
        });
        advance(attr[0].length);
        end = html.match(startTagClose);
        attr = html.match(attribute);
      }
      if (end) {
        advance(end[0].length);
      }
      return match;
    }
  }

  // 注意:在template中书写模板时可能开始和结束会有空白
  html = html.trim();
  while (html) {
    // 开始和结束标签都会以 < 开头
    const textEnd = html.indexOf('<');
    if (textEnd === 0) {
      // 处理开始标签
      const startTag = parseStartTag();
      if (startTag) {
        start(startTag.tag, startTag.attrs);
      }
      // some code ...
    }
    // some code...
  }
  return root;
}
在获得开始标签的标签名和属性后,通过start函数,可以生成树根以及每一个入栈标签对应ast元素并确定父子关系:
// 树 + 栈
function createASTElement (tag, attrs) {
  return {
    tag,
    type: 1,
    attrs,
    children: [],
    parent: null
  };
}

let root, currentParent;
const stack = [];

function start (tag, attrs) {
  const element = createASTElement(tag, attrs);
  if (!root) {
    root = element;
  } else {
    // 记录父子关系
    currentParent.children.push(element);
    element.parent = currentParent;
  }
  currentParent = element;
  stack.push(element);
}
以一段简单的html为例,我们画图看下其具体的出栈入栈逻辑:
<div id="app">
  <h2>
    hello world
    <span> xxx </span>
  </h2>
</div> 通过对象的引用关系,最终便能得到一个树形结构对象root。
解析完开始标签后,剩余的文本起始字符串可能为:
- 下一个开始标签
如果仍然是开始标签,会重复上述逻辑。如果是文本内容,<字符的索引会大于0,只需要将[0, textEnd)之间的文本截取出来放到父节点的children中即可:
export function parseHtml (html) {

  // 树 + 栈
  let root, currentParent;
  const stack = [];

  function char (text) {
    // 替换所有文本中的空格
    text = text.replace(/\s/g, '');
    if (currentParent && text) {
      // 将文本放到对应的父节点的children数组中,其type为3,标签type为1
      currentParent.children.push({
        type: 3,
        text,
        parent: currentParent
      });
    }
  }

  while (html) {
    // some code ...
    //  < 在之后的位置,说明要处理的是文本内容
    if (textEnd > 0) { // 处理文本内容
      let text = html.slice(0, textEnd);
      if (text) {
        char(text);
        advance(text.length);
      }
    }
  }
  return root;
}
最后来处理结束标签。
匹配到结束标签时要将stack中最后一个元素出栈,更新currentParent,直到stack中的元素为空时。就得到了完整的ast抽象语法树:
export function parseHtml (html) {
  // 树 + 栈
  let root, currentParent;
  const stack = [];

  // 每次处理好前一个,最后将所有元素作为子元素push到root节点中
  function end (tag) { // 在结尾标签匹配时可以确立父子关系
    stack.pop();
    currentParent = stack[stack.length - 1];
  }

  while (html) {
    // 开始和结束标签都会以 < 开头
    const textEnd = html.indexOf('<');
    if (textEnd === 0) {
      // some code ...
      // 处理结尾标签
      const endTagMatch = html.match(endTag);
      if (endTagMatch) {
        end(endTagMatch[1]);
        advance(endTagMatch[0].length);
      }
    }
    // some code ...
  }
  return root;
}
到这里我们拿到了一个树形结构对象ast,接下来要根据这个树形结构,递归生成代码字符串
生成代码字符串
先看下面一段html字符串生成的代码字符串是什么样子的:
<body>
<div id="app">
  hh
  <div id="aa" style="color: red;">hello {{name}} world</div>
</div>
<script>
  const vm = new Vue({
    el: '#app',
    data () {
      return {
        name: 'zs',
      };
    },
  });
</script>
</body>
最终得到的代码字符串如下:
const code = `_c("div",{id:"app"},_v("hh"),_c("div"),{id:"aa",style:{color: "red"}},_v("hello"+_s(name)+"world"))`
最终会将上述代码通过new Function(with(this) { return ${code}})转换为render函数,而在render函数执行时通过call来将this指向vm 。所以代码字符串中的函数和变量都会从vm上进行查找。
下面是代码字符串中用到的函数的含义:
_c: 创建虚拟元素节点createVElement_v: 创建虚拟文本节点createTextVNode_s:stringify对传入的值执行JSON.stringify
接下来开始介绍如何将ast树形对象处理为上边介绍到code。
创建src/compiler/generate.js文件,需要解析的内容如下:
- 递归处理
children
标签处理比较简单,直接获取ast.tag即可。
属性在代码字符串中是以对象的格式存在,而在ast中是数组的形式。这里需要遍历数组,并将其name和value处理为对象的键和值。需要注意style属性要特殊处理
function genAttrs (attrs) {
  if (attrs.length === 0) {
    return 'undefined';
  }
  let str = '';
  for (let i = 0; i < attrs.length; i++) {
    const attr = attrs[i];
    if (attr.name === 'style') {
      const styleValues = attr.value.split(',');
      // 可以对对象使用JSON.stringify来进行处理
      attr.value = styleValues.reduce((obj, item) => {
        const [key, val] = item.split(':');
        obj[key] = val;
        return obj;
      }, {});
    }
    str += `${attr.name}:${JSON.stringify(attr.value)}`;
    if (i !== attrs.length - 1) {
      str += ',';
    }
  }
  return `{${str}}`;
}

// some code ...

export function generate (el) {
  const children = genChildren(el.children);
  return `_c("${el.tag}", ${genAttrs(el.attrs)}${children ? ',' + children : ''})`;
}
在用,拼接对象时,也可以先将每一部分放到数组中,通过数组的join方法用,来拼接为字符串。
标签和属性之后的参数都为孩子节点,要以函数参数的形式用,进行拼接,最终在生成虚拟节点时会通过...扩展运算符将其处理为一个数组:
function gen (child) {
  if (child.type === 1) {
    // 将元素处理为代码字符串并返回
    return generate(child);
  } else if (child.type === 3) {
    return genText(child.text);
  }
}

// 将children处理为代码字符串并返回
function genChildren (children) { // 将children用','拼接起来
  const result = [];
  for (let i = 0; i < children.length; i++) {
    const child = children[i];
    // 将生成结果放到数组中
    result.push(gen(child));
  }
  return result.join(',');
}

export function generate (el) {
  const children = genChildren(el.children);
  return `_c("${el.tag}", ${genAttrs(el.attrs)}${children ? ',' + children : ''})`;
}
在生成孩子节点时,需要判断每一项的类型,如果是元素会继续执行generate方法来生成元素对应的代码字符串,如果是文本,需要通过genText方法来进行处理:
const defaultTagRE = /\{\{((?:.|\r?\n)+?)\}\}/g;

function genText (text) {
  if (!defaultTagRE.test(text)) {
    return `_v(${JSON.stringify(text)})`;
  }
  // <div id="aa">hello {{name}} xx{{msg}} hh <span style="color: red" class="bb">world</span></div>
  const tokens = [];
  let lastIndex = defaultTagRE.lastIndex = 0;
  let match;
  while (match = defaultTagRE.exec(text)) {
    // 这里的先后顺序如何确定? 通过match.index和lastIndex的大小关系
    // match.index === lastIndex时,说明此时是{{}}中的内容,前边没有字符串
    if (match.index > lastIndex) {
      tokens.push(JSON.stringify(text.slice(lastIndex, match.index)));
    }
    // 然后将括号内的元素放到数组中
    tokens.push(`_s(${match[1].trim()})`);
    lastIndex = defaultTagRE.lastIndex;
  }
  if (lastIndex < text.length) {
    tokens.push(JSON.stringify(text.slice(lastIndex)));
  }
  return `_v(${tokens.join('+')})`;
}
genText中会利用lastIndex以及match.index来循环处理每一段文本。由于正则添加了g标识,每次匹配完之后,都会将lastIndex移动到下一次开始匹配的位置。最终匹配完所有的{{}} 文本后,match=null并且lastIndex=0,终止循环。
在{{}}中的文本需要放到_s() 中,每段文本都会放到数组tokens中,最后将每段文本通过+拼接起来。最终在render函数执行时,会进行字符串拼接操作,然后展示到页面中。
代码中用到的lastIndex和match.index的含义分别如下:
lastIndex: 字符串下次开始匹配的位置对应的索引match.index: 匹配到的字符串在原字符串中的索引
其匹配逻辑如下图所示:
在上边的逻辑完成后,会得到最终的code,下面需要将code处理为render函数。
生成render函数
在js中,new Function可以通过字符串来创建一个函数。利用我们之前生成的字符串再结合new Function便可以得到一个函数。
而字符串中的变量最终会到vm实例上进行取值,with可以指定变量的作用域,下面是一个简单的例子:
const obj = { a: 1, b: 2 }
with (obj) {
  console.log(a) // 1
  console.log(b) // 2
}
利用new Function和with的相关特性,可以得到如下代码:
const render = new Function(`with(this){return ${code}}`)
到这里,我们便完成了compileToFunctions函数的功能,实现了文章开始时这行代码的逻辑:
vm.$options.render = compileFunctions(template)
文本中代码主要涉及的知识如下:
- 通过栈+树这俩种数据结构,通过正则将
html解析为树 - 利用正则表达式来进行字符串的匹配实现相应的逻辑
文章中介绍到的整个逻辑,也是Vue在文本编译过程中的核心逻辑。希望小伙伴在读完本文之后,可以对Vue如何解析template有更深的理解,并可以尝试阅读其源码。
Recommend
About Joyk
Aggregate valuable and interesting links.
Joyk means Joy of geeK