

Java Tutorial | Java Programming Made Easy | Learn Java | Edureka
source link: https://www.edureka.co/blog/java-tutorial/
Go to the source link to view the article. You can view the picture content, updated content and better typesetting reading experience. If the link is broken, please click the button below to view the snapshot at that time.

Java Tutorial For Beginners – Java Programming Made Easy!
Last updated on Sep 16,2020 168.4K ViewsIn this Java Tutorial blog, I am going to introduce you to some of the basic concepts of Java. But before moving ahead, I would suggest you get familiar with “What is Java”, features of Java and how can you install Java on your system, which I have covered in my previous blog. This will help you grab the coming concepts quickly and easily. The other blogs in this Java tutorial series written by our Java Training experts will cover all the important topics of Java & J2EE in depth.
Now, let us move ahead in this Java Tutorial blog, where we will understand each aspect of Java in the following sequence.
Installation of Java
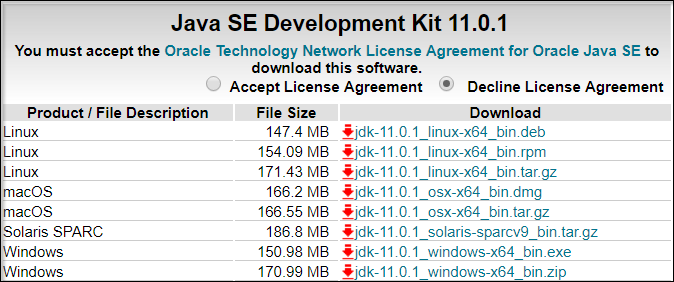
The first step of learning Java would be to install and set up Java Environment. I will redirect you to the download link for Java. Once you enter the downloading web page, you will be able to see something like this as shown below.
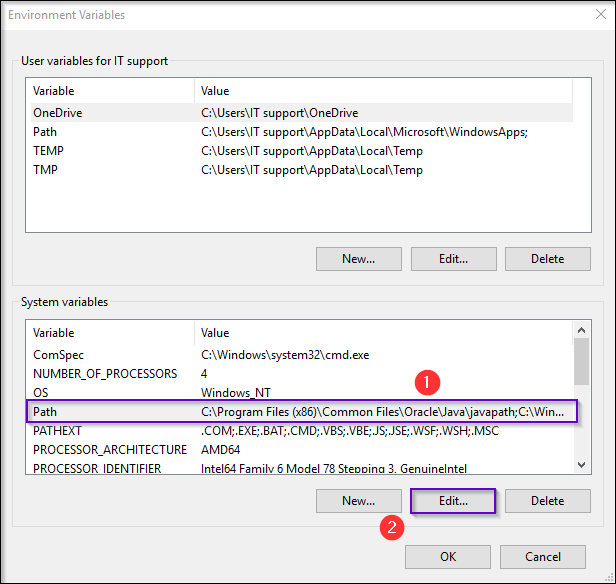
Once you download the required JDK file, go ahead and set the environment for Java. Go to windows advanced settings and select environment variables. You should be able to see the following Dialogue box as shown below.
Steps to locate Environment variables.
- Go to Start and search for ‘System’
- Click on ‘System’
- Click on ‘Advanced system settings’
- Click on ‘Environment Variables’ under ‘Advanced’ tab as shown below

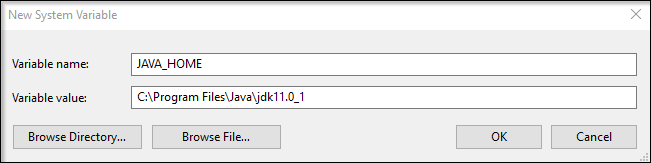
Next, under system variables choose new and enter the variable name as ‘JAVA_HOME’ and the full path to Java installation directory as per your system as shown below
Below figure depicts the configuration of environment variable name and value.
Next thing that you have to do is to configure your environment variables. Let’s see how to do that. Here, you have to edit the path of the system variable as shown below.

Under ‘Variable value’, at the end of the line, enter the following path – %JAVA_HOME%bin;
Now, you can click ‘OK’ and you are done.
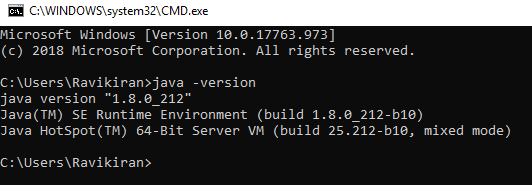
Now to cross-check the installation, just run following command in cmd – java -version. It should display the installed version of Java in your system.
Now You have successfully installed Java into your local system.
Features of Java

Open Source
Java since its birth, till today, is an open-source product and it has all the public access. programmers are free to post entire source code for anyone to download, copy, redistribute them, which is usually part of the GPL (General Public License,) the license that usually comes with open-source software.
High Performance
Java is an interpreted language, so it will never be as fast as a compiled language like C or C++. But, Java enables high performance with the use of the just-in-time compiler.
Multi-Threading
Java multithreading feature makes it possible to write a program that can do many tasks simultaneously. The benefit of multithreading is that it utilizes the same memory and other resources to execute multiple threads at the same time, like While typing, grammatical errors are checked along.
Secure
When it comes to security, Java is always the first choice. With java secure features it enables us to develop virus-free, temper free system. Java program always runs in Java runtime environment with almost null interaction with system OS, hence it is more secure.
Platform independent
Unlike other programming languages such as C, C++ etc which are compiled into platform-specific machines. Java is guaranteed to be write-once, run-anywhere language. On compilation, Java program is compiled into bytecode. This bytecode is platform-independent and can be run on any machine, plus this bytecode format also provides security. Any machine with Java Runtime Environment can run Java Programs.
Portability
The cross-platform feature enables the Java code to be highly portable. Programmers can write code in windows and execute the same code in Linux Operating System.
Object-Oriented
In java, everything is an object which has some data and behaviour. Java can be easily extended as it is based on Object Model.
Robust
Java makes an effort to eliminate error-prone codes by emphasizing mainly on compile-time error checking and runtime checking. But the main areas which Java improved were Memory Management and mishandled Exceptions by introducing automatic Garbage Collector and Exception Handling.
Let’s get started with the first topic in the Java Tutorial blog i.e Hello World Program.
Hello World Program
I will give you a simple overview of how a Java program looks like. In the below code, I have created a class – MyFirstJavaProgram and printed “Hello World”. Go ahead and try to execute the below example in your Eclipse IDE. Do not worry, we will discuss the Java class in a while.
public class FirstProgram { public static void main(String[] args){ System.out.println("Hello World"); } } //Output:
Hello World
Next, let us understand different member variables in Java.
Java Tutorial: Member Variables
A member variable plays a major role in a class as it is used to store a data value. When we define a class, we can declare a member variable. These variables are members of a class.
Member variables are further classified into three types:
- Local variable
- Instance variable
- Class/Static variable
Let me discuss each one of them:
Local variable: These are the variables which are declared within the method of a class. Let’s understand this with a programmatic example:
public class Car {public void display(int m){ // Methodint model=m; // Created a local variable modelSystem.out.println("Model of the car is" +model);}}In the above code, my local variable is ‘model’ which I have declared inside a method ‘display’ which has a parameter-‘m’.
Instance variable: Instance variable is declared in a class but outside a method, constructor or any block. Let’s understand this with a programmatic example.
public class Car {public String color; // Created an instance variable colorCar(String c){color=c;}public void display() { // Method System.out.println("color of the car is"+color);}public static void main(String args[]){Car obj=new Car("black");obj.display();}}In the above code, ‘colour’ is my instance variable which has a value “black” associated with it.
Class variable: Class variables are also called as static variables. These variables have only one copy that is shared by all the different objects in a class. Let’s understand this with a programmatic example.
public class Car {public static int tyres; // Created a class variable tyrespublic static void main(String args[]){tyres=4;System.out.println("Number of tyres are"+tyres);}}All cars must be having 4 tyres, right? So in my above code, I have declared a static variable as ‘tyre’ whose value remains same throughout the class.
Let’s move ahead in this Java Tutorial blog and look at our next topic i.e data types and operators in Java.
Java Tutorial: Datatypes
A data type is used to represent different values which are stored in a variable. They are mainly classified into 4 different aspects – Integer, Float, Character and Boolean. You can refer to the below image to understand the different data types with respect to the memory allocated to them.
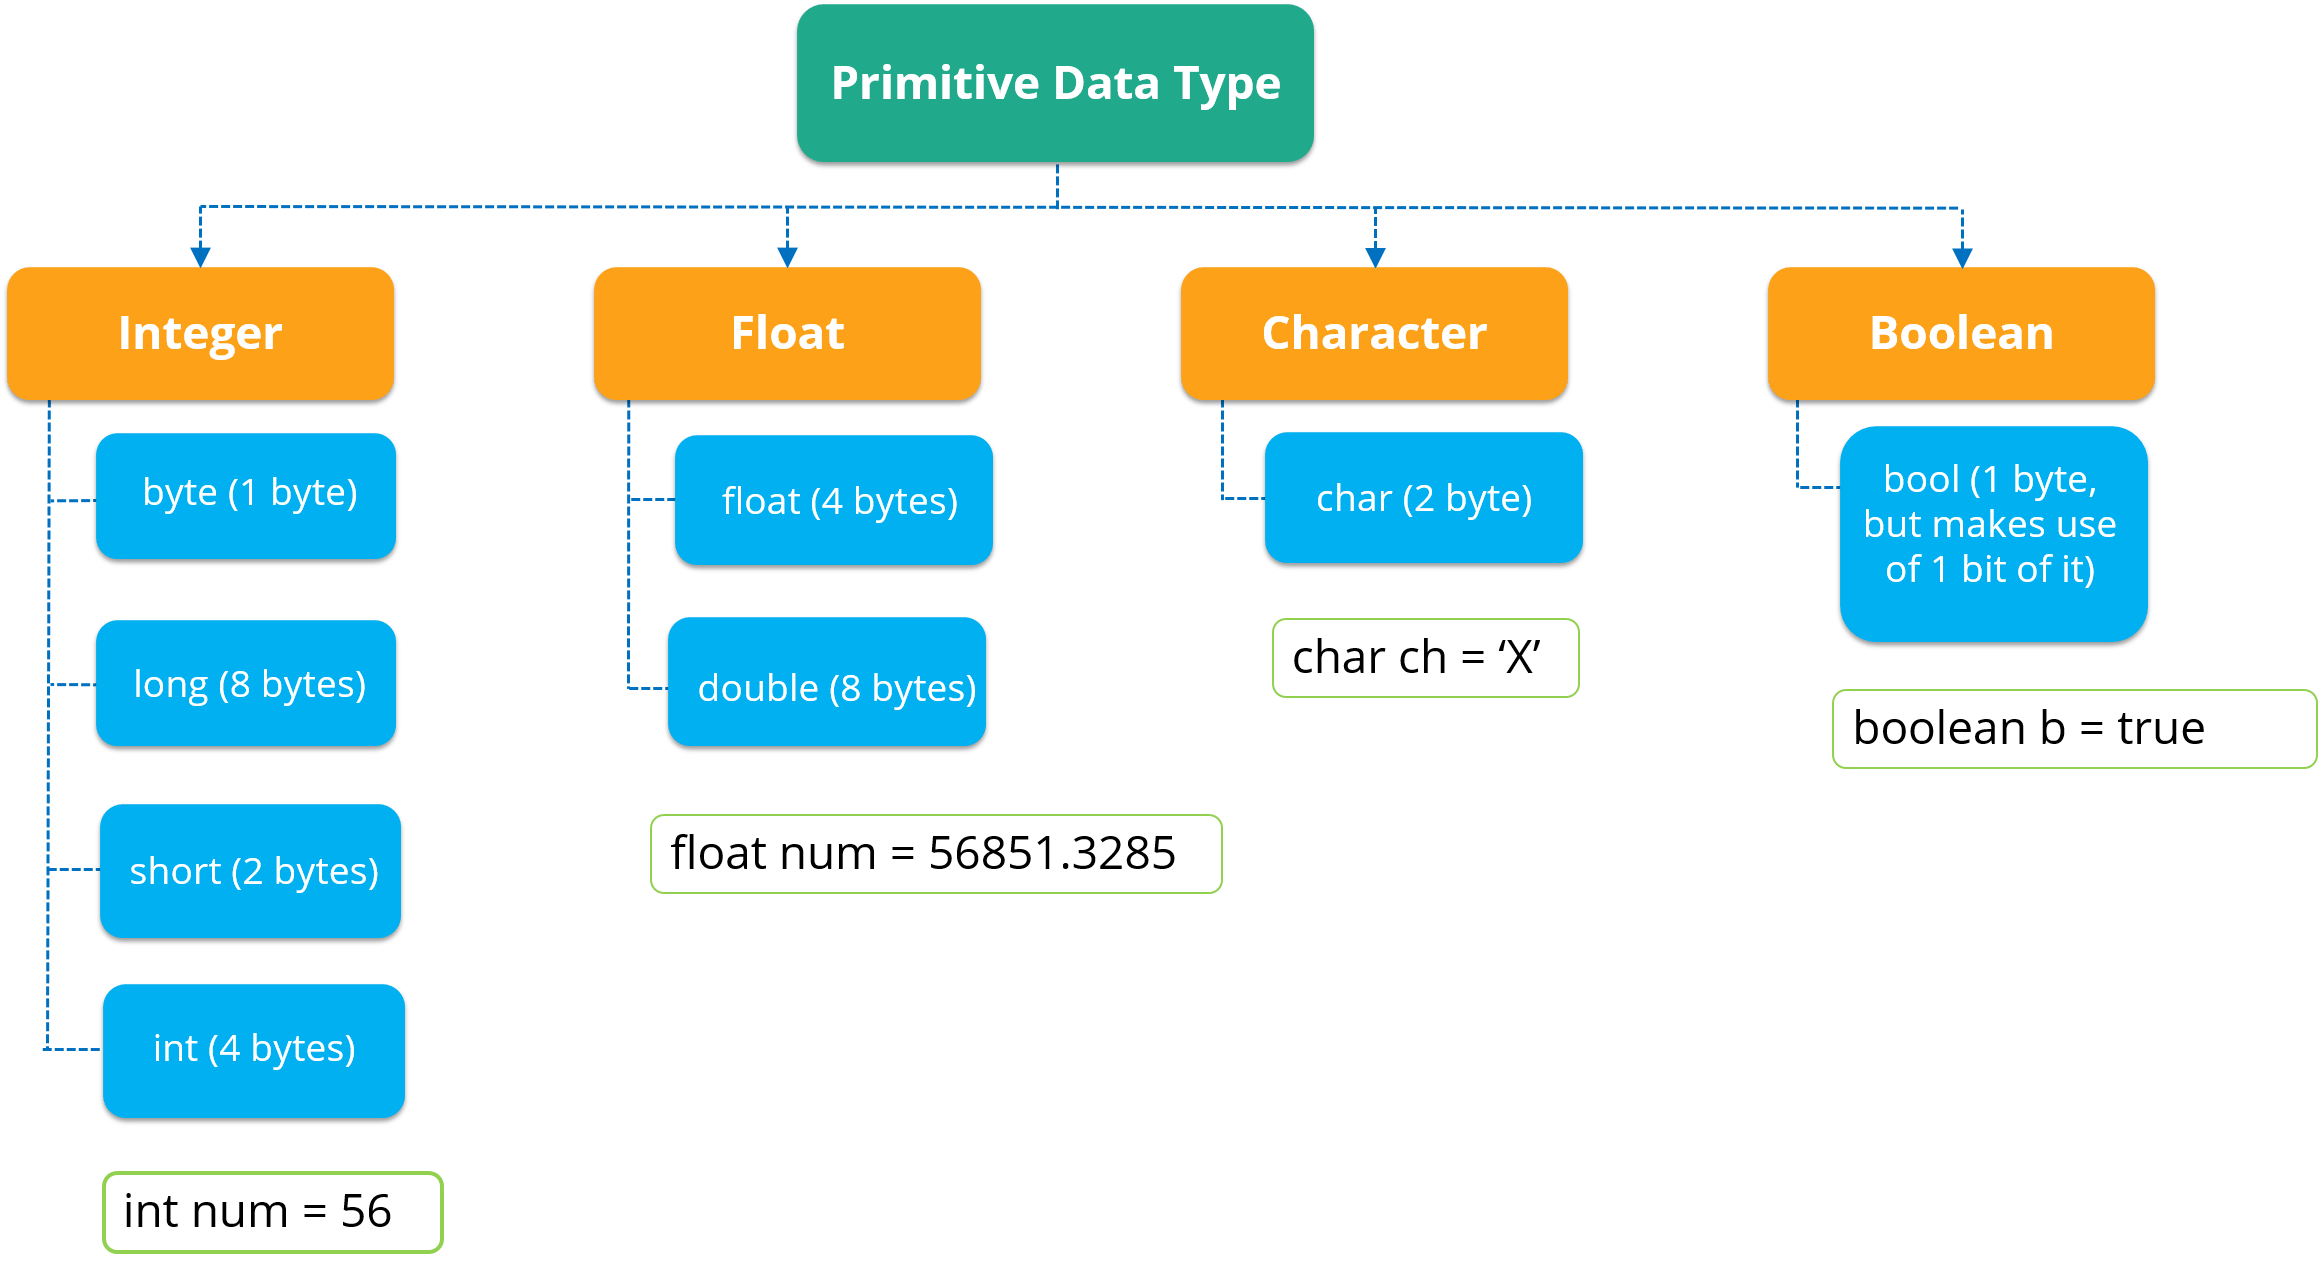
As you can see in the above image, data types are of 4 major types.
- The first data type is an Integer which stores a numerical value.
- Now, if a numerical value contains the decimal part, it will be referred to as a float Datatype.
- Next, if you wish to store a character, then the third data type i.e char is used. In char, you can store any alphabetical character as well as a special character.
- The last data type is Boolean which stores only ‘true’ or ‘false’ value.
Let’s move forward and look at the various data operations which you can perform in Java.
Java Tutorial: Data Operators
There are mainly 4 different types of operators, which are listed below:
- Arithmetic Operator: Perform arithmetic operations such as addition, subtraction, multiplication, division and modulus.
- Unary Operator: Unary operators are used to increments or decrements a particular value. For example: ++ stands for increment, – – stands for decrements.
- Relational Operator: It defines some kind of relation between two entities. For example: <, >, <=, >=, !=, ==.
- Logical Operator: Logical operators are typically used with boolean (logical) values.
To know more about operators in Java, please go through this article link
Meanwhile, you may go through this Java Tutorial video where all the concepts related to Java has been clearly explained using an example:
Java Tutorial for Beginners | Java Programming Tutorial | Edureka

Next, let us move forward in Java Tutorial blog and understand the concept of control statements.
Java Tutorial: Control statements
Control statements are the statements that define the flow of your program. There are the following types of control statements in Java
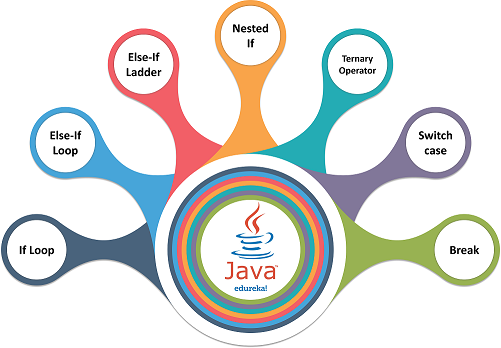

They suggest the computer that it should carry out the execution of a particular segment of code, given the condition stated is true and valid. The Conditional Statements are classified as shown below
If Condition
If Statement is a programming conditional statement that executes a code segment over a condition, provided if it is true and valid. Below is an example of an If statement.

//Find if the number is positive or negative.
Package ifloop;public class ifloop {public static void main(String[] args) {int number = -10;if (number > 0) {System.out.println("Number is positive.");}System.out.println("The number is negative.");}}//Output:
The number is negative.
Else-If Condition
Else If Conditional Statement is used to execute one statement out of the two. The Conditional Statement executes the code segment provided is true and valid. Below is an example of an If statement.

//Find if the number is Even or Odd
package Esleifloop;import java.util.Scanner;public class elseifloop {public static void main(String[] args) {Scanner kb = new Scanner(System.in);System.out.println("Enter any integer value");int a=kb.nextInt();if(a%2==0){System.out.println("even number");} else{System.out.println("odd number");}}}//Output:
Enter any integer value21odd number
Else-If Ladder
Else if Ladder is set of consecutive Else-If statements which are used to execute one true and valid statement out of a collection of given statements. Below is an example for Else-If Ladder.

//Selecting the Vehicle of your Choice.
package elseifladder;import java.util.Scanner;public class ladder {public static void main(String[] args) {Scanner kb = new Scanner(System.in);System.out.println("Enter your chioce, 1 for the Sedan, 2 for SUV, 3 for Sports, 4 Cross Breed");int choice=kb.nextInt();if(choice==1){System.out.println("Sedan Class");}else if(choice==2){System.out.println("SUV Class");}else if(choice==3){System.out.println("Sports Class");}else if(choice==4){System.out.println("Cross-Breed Segment");} else {System.out.println("Invalid Choice");}}}//Output:
Enter your choice, 1 for the Sedan, 2 for SUV, 3 for Sports, 4 Cross-Breed
3Sports Class
Nested If Condition
Nested-If is a conditional statement where one Else-If statement is embedded into another If statement. The following program is an example for Nested If condition.

//Find the greatest number out of the given three numbers
package nestedif;public class nested {public static void main(String[] args) {int n1 = 20, n2 = 30, n3 = 10, greatest;if (n1 >= n2) {if (n1 >= n3) {greatest = n1;} else {greatest = n3;}} else {if (n2 >= n3) {greatest = n2;} else {greatest = n3;}}System.out.println("Largest number is " + greatest);}}//Output:
Largest number is 30
Ternary Operator
Ternary Operator is a conditional statement which has three arguments. First one is a conditional argument and the second is the result upon a true comparison, and the third is the result upon a false comparison.
//Find the greatest of the two numbers
package Ternary;import java.util.Scanner;public class Ternaryoperators {public static void main(String[] args) {Scanner kb = new Scanner(System.in);System.out.println("Enter any integer value to a");int a=kb.nextInt();System.out.println("Enter any integer value to b");int b=kb.nextInt();int greater = (a < b) ? a : b;System.out.println(greater);}}//Output:
Enter any integer value to a10Enter any integer value to b2525
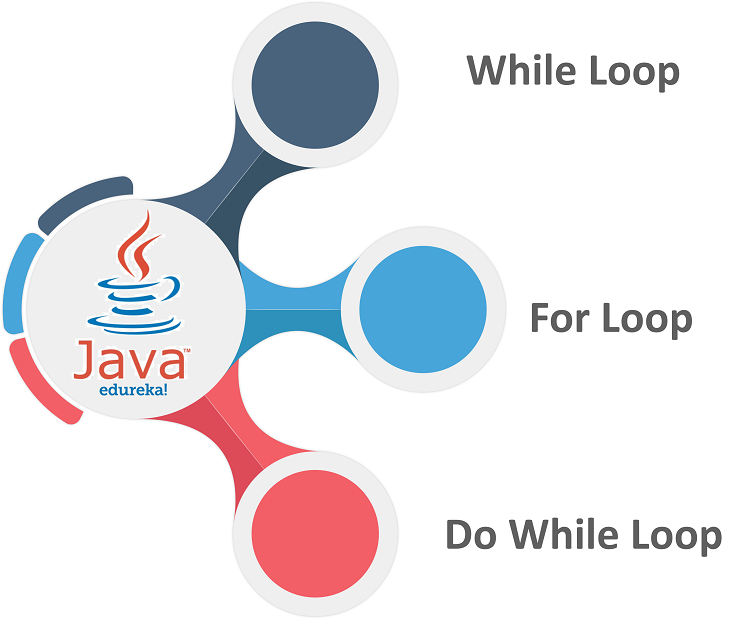
Now, we will understand the Iteration in Java. There are 3 Iteration Loops in Java
For Loop
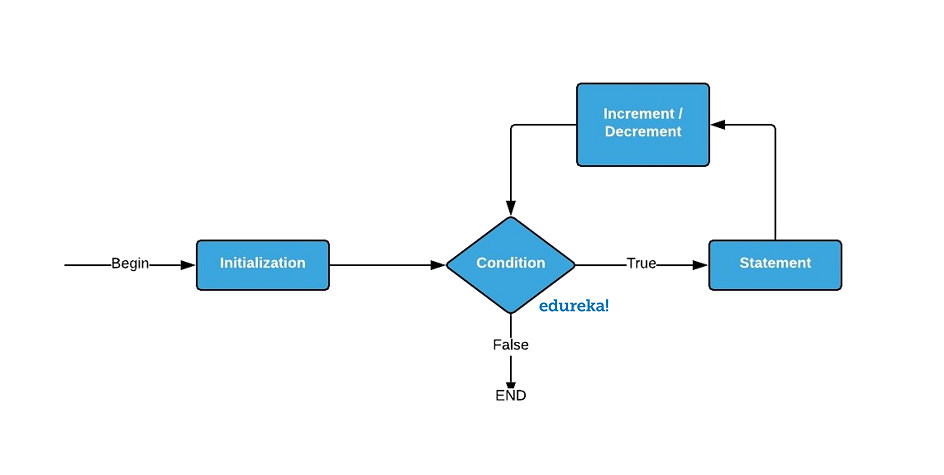
For loop is a Control Flow Statement which allows you to execute a specific code segment for a finite number iterations. A for loop has three arguments, namely, initialization variable, Counter variable, and increment/decrement variable.
Below is the flow chart Related to For Loop.
Following code is an example for For Loop.
//Print the elements in an array using normal For Loop
package forloop;public class forloop {public static void main(String[] args) {String[] arrData = {"JOHN", "JERRY", "RALPH", "JIM", "TOM"};System.out.println("Using normal For Loop:");for(int i=0; i< arrData.length; i++){System.out.println(arrData[i]);}}}//Output:
Using normal For Loop:JOHNJERRYRALPHJIMTOM
Enhanced For Loop
Enhanced/Advanced For loop is similar to a for loop, but, it minimizes the code length and excludes counter variable and initialization variable. The control flows directly into the array/collection and executes operations on the elements by accessing their index.
Below is the flow chart Related to enhanced For Loop.

Following code is an example for Enhanced For Loop.
//Print the elements in an array using enhanced/advanced For Loop
package advforloop;public class advforloop {public static void main(String[] args) {String[] arrData = {"JOHN", "JERRY", "RALPH", "JIM", "TOM"};System.out.println("Using Enhanced For Loop:");for (String strTemp : arrData){System.out.println(strTemp);}}}//Output:
Using Enhanced for loop:JOHNJERRYRALPHJIMTOM
Nested For Loop
Nested for loop embeds another For loop within itself. The outer loop triggers the inner loop. The inner loop executes completely and then triggers the outer loop for updating the iteration. This process continues until the outer loop executes completely.
Below is the flow chart Related to Nested For Loop.
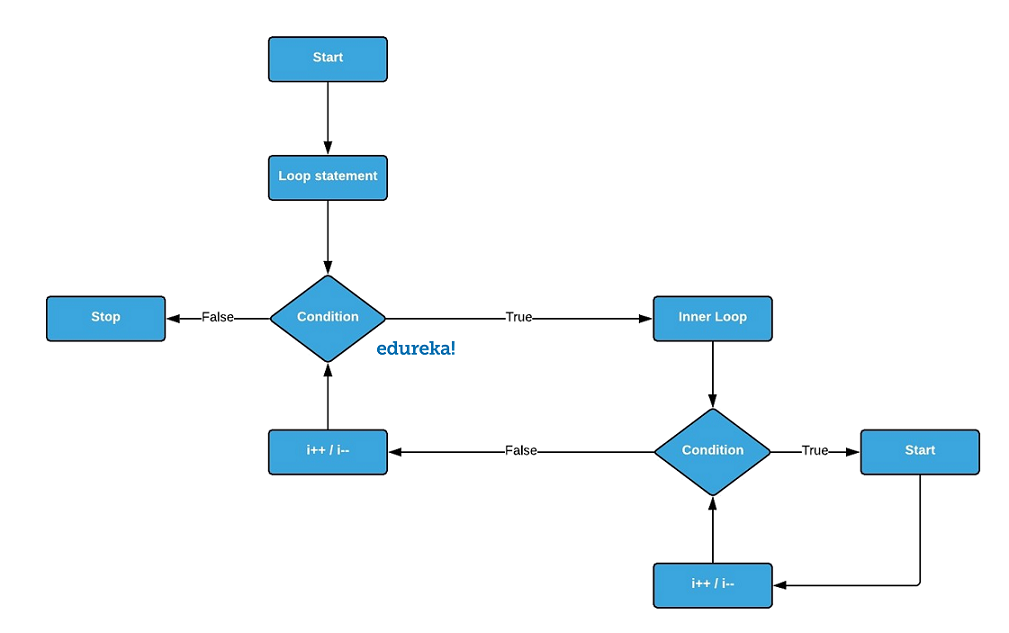
Following code is an example for Nested For Loop.
//Print the elements in a two-dimensional array using normal For Loop
package nestedforloop;public class nested {public static void main(String[] args){int[][] arr = { { 1, 2 }, { 3, 4 } };for (int i = 0; i < 2; i++)System.out.println("Row" + i + " - ");for (int j = 0; j < 2; j++)System.out.println(arr[i][j]);}System.out.println("");}}}//Output:
Row 0 - 12Row 1 - 34
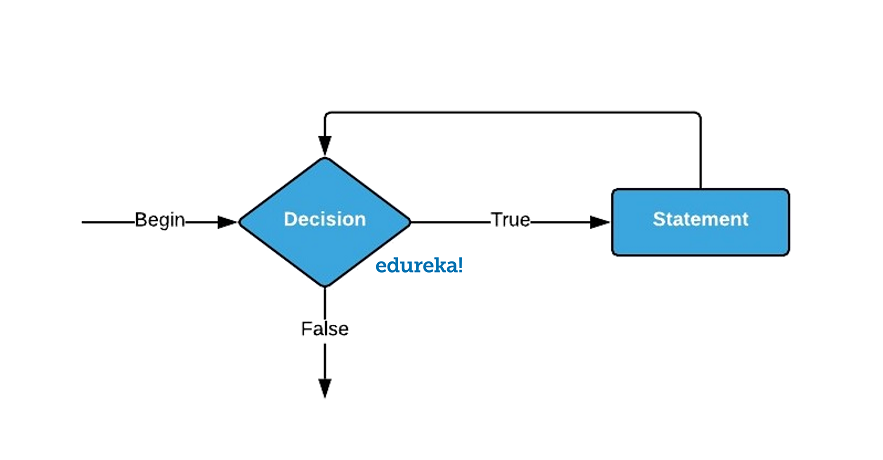
While Loop
While loop is a Contol Flow Statement that executes itself repeatedly until a given boolean condition is satisfied. While loop can be considered as a repeating If statement.
Below is the flow chart for While Loop.
Following code is an example for While Loop.
//Find if the number is a Prime Number or not using a While Loop
package whileloop;import java.util.Scanner;public class whiledemo {public static void main(String[] args) {Scanner kb = new Scanner(System.in);System.out.println("Enter any number");int num=kb.nextInt();int i = 2;boolean flag = false;while(i <= num/2){if(num % i == 0){flag = true;break;}++i;}if (!flag)System.out.println(num + " is a prime number.");elseSystem.out.println(num + " is not a prime number.");}}//Output:
Enter any number55 is a prime number.
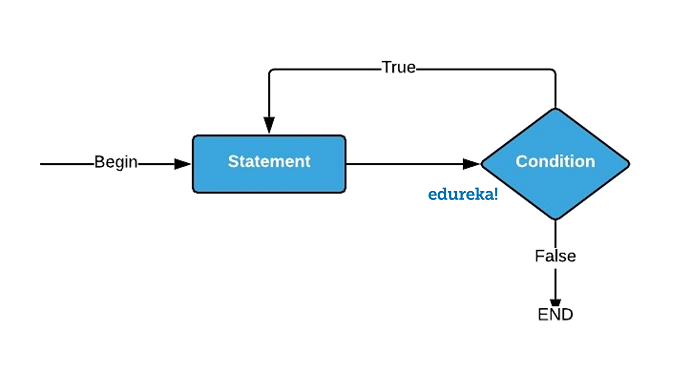
Do While Loop
Do While loop is considered to be a conditional statement completely similar to a normal While loop. The only difference is that the Do While loop has the boolean/conditional statement is placed at the end of the loop. This makes the Do While loop to execute at least for once.
Below is the flow chart for Do While Loop.
Following code is an example for Do While Loop.
//Insert elements in an array and add them using normal While Loop
package dowhileloop;import java.util.Scanner;public class dowhile {public static void main(String[] args) {Double a, Summation = 0.0;Scanner kb = new Scanner(System.in);do {System.out.print("Enter a number to perform addition and zero to exit: ");a = kb.nextDouble();Summation += a;} while (a != 0.0);System.out.println("Sum of the numbers = " + Summation);}}//Output:
Enter a number to perform addition and zero to exit: 10Enter a number to perform addition and zero to exit: 20Enter a number to perform addition and zero to exit: 30Enter a number to perform addition and zero to exit: 40Enter a number to perform addition and zero to exit: 0Sum of the numbers = 100.0
Infinite Loop
Infinite Loop is not actually a practically designed loop. Instead, It is a situation where the condition of the loop fails and the execution persists until you stop it manually.

Following code is an example for Infinite Loop.
//Generate Infinite Loop
package infiniteloop; public class infinity { public static void main(String[] args) { int i=0; while(true) { System.out.println("Edureka"); i++;} } }//Output:
EdurekaEdurekaEdureka.............
Next, let us see what are classes and objects in Java.
Java Tutorial: Classes and Objects
A class in Java is a blueprint which includes all your data. A class contain fields(variables) and methods to describe the behaviour of an object. Let’s have a look at the syntax of a class.
class Abc {member variables // class bodymethods}But how can you access these member variables and methods? Here comes the concept of Object.
An object is a major element in a class which has a state and behaviour. It is an instance of a class which can access your data. Let’s see the syntax to create an object in Java:
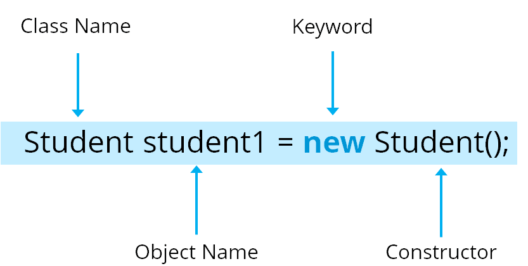
Here, Student is your class name followed by the name of the object. Then there is a “new” keyword which is used to allocate memory. Finally, there is a call to the constructor. This call initializes the new object.
Now let’s see how can you call a method using an object in Java:
class Student()void display(); { // Method------ // logic of method}public static void main(String args[]){Student obj=new Student(); // Created an objectobj.display(); // Method called} Want to know more about them? I would suggest you to see this Java class video which will take you through in-depth details of Java classes and the different key-components in Java. Go ahead, enjoy the video and tell me what you think.
Java Classes | Java Classes and Objects | Java Training | Edureka

Next, let us move ahead in our Java Tutorial blog where we’ll be discussing another key concept i.e. Arrays.
Java Tutorial: Arrays
Arrays in Java is similar to that of C++ or any other programming language. An array is a data structure which holds the sequential elements of the same type.
Let’s say you want to store 50 numbers. Instead of declaring individual variables, such as number0, number1, … and so on. You can declare one array variable – “numbers” and use number[0], the number[1] to represent individual variables. This will ease your task and minimizes the redundancy.
Each array has two components: index and value. Refer to the below image for better understanding:
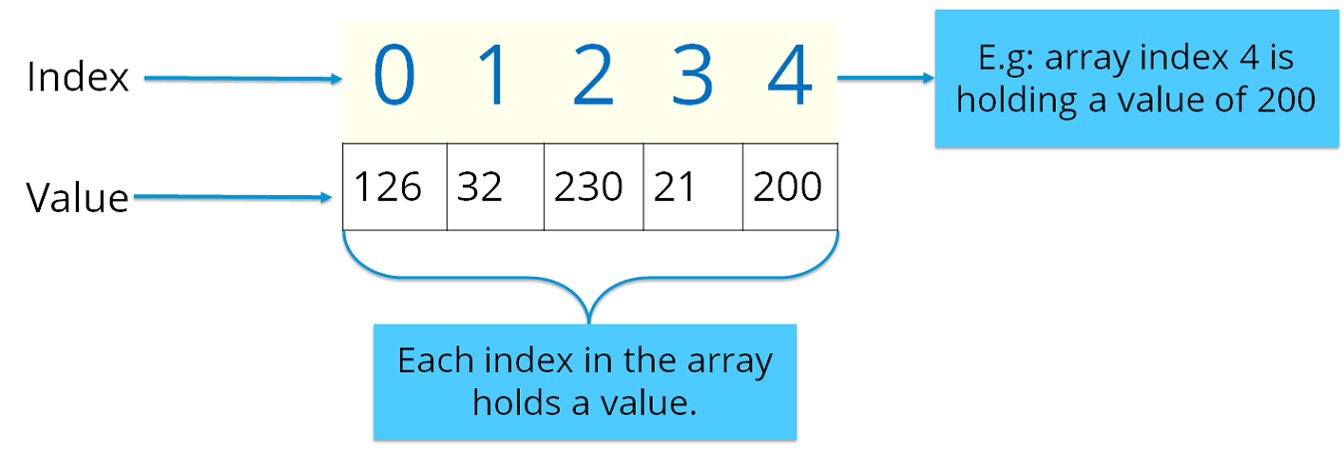
Here the indexing starts from zero and goes till (n-1) where n= size of the array. Let’s say you want to store 10 numbers, then the indexing starts from zero and goes till 9.
There are two types of arrays in Java:
- Single-dimension Array
- Multi-dimension Array
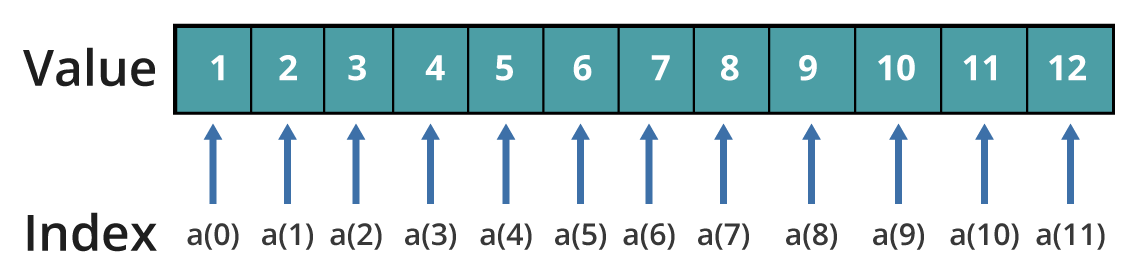
Single-dimension Array: In a single-dimension array, a list of variables of the same type can be accessed by a common name. You can initialize the array using the following syntax:
int a[] = new int[12];
You can refer to the below image where I have stored data with respect to the given index.
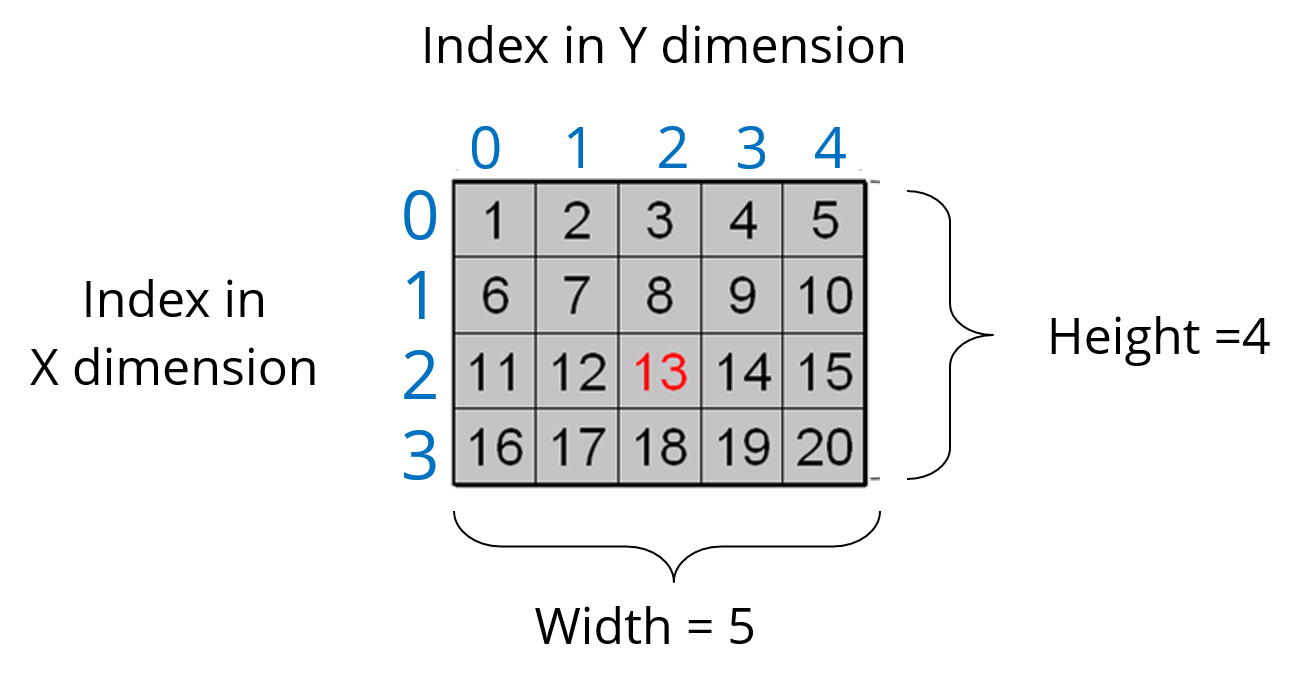
Multi–dimension Array: In a multi-dimension array, your data is stored in a matrix form. Here, you can initialize the array using the following syntax:
int table[][]= new int[4][5];
It is quite similar to the matrix that we use in mathematics. Refer to the below image where I have stored data with respect to different dimensions.
 Thus, arrays help you in optimizing the code where you can insert the data at any location.
Let’s see the below code to understand the concept of the array in Java.
import java.util.*;public class ArrayExample {public static void main( String args[]){double invoice[][]= new double[10][2]; // Initializing arrayScanner obj= new Scanner(System.in); // creating a scanner object to take input from userfor(i=0;i<10;i++){ // nested for loopsfor(j=0;j<2;j++);{System.out.println("Enter the value");invoice[i][j]=obj.nextDouble(); // store values to array for(i=0;i<10;i++){for(j=0;j<2;j++){System.out.println(invoice[i][j]);}}}}In the above code, I have explained how you can take input for the array and print the same.
I hope you guys are clear with how an array looks like and how do you initialize one. Now, let’s summarize the above topics and see the entire structure of a Java program.
Java Tutorial: Structure of a Program
Till now, we have learned about member variables, data types, control statements, classes and objects. Let’s see how all of them are structured together in a class in Java.
public class Car{ // Class creationString color; // Member variables String model;public void SpeedCheck(int s) // Method {int speed=s;if(speed>100) // Control statement{System.out.println(" You are driving very fast");}else{System.out.println("You are driving at normal speed");}public static void main ( String args[]) {Car obj= new Car(); // Object creationobj.speed(60);}Finally, we come to our last topic in the Java Tutorial blog i.e Object Oriented programming concepts.
File Input/Output Handling
Java has a dedicated library to handle all its input and output functionalities. It is the java.io package/library that handles all the input/output streams in Java. Java has two types of streams, they are:
- Input Stream
- Output Stream
Input Stream
It is responsible for reading data from all the sources.
Output Stream
It is responsible for writing the data to the destination.
//Example:
package edureka;import java.io.*;public class fileStreamTest {public static void main(String args[]) {try {byte bWrite[] = { 1, 2, 3, 4, 5 };OutputStream os = new FileOutputStream("Edureka.txt");for (int x = 0; x < bWrite.length; x++) {os.write(bWrite[x]);}os.close();InputStream is = new FileInputStream("Edureka.txt");int size = is.available();for (int i = 0; i < size; i++) {System.out.print((char) is.read() + " ");}is.close();} catch (IOException e) {System.out.print("Exception");}}}Now, we shall move into Object-oriented programming concepts in Java.
Java Tutorial: OOPs Concept
We have already discussed classes and objects in Java. Let’s discuss the 4 main concepts of object-oriented programming – Inheritance, Encapsulation, Polymorphism and Abstraction.
Let’s begin with the first concept i.e. Inheritance.
Inheritance: Most of you must be familiar with inheritance. Inheritance is a process where one class acquires the properties of another. But whose properties are inherited? Here we have two classes, a child class which inherits the properties of a base class.
A Class which inherits the properties are known as Child class. It is also referred to as a derived class or a subclass. Next, the class whose properties are inherited are known as Parent class or a base class.
Let’s understand these classes by looking at this real-life example of animals.
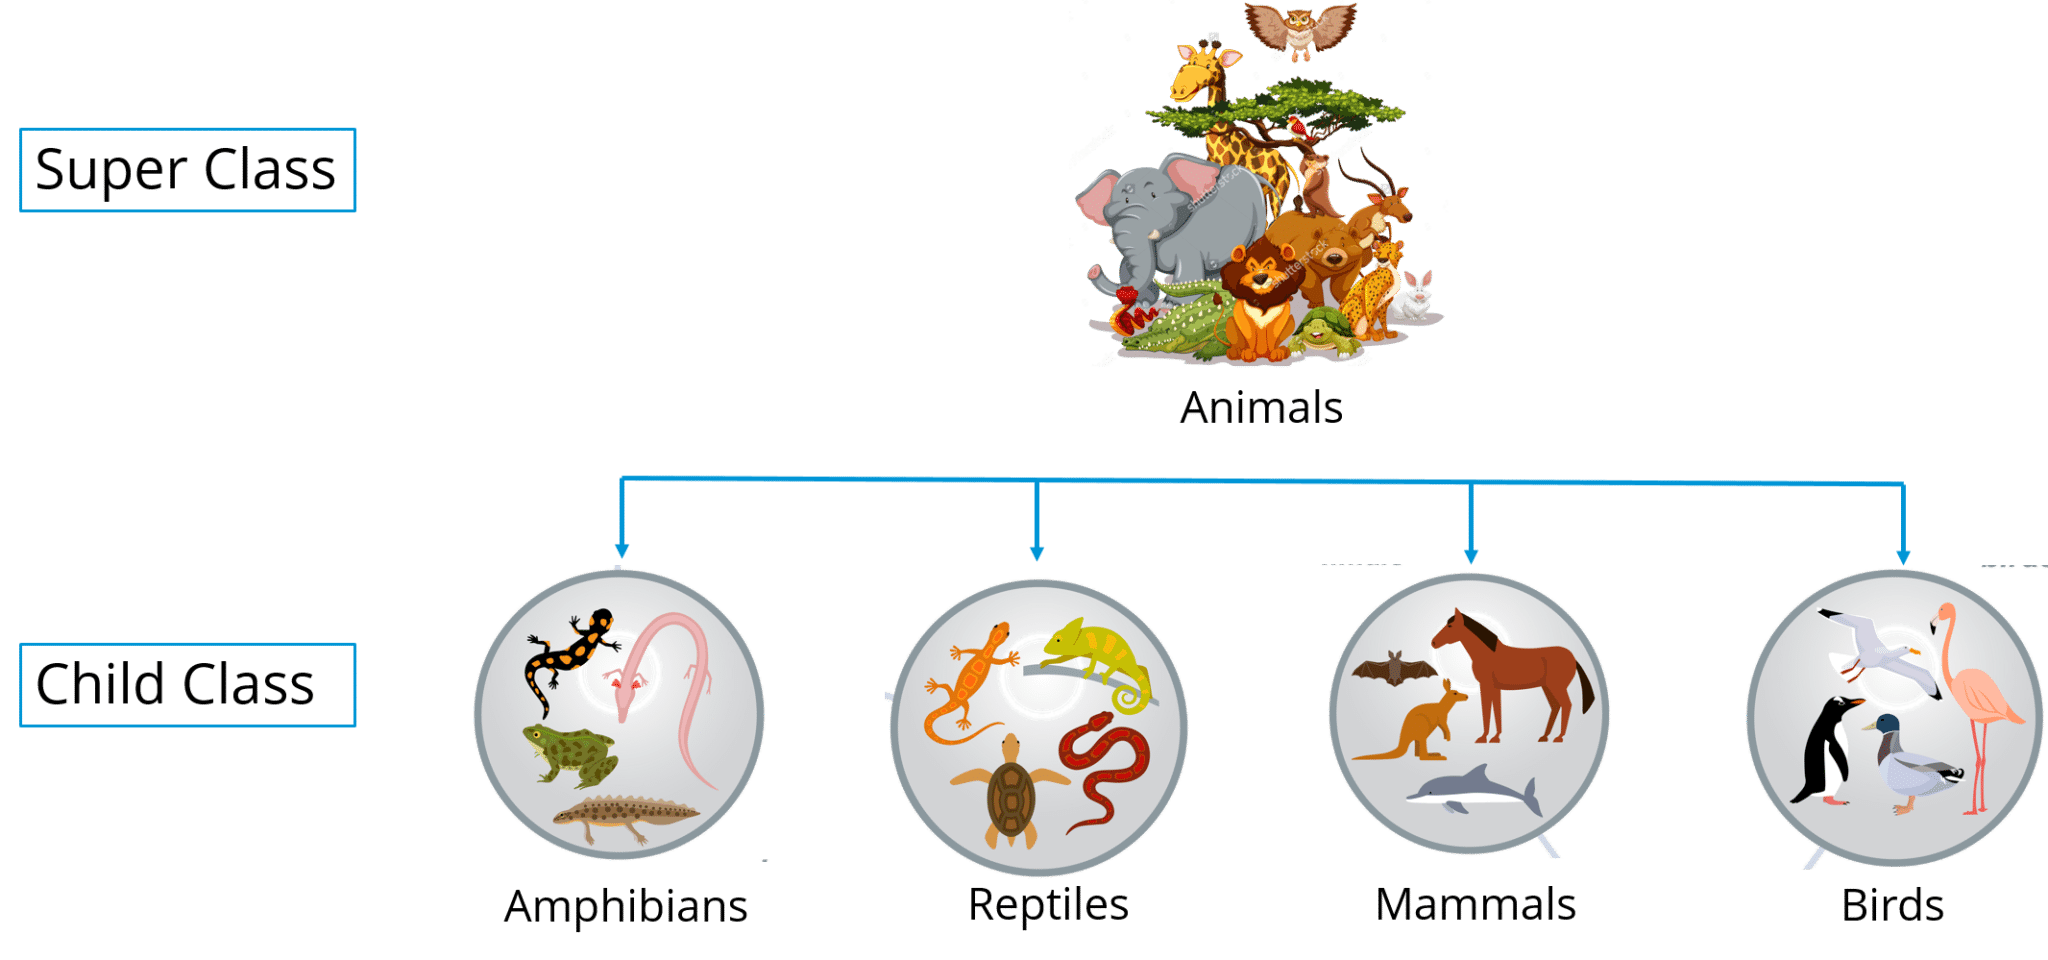
In the above image, Animal is the superclass whereas amphibians, reptiles, mammals and birds are your child classes which are inheriting the properties from ‘Animal’ class.
In Java, inheritance is used to avoid code redundancy. Also, inheritance has many types, don’t worry, we will be going into more depth in my next blog on object-oriented programming.
Encapsulation: Encapsulation in Java is a mechanism of wrapping up the data and code together as a single unit. Refer to the below image where all your methods, variables are bound together in a single class.

In encapsulation, the variables of a class will be hidden from other classes and can be accessed only through the methods of their current class.
Polymorphism: Polymorphism is the ability of a variable, function or object to take multiple forms. The most common use of polymorphism in OOPs occurs when a parent class is used to refer to a child class object. Polymorphism is also achieved through function overloading. Don’t worry! I will be explaining the whole concept in my next blog. For now, let’s take a real-life scenario where a teacher tells the student to draw different shape/figure having different functionalities.

Let’s say I want to draw a specific shape which already has multiple functions present as part of my program. So the functions that are dealing with shape, I’ll call them as a draw(). Now based on the values that I have passed to these functions, it will draw different shapes. Let’s say in case of a rectangle, I am passing two values – length and breadth. Similarly, for a circle, I am passing a radius. Based on the values you pass, the different function will be called that serve different purposes. So this can be achieved through function overloading. Stay tuned, the concept of function overloading will be covered in detail in my next blog.
Abstraction: It is basically the quality of dealing with ideas rather than events. Abstraction is the methodology of hiding the implementation details from the user and only providing the functionality to the users. Let’s see this real-life example of a car where i’ll help you understand what exactly abstraction is.

If you consider the case of this car, here the mechanic is repairing a certain function in a car. But the user or you can say driver doesn’t want to know about these things, he just wants his car back in a working condition. So here, you basically segregate the implementation and show the other person what he actually wants to see and that exactly refers to abstraction.
This is the end of the second blog in the Java Tutorial blog series. I hope you guys are clear about each and every aspect that I have discussed above. In my next blog, I will be explaining object-oriented programming concepts of Java in detail with examples.
To learn object-oriented programming in java in a better way, please go through this article link.
Exception Handling
An exception can be defined as an unexpected problem that arises during the execution of the program. The exception interrupts the sequential and normal flow of the program. Hence, it becomes mandatory to resolve these exceptions to avoid any problems.
An exception can be of any type, such as,
- Invalid data that is given by the user
- A file location that cannot be accessed
- Loss of network or other hardware issues
Let us check array index out of bounds exception example.
package edureka;public class Edureka {public static void main(String args[]) {try {int a[] = new int[21];System.out.println("Accessing element:" + a[22]);} catch (ArrayIndexOutOfBoundsException e) {System.out.println("Exception thrown :" + e);}System.out.println("Out of the block");}}//Output:
Exception thrown :java.lang.ArrayIndexOutOfBoundsException: 22Out of the block
Now that you have understood basics of Java, check out the Java trainingby Edureka, a trusted online learning company with a network of more than 250,000 satisfied learners spread across the globe. Edureka’s Java J2EE and SOA training and certification course is designed for students and professionals who want to be a Java Developer. The course is designed to give you a head start into Java programming and train you for both core and advanced Java concepts along with various Java frameworks like Hibernate & Spring.
Got a question for us? Please mention it in the comments section of this “Java Tutorial” blog and we will get back to you as soon as possible.
Recommend
About Joyk
Aggregate valuable and interesting links.
Joyk means Joy of geeK