

Setting up BigFix Inventory 9.2
source link: https://darrylmiles.blog/2015/05/12/setting-up-ibm-endpoint-manager-software-usage-analysis-sua-9-2/
Go to the source link to view the article. You can view the picture content, updated content and better typesetting reading experience. If the link is broken, please click the button below to view the snapshot at that time.

Setting up BigFix Inventory 9.2 – Many Miles AwaySkip to content

IBM BigFix (Endpoint Manager) has released a new Software Usage Analysis (SUA) module. This release includes a number of new capabilities, specifically SQL support. BigFix Inventory (or SUA) also provides IBM sub-capacity measurement capability. IBM has provided a number of installation and administration guides here. In the following article, I’ll step you through the key elements to setup SUA 9.2: Prerequisites
- I’d created a new Windows 2008 R2 server to run SUA 9.2. My virtual machine had at least 8GB of memory and 2 vCPU
- On the SUA server I had installed Microsoft SQL 2012 and updates
- I had installed an IEM Agent and it was reporting back to the IEM server successfully.
Install and Configure the SUA 9.2 Server
- From the IEM console, select BigFix Management, License Overview and find the Software Usage Analysis section. Next to IBM Endpoint Manager for Software use Analysis v9, select Enable
- Click on IBM Endpoint Manager for Software use Analysis v9, under the Computer Subscriptions tab, change the value from No computers to All computers and select Save Changes
- Select System Lifecycle – Software Use Analysis – Server Setup and Software Use Analytics.
- From the SUA install screen you’ll want to choose a server which will run SUA. For small environments, SUA could run on the same server as IEM. However as you grow beyond several thousand endpoints, you’ll want to dedicate a separate server for SUA 9.2. Select that server and click Deploy Installer.

- SUA 9.2 will then show you the following screen as it downloads the SUA 9.2 software and then mirrors it to that server. In my lab environment this took about 10 minutes. You can check the progress of the download by looking at the running Actions too:


- On the SUA 9.2 server (my server was called SFTSGSUA9 – as it’s on Softlayer) I ran the installer setup-server-windows-x86_64.bat (as an Administrator).
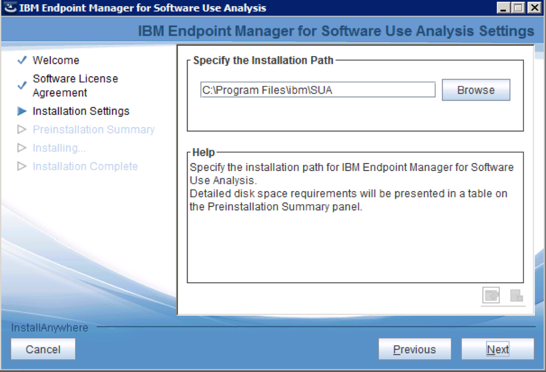
- During the SUA 9.2 installation, select the default including accepting the license agreement. Change the default installation path if required:
- I select the default https port 9081 in my environment (you could choose another port if required)
- I selected System Account and finally reviewed the settings before clicking Install

- When SUA was completed I was shown the following screen:

- Click on Done and a web browser is then launched to complete the SUA 9.2 configuration. You might need to click the certificate warning in your web browser. I entered the following information below to configure SUA.


- After the import was completed (which did take a few hours in my lab), the SUA 9.2 application was then launched:

- Back in the IEM console I could click Finish and configure it with the URL of my IEM9TSUA2 server:


- Now SUA 9.2 is up and running, we’ll now setup the endpoints for SUA scanning.


Setup your Endpoints for SUA scanning
- From the IEM console, select System Lifecycle. Then select Software Use Analysis, select Setup – Activate Analysis. You should see seven Analysis as shown in the example below. Activate each of these.

- Next select Setup – Deploy Scanner to Endpoints and select Install Scanner, select Take Action. Select Target and select Dynamic target by property and select All Computers, if you want the scanner applied to every computer with an IEM Agent installed. Otherwise you might create a manual group (called SUA 9 clients) and select it instead. Click OK to run the Action. The scanner will then be deployed to the endpoint.
- Select Setup – Schedule Scans on Endpoints. Select Initiate Software Scan. Select Target and select Dynamic target by property and select All Computers. Select the Execution tab.By default the scanning process will run every 7 days as shown below. You can change this value if you like. Select OK when complete.

- Finally, select Setup – Schedule Uploads on Endpoints. Select the Upload Software Scan Results fixlet. Click OK to run the Action. Select Target and select Dynamic target by property and select All Computers. Select the Execution tab. You’ll see below the Fixlet will run anytime new scan results are available and retry this 3 times if there is an error. Select OK when complete.


Note: As mentioned above, it’s probably a good idea to do each of the three items above on a group basis, so that as you deploy additional endpoints they’ll automatically be setup for SUA processing. Software Catalog Update You’ll want to use the latest software catalog from IBM, which we see has been automatically detected within the console. You’ll need to perform a similar task roughly every month as IBM releases new SUA catalogs. The update process is documented within the Fixlet, so check there on what you need to do, especially if you customise the catalog.
- From the IEM console, select Systems Lifecycle – Software Use Analysis – Software Catalog Update – Software Catalog Update. Select Take Action and select your SUA 9.2 server. The action will download the latest catalog and install this on your SUA 9.2 server.

- Login to the SUA 9.2 server console.
- Go to Management – Catalog Update
- Click Browse and locate the downloaded catalog file (I expanded the ZIP file first)
- Click Upload. Then select Import Now within the SUA console and browse to the file (D:\Program Files\ibm\SUA\sua_catalog) and select the ZIP file.
- Click Upload
Note: There is a Fixlet 1002 – Upgrade to the newest Software Usage Analysis 9.x catalog that can be run. This will automatically download the latest catalog to the SUA 9.2 server. The above task of applying this catalog via the SUA console is still required (thank’s David Kosenko for this information).

That’s it! SUA is now up and running and you can easily see what software is installed and being utilised in your company. If you have any problems, please post your query to the new Bigfix forum. Are you benefiting from IBM Endpoint Manager SUA? If so we’d love to hear from you. Darryl
Recommend
-
73
bridgy (WIP/beta) TL;DR: bridgy = ssh + tmux + sshfs + cloud inventory search Just get me to my ec2 box with a simple search. Multiple matches? Just ssh into all matching instanc...
-
50
ansible是一款比较新的自动化运维工具,基于Python开发,集合了众多运维工具(puppet、cfengine、chef、func、fabric)的优点,实现了批量系统配置、批量程序部署、批量运行命令等功能。ansible是基于模块工作的,本身没有批量部署的能力。真正具有批量部署的是ans...
-
37
By: Alejandro Cobar | | Related Tips:More >Database Mirroring Problem W...
-
33
Gain insights about your GCP resources with asset inventory 2018-10-09adminGoogleCloud
-
5
Setting up IBM BigFix Compliance for PCI DSS – Many Miles AwaySkip to content ...
-
11
IBM BigFix (Endpoint Manager) Windows 7 Migration Cookbook IBM BigFix can not only provide software distribution but also Operating System Deployment (or OSD). OSD includes the ability to upgrade operating systems (...
-
19
IBM BigFix for Managed Service Providers (MSPs) – Many Miles AwaySkip to content
-
10
Keep calm with IBM BigFix – Many Miles AwaySkip to content
-
5
Manage Amazon (AWS), Azure or IBM Cloud instances with IBM BigFix IBM BigFix provides clients with the ability to manage hundreds of thousands of endpoints from a single console. These can be a range of operating system typ...
-
10
What is IBM’s IASP offering?Licensing audits are time-consuming, expensive, and can disrupt everyday business processes. IBM created their IASP offering to enhance
About Joyk
Aggregate valuable and interesting links.
Joyk means Joy of geeK