
13

typecho个人博客修整记录
source link: https://blog.popkx.com/typecho-modify-record/
Go to the source link to view the article. You can view the picture content, updated content and better typesetting reading experience. If the link is broken, please click the button below to view the snapshot at that time.

typecho个人博客修整记录
此文章记录我的博客修改记录。
typecho-在文章末尾增加文章所述分类链接
2019年12月10日 19:37:56
计划在文章末尾增加文章所述分类链接,作为“更多阅读”的导航。打开usr/theme/NexTPisces/post.php,在“文章主体”和“底部导航(上一篇下一篇)”之间增加:
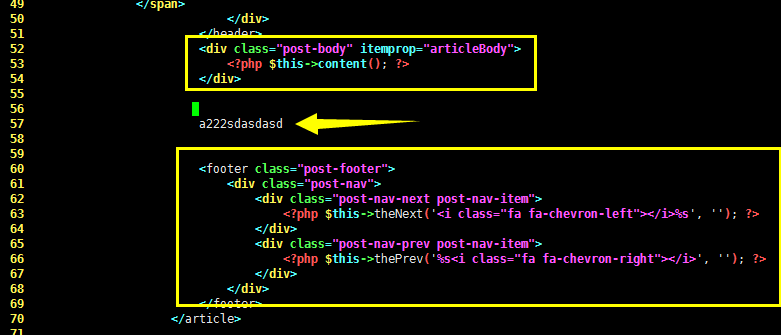
添加如下代码:
<!-- 2019年12月10日 19:42:32 添加阅读更多 -->
<span style="padding:5px; font-size:20px; border:1px; border-style:solid; border-color:#ccc; font-weight:bold; color:#828282">
阅读更多:
<?php $this->category(' , '); ?>
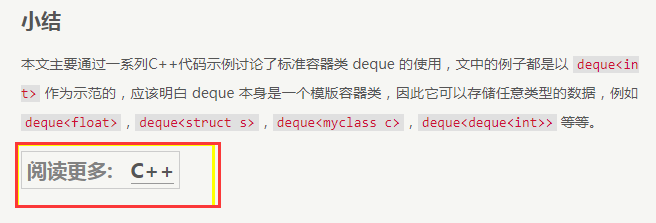
</span>得到如下效果:
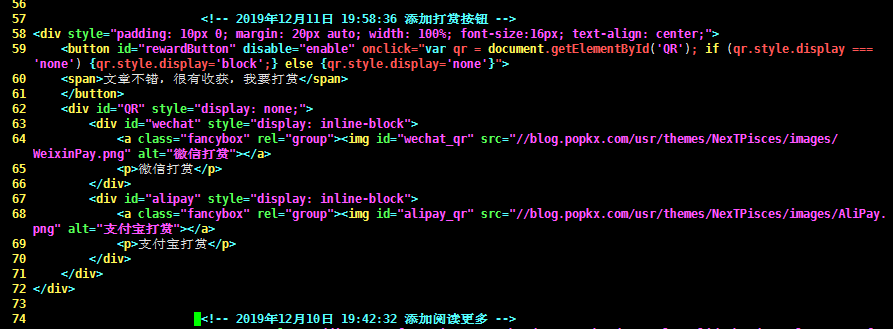
typecho-在文章末尾增加打赏按钮
2019年12月11日 18:48:15
- 在主题的 post.php 恰当位置增加下面的代码:
<!-- 2019年12月11日 19:58:36 添加打赏按钮 -->
<div style="padding: 10px 0; margin: 20px auto; width: 100%; font-size:16px; text-align: center;">
    <button id="rewardButton" disable="enable" onclick="var qr = document.getElementById('QR'); if (qr.style.display === 'none') {qr.style.display='block';} else {qr.style.display='none'}">
    <span>文章不错,很有收获,我要打赏</span>
    </button>
    <div id="QR" style="display: none;">
        <div id="wechat" style="display: inline-block">
            <a class="fancybox" rel="group"><img id="wechat_qr" src="//blog.popkx.com/usr/themes/NexTPisces/images/WeixinPay.png" alt="微信打赏"></a>
            <p>微信打赏</p>
        </div>
        <div id="alipay" style="display: inline-block">
            <a class="fancybox" rel="group"><img id="alipay_qr" src="//blog.popkx.com/usr/themes/NexTPisces/images/AliPay.png" alt="支付宝打赏"></a>
            <p>支付宝打赏</p>
        </div>
    </div>
</div>
- 添加 css 代码,我使用的主题使用
主题/dist/css/main.min.css,因此将下面的代码添加到该文件尾部:
 #QR{padding-top:20px;}#QR a{border:0}#QR img{width:180px;max-width:100%;display:inline-block;margin:.8em 2em 0 2em}
#rewardButton{border:3px solid #ccc;line-height:36px;text-align:center;font-size:20px;height:56px;display:block;border-radius:15px;-webkit-transition-duration:.4s;transition-duration:.4s;background-color:#999999;color:#fff;margin:0 auto;padding:0 25px}
#rewardButton:hover{color:#fff;border-color:#4caf50;outline-style:none}
最终的效果参考文章尾部的赞赏按钮。
评论区添加表情
2020年3月7日 10:38:03
今天心血来潮,想添加个评论表情,主要还是借助于大神们的插件,参考下面这个 GitHub 开源工程:
https://github.com/jzwalk/Smilies
主要步骤很简单,进入 usr/plugins,下载工程,然后就可在后台设置了:
# cd <your_blog_root_path>/usr/plugins
# git clone https://github.com/jzwalk/Smilies
阅读更多: 杂谈
Recommend
About Joyk
Aggregate valuable and interesting links.
Joyk means Joy of geeK