

paddle2.0之 paddle Tensor 第一集
source link: https://my.oschina.net/u/4067628/blog/4782603
Go to the source link to view the article. You can view the picture content, updated content and better typesetting reading experience. If the link is broken, please click the button below to view the snapshot at that time.

paddle2.0之 paddle Tensor 第一集
paddlepaddle2.0— 开启新梦想
paddlepaddle2.0新的起航,是不是有新手小伙伴对这些很迷茫呢?
下载安装命令

## CPU版本安装命令
pip install -f https://paddlepaddle.org.cn/pip/oschina/cpu paddlepaddle

## GPU版本安装命令
pip install -f https://paddlepaddle.org.cn/pip/oschina/gpu paddlepaddle-gpu
传说中的:可以new一个对象的python还没有到创建对象的能力。
听说对象在paddle的加持下已经是过去,只需百度和谷歌加上paddle的熟练操作,和paddle实现人机对话指日可待
作为一名paddle小白怎么办呢?
今天由三岁带大家一起开启paddle学习新梦想!
本文对应AIstudio地址:https://aistudio.baidu.com/aistudio/projectdetail/1275635
三岁白话paddle2.0系列历史地址
三岁白话paddle2.0系列第一话:起航新征程(项目):https://aistudio.baidu.com/aistudio/projectdetail/1270135
三岁白话paddle2.0系列第一话:起航新征程(csdn):https://blog.csdn.net/weixin_45623093/article/details/110198594
参考资料:
paddlepaddle官方文档:
百度:https://www.baidu.com/s?wd=Tensor
pytorch官方文档:https://pytorch.org/tutorials/beginner/blitz/tensor_tutorial.html#sphx-glr-beginner-blitz-tensor-tutorial-py
Tensor->张量
在paddle中和大多数的深度学习框架一样Tensor是运算的基础,那么什么是Tensor呢?让我们一起来看看吧!
这是paddle提供的一种数据结构和python的几种内置结构类型有所不同,他更类似于C语言的多维数组,和Numpy的array相类似
我们可以非常方便的读取到位置上的内容,但是不能够轻易的给已经生成的Tensor添加成员或者生成维度(优缺点)
所有的修改都需要通过新建在把数据处理后复制进去(paddle对此作了一定程度的封装,便于使用)
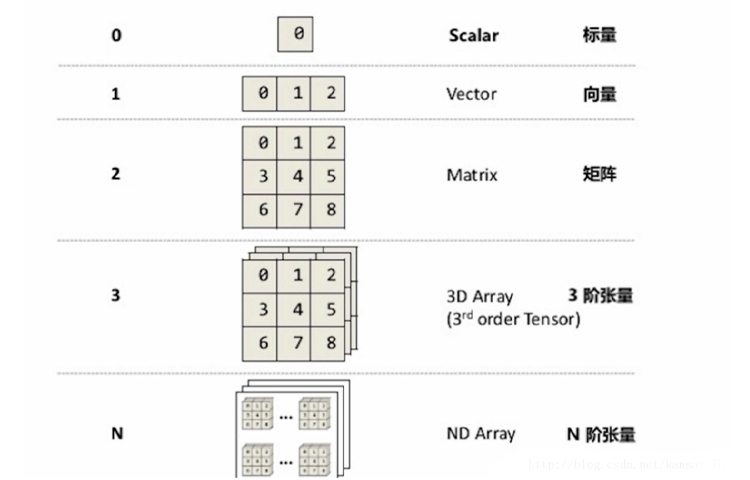
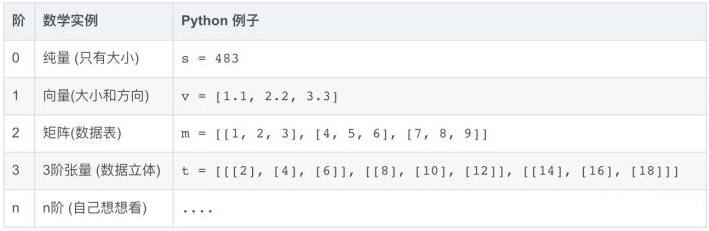
数学上的张量(图解)
在数学上张量就是向量这个大家就有数了,但也可能是多维的向量,向量的向量,向量的向量的向量,……反复套娃
paddle Tensor的创建
# 导入paddle
import paddle
创建类似于vector的1-D Tensor,其rank为1
创建一个向量维度是一
# 可通过dtype来指定Tensor数据类型,否则会创建float32类型的Tensor
rank_1_tensor = paddle.to_tensor([2.0, 3.0, 4.0], dtype='float64')
print(rank_1_tensor)
Tensor(shape=[3], dtype=float64, place=CPUPlace, stop_gradient=True,
[2., 3., 4.])
shape=[3]:一维长度为3;
dtype=float64:类型是64位的;
place=CPUPlace:使用的是cpu;
stop_gradient=True:不求导,不参加梯度更新;
[2., 3., 4.]内容是[2., 3., 4.]
创建一个标量
这里使用两种办法得到的结果是一样的!
int_0 = paddle.to_tensor(2)
int_1 = paddle.to_tensor([2])
print(f"整型标量:{int_0},{int_1}")
float_0 = paddle.to_tensor(2.0, dtype='float64')
float_1 = paddle.to_tensor([2.0], dtype='float64')
print(f"浮点型标量:{float_0},{float_1}")
整型标量:Tensor(shape=[1], dtype=int64, place=CPUPlace, stop_gradient=True,
[2]),Tensor(shape=[1], dtype=int64, place=CPUPlace, stop_gradient=True,
[2])
浮点型标量:Tensor(shape=[1], dtype=float64, place=CPUPlace, stop_gradient=True,
[2.]),Tensor(shape=[1], dtype=float64, place=CPUPlace, stop_gradient=True,
[2.])
创建一个二维的张量(矩阵)
法方法和一维的一样,但是可以对比结果,看到一维和二维的差距明显
rank_2_tensor = paddle.to_tensor([[1.0, 2.0, 3.0],
                                  [4.0, 5.0, 6.0]])
print(rank_2_tensor)
Tensor(shape=[2, 3], dtype=float32, place=CPUPlace, stop_gradient=True,
[[1., 2., 3.],
[4., 5., 6.]])
创建多维矩阵
方法一样,就是把里面的内容进行一定程度的修改,把矩阵的维度进行一定的提高
# Tensor可以有任意数量的轴(也称为维度)
rank_3_tensor = paddle.to_tensor([[[1, 2, 3, 4, 5],
                                   [6, 7, 8, 9, 10]],
                                  [[11, 12, 13, 14, 15],
                                   [16, 17, 18, 19, 20]]])
print(rank_3_tensor)
Tensor(shape=[2, 2, 5], dtype=int64, place=CPUPlace, stop_gradient=True,
       [[[1, 2, 3, 4, 5],
         [ 6,  7,  8,  9, 10]],

        [[11, 12, 13, 14, 15],
         [16, 17, 18, 19, 20]]])
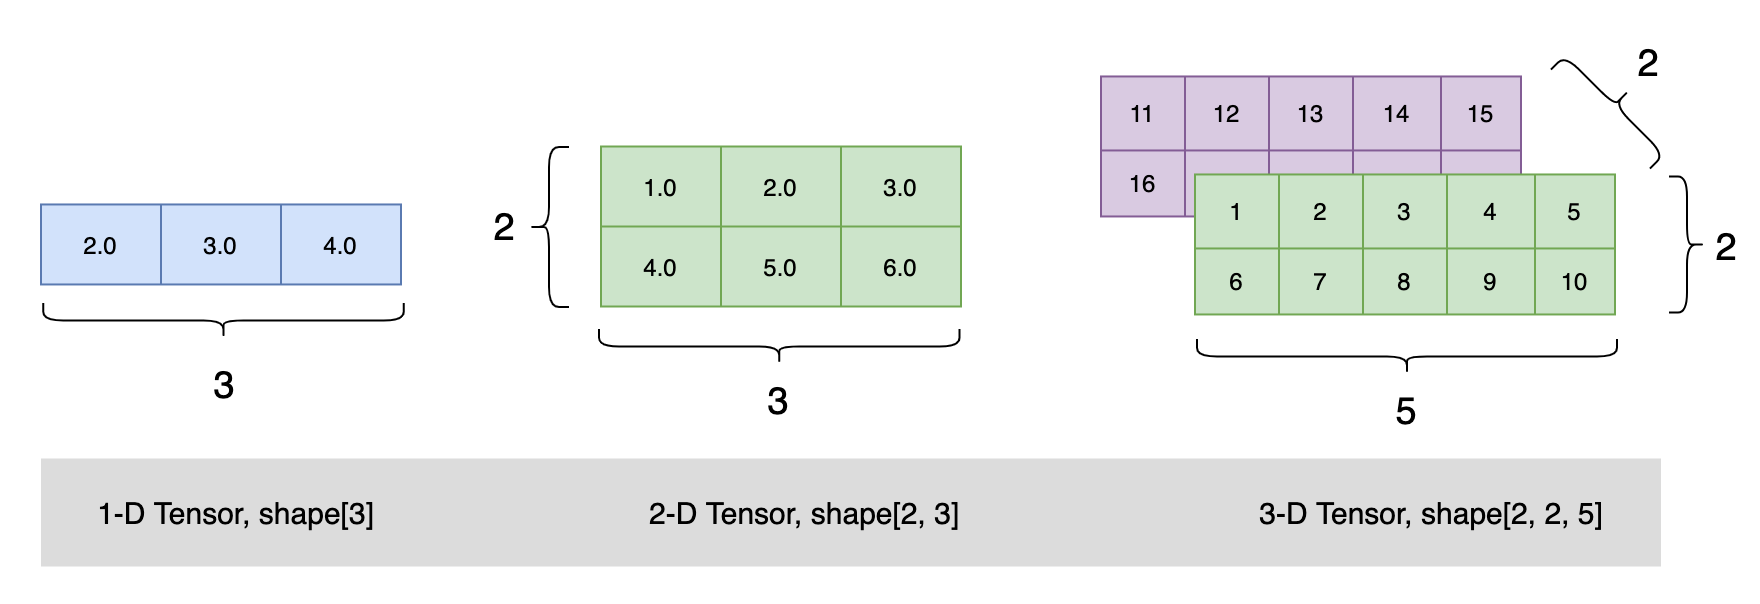
利用图片对上面的一维、二维、三维Tensor进行解释
不同rank的Tensor可视化表示
Tensor与Numpy array的相互转换
由于Tensor与Numpy array在表现上极为相似,转换也便存在可能
使用Tensor.numpy()即可轻松装换由Tensor转换成Numpy
使用paddle.to_tensor(Numpy array(xxx))可以把Numpy转换成Tensor
创建的 Tensor 与原 Numpy array 具有相同的 shape 与 dtype。
import numpy# 对rank_3_tensor进行转换(Tensor->Numpy)
rank_3_tensor.numpy()array([[[ 1, 2, 3, 4, 5],
[ 6, 7, 8, 9, 10]],
[[11, 12, 13, 14, 15],
[16, 17, 18, 19, 20]]], dtype=int64)
# 使用Numpy转换成Tensor
#生成一维
rank_1_tensor = paddle.to_tensor(numpy.array([1.0, 2.0]))
#生成二维
rank_2_tensor = paddle.to_tensor(numpy.array([[1.0, 2.0],
                                              [3.0, 4.0]]))
#生成随机的三维
rank_3_tensor = paddle.to_tensor(numpy.random.rand(3, 2))
print(f'生成一维:{rank_1_tensor}生成二维:{rank_2_tensor}生成随机的三维:{rank_3_tensor}')
生成一维:Tensor(shape=[2], dtype=float64, place=CPUPlace, stop_gradient=True,
       [1., 2.])生成二维:Tensor(shape=[2, 2], dtype=float64, place=CPUPlace, stop_gradient=True,
       [[1., 2.],
        [3., 4.]])生成随机的三维:Tensor(shape=[3, 2], dtype=float64, place=CPUPlace, stop_gradient=True,
       [[0.47932373, 0.27477318],
        [0.15932428, 0.56038360],
        [0.30284743, 0.91852095]])
对虚数的支持
在深度学习中虚数的存在也是不可或缺的对虚数的包涵也是很有必要的
Tensor不仅支持 floats、ints 类型数据,也支持 complex numbers 数据!
rank_2_complex_tensor = paddle.to_tensor([[1+1j, 2+2j],
                                          [3+3j, 4+4j]])
print(rank_2_complex_tensor)
ComplexTensor[real]: generated_tensor_1.real
- place: CPUPlace
- shape: [2, 2]
- layout: NCHW
- dtype: float
- data: [1 2 3 4]
ComplexTensor[imag]: generated_tensor_1.imag
- place: CPUPlace
- shape: [2, 2]
- layout: NCHW
- dtype: float
- data: [1 2 3 4]
查看结果可以发现它把实部和虚部进行了分开的展示
实部:
ComplexTensor[real]: generated_tensor_1.real
  - place: CPUPlace
  - shape: [2, 2]
  - layout: NCHW
  - dtype: float
  - data: [1 2 3 4]
虚部:
ComplexTensor[imag]: generated_tensor_1.imag
  - place: CPUPlace
  - shape: [2, 2]
  - layout: NCHW
  - dtype: float
  - data: [1 2 3 4]
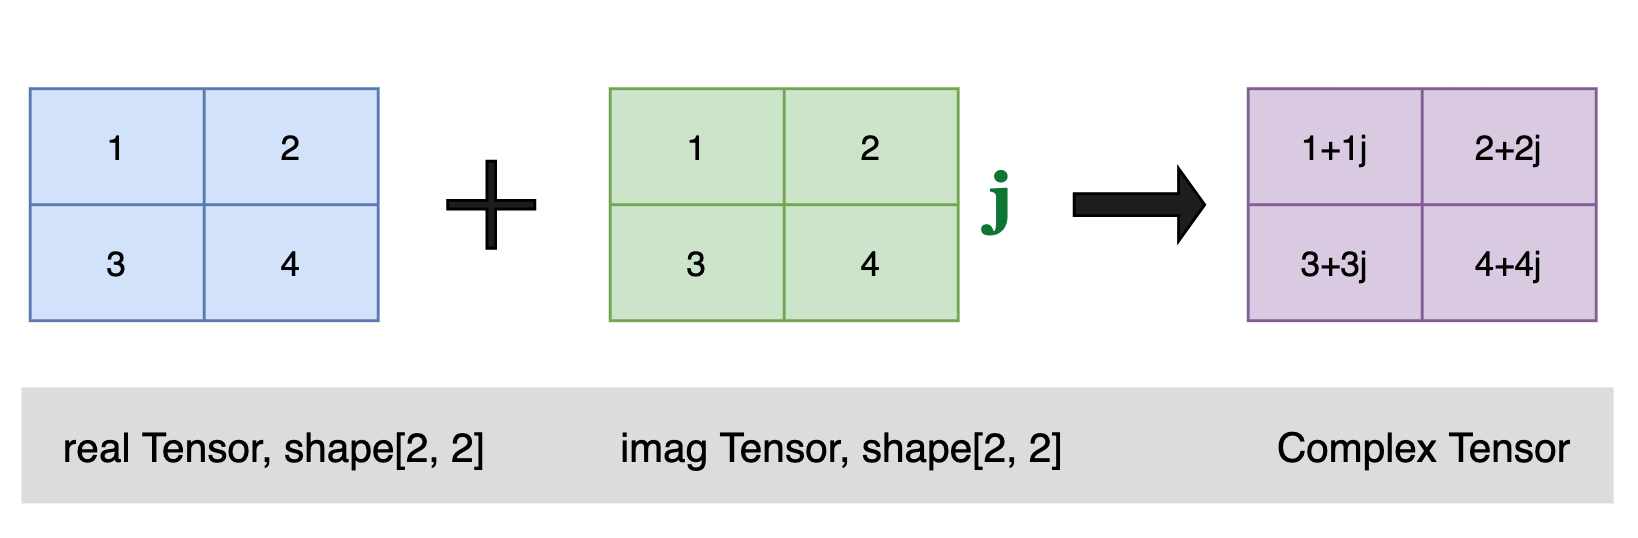
如果检测到输入数据包含complex numbers,则会自动创建一个ComplexTensor,ComplexTensor是Paddle中一种特殊的数据结构, 其包含实部(real)与虚部(imag)两个形状与数据类型相同的Tensor。
其结构可视化表示为:
Tensor报错
Tensor只支持规则的矩阵,对于非规则的会抛出异常!
也就是同一个维度上大小、类型要相同!
# 维数不对会报错!
rank_2_tensor = paddle.to_tensor([[1.0, 2.0],
                                  [4.0, 5.0, 6.0]])
以上会出现报错
ValueError:
	Faild to convert input data to a regular ndarray :
	 - Usually this means the input data contains nested lists with different lengths.
创建一个指定shape的Tensor
Paddle提供了一些API
paddle.zeros([m, n])                # 创建数据全为0,shape为[m, n]的Tensor
paddle.ones([m, n])                 # 创建数据全为1,shape为[m, n]的Tensor
paddle.full([m, n], 10)             # 创建数据全为10,shape为[m, n]的Tensor
paddle.arrange(start, end, step)    # 创建从start到end,步长为step的Tensor
paddle.linspace(start, end, num)    # 创建从start到end,元素个数固定为num的Tensor
Tensor的shape(形状)
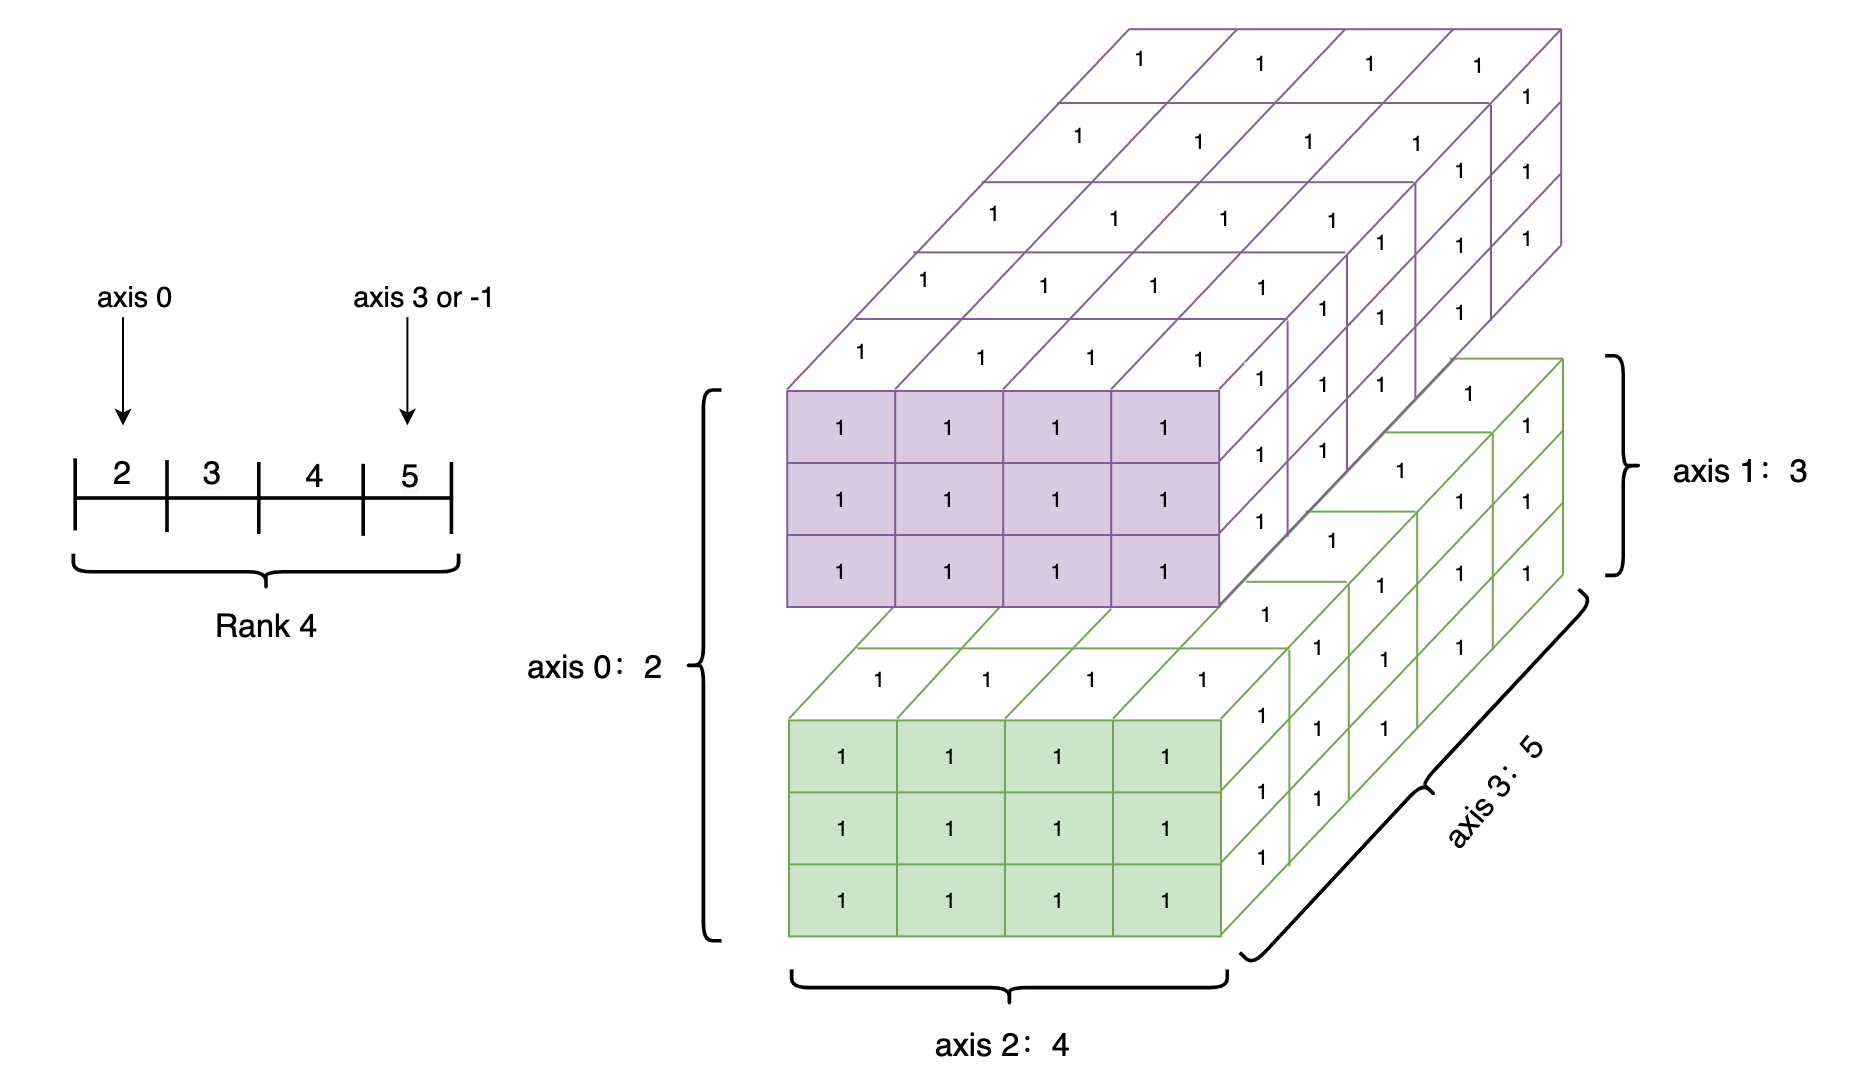
名称 属性 shape tensor的每个维度上的元素数量 rank tensor的维度的数量,例如vector的rank为1,matrix的rank为2. axis/dimension tensor某个特定的维度 size tensor中全部元素的个数举例说明shape之间的关系
rank_4_tensor = paddle.ones([2, 3, 4, 5])
print(rank_4_tensor)
print("Data Type of every element:", rank_4_tensor.dtype)
print("Number of dimensions:", rank_4_tensor.ndim)
print("Shape of tensor:", rank_4_tensor.shape)
print("Elements number along axis 0 of tensor:", rank_4_tensor.shape[0])
print("Elements number along the last axis of tensor:", rank_4_tensor.shape[-1])
Tensor(shape=[2, 3, 4, 5], dtype=float32, place=CPUPlace, stop_gradient=True,
[[[[1., 1., 1., 1., 1.],
[1., 1., 1., 1., 1.],
[1., 1., 1., 1., 1.],
[1., 1., 1., 1., 1.]],
[[1., 1., 1., 1., 1.],
[1., 1., 1., 1., 1.],
[1., 1., 1., 1., 1.],
[1., 1., 1., 1., 1.]],
[[1., 1., 1., 1., 1.],
[1., 1., 1., 1., 1.],
[1., 1., 1., 1., 1.],
[1., 1., 1., 1., 1.]]],
[[[1., 1., 1., 1., 1.],
[1., 1., 1., 1., 1.],
[1., 1., 1., 1., 1.],
[1., 1., 1., 1., 1.]],
[[1., 1., 1., 1., 1.],
[1., 1., 1., 1., 1.],
[1., 1., 1., 1., 1.],
[1., 1., 1., 1., 1.]],
[[1., 1., 1., 1., 1.],
[1., 1., 1., 1., 1.],
[1., 1., 1., 1., 1.],
[1., 1., 1., 1., 1.]]]])
Data Type of every element: VarType.FP32
Number of dimensions: 4
Shape of tensor: [2, 3, 4, 5]
Elements number along axis 0 of tensor: 2
Elements number along the last axis of tensor: 5
Data Type of every element: VarType.FP32
数据类型是32位的
Number of dimensions: 4
维度是4维
Shape of tensor: [2, 3, 4, 5]
大小是[2, 3, 4, 5]
Elements number along axis 0 of tensor: 2
0维度的数量
Elements number along the last axis of tensor: 5
最后一个维度的数量
图解:
之前提过Tensor的维度和数量不能够随意更改和添加,paddle在这里就封装了一个reshape接口来改变Tensor的shape
# 新建3维数据
rank_3_tensor = paddle.to_tensor([[[1, 2, 3, 4, 5],
                                   [6, 7, 8, 9, 10]],
                                  [[11, 12, 13, 14, 15],
                                   [16, 17, 18, 19, 20]],
                                  [[21, 22, 23, 24, 25],
                                   [26, 27, 28, 29, 30]]])
print("rank_3_tensor:", rank_3_tensor)
print("the shape of rank_3_tensor:", rank_3_tensor.shape)
# 对数据进行维度修改
rank_3_tensor = paddle.reshape(rank_3_tensor, [2, 5, 3])
print("rank_3_tensor:", rank_3_tensor)
print("After reshape:", rank_3_tensor.shape)
rank_3_tensor: Tensor(shape=[3, 2, 5], dtype=int64, place=CPUPlace, stop_gradient=True,
[[[1, 2, 3, 4, 5],
[ 6, 7, 8, 9, 10]],
[[11, 12, 13, 14, 15],
[16, 17, 18, 19, 20]],
[[21, 22, 23, 24, 25],
[26, 27, 28, 29, 30]]])
the shape of rank_3_tensor: [3, 2, 5]
rank_3_tensor: Tensor(shape=[2, 5, 3], dtype=int64, place=CPUPlace, stop_gradient=True,
[[[1, 2, 3],
[4, 5, 6],
[7, 8, 9],
[10, 11, 12],
[13, 14, 15]],
[[16, 17, 18],
[19, 20, 21],
[22, 23, 24],
[25, 26, 27],
[28, 29, 30]]])
After reshape: [2, 5, 3]
- -1 表示这个维度的值是从Tensor的元素总数和剩余维度推断出来的。因此,有且只有一个维度可以被设置为-1。
-
0 表示实际的维数是从Tensor的对应维数中复制出来的,因此shape中0的索引值不能超过x的维度。
# reshape为[-1]时,会将tensor按其在计算机上的内存分布展平为1-D Tensor。
print("Tensor flattened to Vector:", paddle.reshape(rank_3_tensor, [-1]).numpy())
Tensor flattened to Vector: [ 1 2 3 4 5 6 7 8 9 10 11 12 13 14 15 16 17 18 19 20 21 22 23 24
25 26 27 28 29 30]
paddle Tensor的dtype
Tensor的数据类型,可以通过 Tensor.dtype 来查看,dtype支持:‘bool’,‘float16’,‘float32’,‘float64’,‘uint8’,‘int8’,‘int16’,‘int32’,‘int64’。
# 查看rank_3_tensor的类型
rank_3_tensor.dtype
VarType.INT64
dtype类型的指定
通过Python元素创建的Tensor,可以通过dtype来进行指定,如果未指定:
对于python整型数据,则会创建int64型Tensor
对于python浮点型数据,默认会创建float32型Tensor
如果对浮点型默认的类型进行修改可以使用set_default_type进行调整
通过Numpy array创建的Tensor,则与其原来的dtype保持相同。
改变dtype(类型)
paddle同样提供了接口改变类型,可以更好的同于“实战”
# 生成一个浮点型32位的张量
float32_tensor = paddle.to_tensor(1.0)
print('float32_tensor', float32_tensor.dtype)
# 转换成浮点型64位
float64_tensor = paddle.cast(float32_tensor, dtype='float64')
print("Tensor after cast to float64:", float64_tensor.dtype)
# 转换成整型64位
int64_tensor = paddle.cast(float32_tensor, dtype='int64')
print("Tensor after cast to int64:", int64_tensor.dtype)
float32_tensor VarType.FP32
Tensor after cast to float64: VarType.FP64
Tensor after cast to int64: VarType.INT64
Tensor的place
初始化Tensor时可以通过place来指定其分配的设备位置,可支持的设备位置有三种:CPU/GPU/固定内存
其中固定内存也称为不可分页内存或锁页内存,其与GPU之间具有更高的读写效率,并且支持异步传输,这对网络整体性能会有进一步提升,但其缺点是分配空间过多时可能会降低主机系统的性能,因为其减少了用于存储虚拟内存数据的可分页内存。
# 创建CPU上的Tensor
cpu_tensor = paddle.to_tensor(1, place=paddle.CPUPlace())
print(cpu_tensor)
Tensor(shape=[1], dtype=int64, place=CPUPlace, stop_gradient=True,
[1])
# 创建GPU上的Tensor
gpu_tensor = paddle.to_tensor(1, place=paddle.CUDAPlace(0))
print(gpu_tensor)
# 创建固定内存上的Tensor
pin_memory_tensor = paddle.to_tensor(1, place=paddle.CUDAPinnedPlace())
ory_tensor = paddle.to_tensor(1, place=paddle.CUDAPinnedPlace())
print(pin_memory_tensor)
好了还有内容就下次吧!
下载安装命令

## CPU版本安装命令
pip install -f https://paddlepaddle.org.cn/pip/oschina/cpu paddlepaddle

## GPU版本安装命令
pip install -f https://paddlepaddle.org.cn/pip/oschina/gpu paddlepaddle-gpu
预告 白话paddle2.0-re—Tensor的……
这里是三岁,就到这里了,下次见!
本文同步分享在 博客“三岁学编程”(CSDN)。
如有侵权,请联系 [email protected] 删除。
本文参与“OSC源创计划”,欢迎正在阅读的你也加入,一起分享。
Recommend
-
5
Introduction A couple of months ago, I published my SaaS side-project: https://keycombiner.com. It is a Django web application to organize, learn, and practice keyboard shortcuts! You can...
-
7
Online payments for data science apps (DSaaS) using R, Shiny, Firebase, Paddle and Google Cloud Functions · Mark Edmondson...
-
7
白话Paddle2.0-rc — 起航新征程 下载安装命令 ## CPU版本安装命令 pip install -f https://paddlepaddle.org.cn/pip/oschina/cpu paddlepadd...
-
8
先贴重要的链接 DeepFM的论文参考 https://arxiv.org/pdf/1703.04247.pdf 代码仓: https://github.com...
-
5
很久之前用tensorflow 写过LR,现在用paddle来实现一遍。 由于很多文章都是输出一个简单结果,缺乏对整个过程的数据可视化,这里使用paddle提供的VisualDL作为结果的可视化。 VisualDL使用 VisualDL的代码仓地址是
-
11
百度的paddlepaddle有go版本的推理接口,通过cgo调用paddle c的推理库,在实际的api服务中,用go做推理服务器是有优势的。 开发环境 ubuntu 18.04 paddle 1.7.1 cuda 10.0 cudnn7 go 1.12 python 3.7 编...
-
7
python编程(paddle ocr)
-
8
ERNIE时延降低81.3%,飞桨原生推理库Paddle Inference再升级随着深度学习技术的成熟和人工智能的发展,机器开始变得越来越“聪明”,越来越了解用户的喜好和习惯。 下载安装命令 ## CPU版本安装命令 pip install -f...
-
5
Paddle boarder's close encounter with two curious whalesPaddle boarder's close encounter with two curious whalesA drone has captured the moment when a paddle boarder ha...
-
7
基于Paddle Serving&百度智能边缘BIE的边缘AI解决方案 Paddle Serving作为飞桨(
About Joyk
Aggregate valuable and interesting links.
Joyk means Joy of geeK