

How to Implement the Automatic Bill Number Input Function Using HUAWEI ML Kit’s...
source link: https://dzone.com/articles/how-to-implement-the-automatic-bill-number-input-f
Go to the source link to view the article. You can view the picture content, updated content and better typesetting reading experience. If the link is broken, please click the button below to view the snapshot at that time.

How to Implement the Automatic Bill Number Input Function Using HUAWEI ML Kit’s Text Recognition
In this post, I will show you how to implement automatic input of bill numbers and discount codes using HUAWEI ML Kit’s text recognition function.
Application
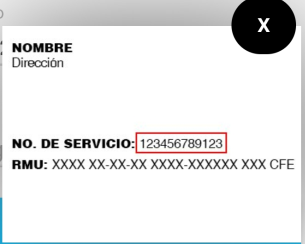
Text recognition is useful in a huge range of situations. For example, if you scan the following bill, indicate that the bill service number starts with “NO.DE SERVICIO”, and limit the length to 12 characters, you can quickly get the bill service number “123456789123” using the text recognition.
Similarly, if you scan the discount coupon below, start the discount code with “FAVE-” and limit the length to four characters, you’ll get the discount code “8329”, and can then complete the payment.

Pretty useful, right? You can also customize the information you want your app to recognize.
Integrating Text Recognition
So, let’s look at how to process bill numbers and discount codes.
1. Preparations
You can find detailed information about the preparations you need to make on the HUAWEI Developer.
Here, we’ll just look at the most important procedures.
1.1 Configure the Maven repository address in the project-level build.gradle file.
buildscript {
repositories {
...
maven {url 'https://developer.huawei.com/repo/'}
}
}
dependencies {
...
classpath 'com.huawei.agconnect:agcp:1.3.1.300'
}
allprojects {
repositories {
...
maven {url 'https://developer.huawei.com/repo/'}
}
}
1.2 Add configurations to the file header.
Once you’ve integrated the SDK, add the following configuration to the file header:
xxxxxxxxxx
apply plugin: 'com.android.application'
apply plugin: 'com.huawei.agconnect'
1.3: Configure SDK dependencies in the app-level build.gradle file.
xxxxxxxxxx
dependencies {
// Import the base SDK.
implementation 'com.huawei.hms:ml-computer-vision-ocr:2.0.1.300'
// Import the Latin character recognition model package.
implementation 'com.huawei.hms:ml-computer-vision-ocr-latin-model:2.0.1.300'
// Import the Japanese and Korean character recognition model package.
implementation 'com.huawei.hms:ml-computer-vision-ocr-jk-model:2.0.1.300'
// Import the Chinese and English character recognition model package.
implementation 'com.huawei.hms:ml-computer-vision-ocr-cn-model:2.0.1.300'
}
1.4: Add these statements to the AndroidManifest.xml file so the machine learning model can automatically update.
xxxxxxxxxx
<manifest>
...
<meta-data
android:name="com.huawei.hms.ml.DEPENDENCY"
android:value="ocr" />
...
</manifest>
1.5: Apply for the camera permission.
xxxxxxxxxx
<uses-permission android:name="android.permission.CAMERA" />
<uses-permission android:name="android.permission.INTERNET" />
<uses-feature android:name="android.hardware.camera" />
<uses-feature android:name="android.hardware.camera.autofocus" />
2. Code Development
2.1: Create an analyzer.
xxxxxxxxxx
MLTextAnalyzer analyzer = new MLTextAnalyzer.Factory(context).setLanguage(type).create();
2.2: Set the recognition result processor to bind with the analyzer.
xxxxxxxxxx
analyzer.setTransactor(new OcrDetectorProcessor());
2.3: Call the synchronous API.
Use the built-in LensEngine of the SDK to create an object, register the analyzer, and initialize camera parameters.
xxxxxxxxxx
lensEngine = new LensEngine.Creator(context, analyzer)
.setLensType(LensEngine.BACK_LENS)
.applyDisplayDimension(width, height)
.applyFps(30.0f)
.enableAutomaticFocus(true)
.create();
2.4: Call the run method to start the camera and read the camera streams for the recognition.
xxxxxxxxxx
try {
lensEngine.run(holder);
} catch (IOException e) {
// Exception handling logic.
Log.e("TAG", "e=" + e.getMessage());
}
2.5: Process the recognition result as required.
xxxxxxxxxx
public class OcrDetectorProcessor implements MLAnalyzer.MLTransactor<MLText.Block> {
@Override
public void transactResult(MLAnalyzer.Result<MLText.Block> results) {
SparseArray<MLText.Block> items = results.getAnalyseList();
// Process the recognition result as required. Only the detection results are processed.
// Other detection-related APIs provided by ML Kit cannot be called.
…
}
@Override
public void destroy() {
// Callback method used to release resources when the detection ends.
}
}
2.6: Stop the analyzer and release the detection resources when the detection ends.
xxxxxxxxxx
if (analyzer != null) {
try {
analyzer.stop();
} catch (IOException e) {
// Exception handling.
}
}
if (lensEngine != null) {
lensEngine.release();
}
Demo Effect
And that’s it! Remember that you can expand this capability if you need to. Now, let’s look at how to scan travel bills.

And here’s how to scan discount codes to quickly obtain online discounts and complete payments.

The GitHub source code can be found here.
Opinions expressed by DZone contributors are their own.
Recommend
-
15
Supercharging Kilian ValkhofBuilding tools that make developers awesome. Search term Supercharging <input type=number>
-
4
Implement event-driven input #4 Closed
-
5
HTML5: Input additional characters with type = & ldquo; Number & rdquo; advertisements In our app, we have many inputs that are used t...
-
7
New issue Implement filter on Str input type #16
-
5
How to create a number input 2021-12-18 by marc There are situations, in which you want the user to be able to type only numbers into...
-
6
Are you sure that’s a number input? Kilian ValkhofBuilding tools that make developers awesome. Search term
-
3
Automatic memory management with short pauses that is simple to implement? I’m looking for recommendations for an automatic memory management scheme for a programming language. It must be portable, concurren...
-
4
-
5
Getting the value of an input element as a number without parseIntEvery once in a while, you come across something and you think, how did I not know this earlier? valueAsNumber is that thing for me. Whenever we nee...
-
7
React Native International Phone Number Input
About Joyk
Aggregate valuable and interesting links.
Joyk means Joy of geeK