

How to Create a Realistic Embroidery Text Effect in Adobe Photoshop
source link: https://design.tutsplus.com/tutorials/how-to-create-a-realistic-embroidery-text-in-adobe-photoshop--cms-27120
Go to the source link to view the article. You can view the picture content, updated content and better typesetting reading experience. If the link is broken, please click the button below to view the snapshot at that time.

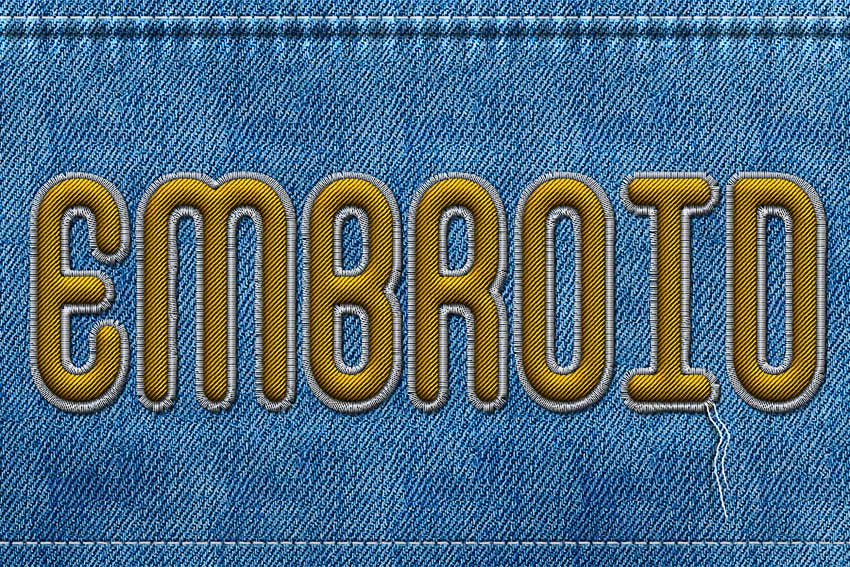
In this tutorial, you'll learn how to create a realistic embroidery effect in Photoshop using stitch brushes and layer styles. The end result will be a font that looks like embroidery!
If you love the texture of embroidery, you'll enjoy this detailed tutorial. However, if you want to save yourself some time and still achieve a realistic embroidery texture, I've got great news for you.
Get this cool embroidery effect Photoshop action from Envato ElementsYou can download stitch effect Photoshop actions from Envato Elements. They're professionally designed and easy to use. You'll recreate the embroidery effect in a few clicks! Find our selection of top embroidery texture Photoshop actions after this tutorial.
And if you'd like to watch a video on how to make an embroidery effect in Photoshop, follow along with us over on our Envato Tuts+ YouTube channel:
What Will You Learn in This Adobe Photoshop Tutorial
- How to make an embroidery effect in Photoshop
- How to create stitch brushes
- How to add realistic sewing details
- How to make a realistic embroidery texture
Tutorial Assets
The following assets were used during the production of this tutorial:
1. How to Create the Jeans Background
Step 1
Create a new 1100 x 600 px document, and create a new layer called Jeans Background. Copy and Paste the Jeans Texture on this layer. Make sure you use the large texture (2000 x 1500 px).
Step 2
Create a new layer called Textured and Fill it with white. Make sure you have the Foreground Color set to white and the Background Color set to black. Go to Filter > Render > Clouds.
Step 3
Go to Filter > Brush Strokes > Crosshatch. Set the Stroke Length to 15, Sharpness to 16, and Strength to 2. You can, of course, change the settings to your liking.
Step 4
Set the blend mode of the Textured layer to Soft Light and around 50% Opacity. If you want, you can change the color of the jeans; add a Color Overlay style to the Textured layer with blend mode Color and simply pick a color that you like.
2. How to Create Stitch Brushes
Step 1
In order to finish the jeans background and to start creating the stitched embroidery effect, we need some stitch brushes that we are going to make from scratch.
Create a new PSD file, size 27 x 5 px. Fill the canvas with black. Go to Edit > Define Brush Preset. Set the brush name to "stitch" and click OK.
You can now close the new PSD file without saving and return to the initial PSD file (the one with the jeans background).
Step 2
Now we are going to modify the brush that we just made, to create a custom brush. Choose the Brush Tool and select the "stitch" brush from the Brush Preset Picker. Toggle the Brush Panel and make the following settings: Angle 90, Roundness 50%, Spacing 87%, and set the Angle Jitter to Direction.
Step 3
Click on the top right corner of the Brush Panel and choose New Brush Preset. Name the new brush "stitch1".
Step 4
Now we'll create the second brush. Again choose the Brush Tool and select the "stitch" brush from the Brush Preset Picker. Toggle the Brush Panel and make the following settings: Spacing 750% and set the Angle Jitter to Direction.
Step 5
Click on the top right corner of the Brush Panel and choose New Brush Preset. Name the new brush "stitch2".
3. How to Add Sewing Details
Step 1
Use the Rectangle Tool and draw a shape as shown in the preview image. Make sure it exceeds the canvas on the top and left/right edges. Name this layer Jeans Border.
Step 2
Go to Filter > Distort > Wave and set the Wavelength, Amplitude, and Scale to create a wavy border. Also go to Filter > Blur > Gaussian Blur and set the Radius to 0.7 pixels.
Step 3
Add this layer style to the Jeans Border layer:
-
Drop Shadow (color
#131e26) -
Inner Shadow (color
#131e26) -
Inner Glow (color
#ffffff) -
Bevel and Emboss (colors:
#ffffffand#131e26)
Step 4
Create a new layer and call it Stitch. Pick the Brush Tool and choose the "stitch2" brush. Set the size to around 13 px and the color to #ffffff. Keep the Shift key pressed to draw a straight line. Add another line on the bottom of the jeans background in the same way.
Step 5
Add this layer style to the Stitch layer:
- Drop Shadow
- Inner Glow
- Bevel and Emboss
- Stroke
Step 6
Go to Filter > Distort > Ripple and set the Amount 30% and Size Small. Your result should now look like this.
Step 7
Create a new layer and call it Ripple Edge. Take the Brush Tool and pick the Soft Round Brush, which is a default Adobe Photoshop brush that you should have in your list. Toggle the Brush panel to customize the brush and make these settings: Size 50 px, Angle 90, Roundness 45%, Spacing 150%.
Step 8
Draw two lines using this custom brush and color white. Set the blend mode of the Ripple Edge layer to Overlay, 40% Opacity. Also add a Drop Shadow layer style (color #0f1114).
4. How to Make an Embroidery Effect in Photoshop
Step 1
Create a new text layer and call it Embroidered Text. Type your text using the False Positive font. Click on the Toggle the Character and Paragraph Panels button and set the Font Size toaround 230 px, Vertically/Horizontally Scale, etc., as shown in the preview.
You can, of course, use any font type you want or even combine text and vector shapes. In this last case, you will have to convert the layers into a smart object.
Step 2
Add a Stroke layer style to the Embroidered Text layer. I am doing that to make the text a little thinner. Right-click on the layer and Convert to Smart Object.
Step 3
Again, add this layer style to the Embroidered Text smart object:
-
Drop Shadow (color
#000000) -
Inner Shadow (color
#000000) -
Bevel and Emboss (colors
#ffffffand#000000) - Bevel and Emboss - Texture (Pattern "pixel-pattern-diagonal")
-
Color Overlay (color
#686565)
Step 4
Convert the layer into a smart object one more time, so that you can add another layer style without rasterizing the effects. Press Control-T to transform the smart object and scale it to 130% on both the horizontal and vertical scales.
Step 5
Duplicate the Embroidered Text smart object and call it Shadow. Move this layer below the Embroidered Text smart object.
Step 6
Now we'll add layer styles for each of these two layers. Let's start with the Embroidered Text smart object. Add an Inner Shadow (color #000000), Bevel and Emboss (colors #ffffff and #000000), Color Overlay (color #ffc000), and Gradient Overlay (colors #ffffff and #ffffff). You can choose any Color Overlay you like, but just make sure to also adjust the Gradient Overlay opacity if you want a darker or lighter color tone.
Step 7
To make the effect more realistic, let's add a Filter > Distort > Ripple and a Filter > Distort > Noise effect. These two effects are added as Smart Filters, so you can edit them at any time by double-clicking on the Filter name.
Step 8
Go to the Shadow Layer and set the Fill to 0%. Next, add a Bevel and Emboss (colors #ffffff and #000000) layer style. The embroidered text should now look like this.
Step 9
Create a new layer just below the Shadow layer and name it Stitched Border. Keep the Control key pressed and click on the Embroidered Text layer thumbnail to make a selection. Go to Select > Modify > Expand and expand by 5 pixels.
Step 10
Go to the Paths tab and choose Make Work Path.
Step 11
Select the Brush Tool, color #ffffff, and pick the "stitch1" brush. Again from the Paths tab, choose Stroke Path. Press Delete to remove the work path.
Step 12
Add a Drop Shadow (color #000000) layer style to the Stitched Border layer. Convert this layer to a smart object.
Step 13
Finally, let's add a layer style to the Stitched Border smart object: Drop Shadow (color #161616), Inner Shadow (color #161616), Bevel and Emboss (color #ffffff and #161616), Color Overlay (color #f5f5f5—you can choose any color you want for the stitch).
Your Embroidery Texture in Photoshop Is Done!
In this tutorial, you learned how to make an embroidery effect in Photoshop. As we promised, below you'll find some of the best embroidery texture Photoshop actions we've got. Save time and have all the fun with them!
5 Top Embroidery Effect Photoshop Actions From Envato Elements
Next up, I'll show you some of the best embroidery texture Photoshop actions from Envato Elements.
If you're a graphic designer or an avid Photoshop expert, you'll love our subscription-based marketplace. For a low monthly fee, you get unlimited downloads of Photoshop add-ons, fonts, graphic templates, and more.
The actions you're about to see are way better than any stitch effect Photoshop free download out there.
1. Embroidery Sticker - Photoshop Action (ATN, ABR, PAT, PSD)
We begin with a really cool and fun add-on. This embroidery effect Photoshop action is designed to look like stitched stickers. Achieve a realistic patch effect on jeans in a few clicks. In this kit you'll get seven stitch layers and unlimited stitch colors.
2. Smart Embroidery - Photoshop Action (ATN, ABR, PSD)
If you're looking for a very realistic embroidery texture, this is for you. This embroidery texture Photoshop action transforms any text or shape into realistic embroidery in one click. You'll get three different embroidery effects, and you can choose any color for the stitches.
3. Realistic Embroidery - Photoshop Actions (ABR, ATN, ASL)
This embroidery effect Photoshop action is elegant and professionally designed. It's a very complete kit that includes:
- 4 actions, 3 different materials, 9 styles, 15 brushes
- infinite fill feature
- photorealistic and clean effect
- easy and fun to use
- quick to customize
- 3 bonus backgrounds: blue denim, black jeans, and white fabric
4. Sewing & Embroidery Photoshop Kit (ABR, ASL, PAT)
If you're searching for the most complete stitch effect Photoshop action kit, you've found it. Add this to your collection and you won't need anything else for embroidery textures. You'll get:
- 40 stitch and yarn brushes
- 10 fabric layer styles
- Photoshop seamless pattern set (grayscale)
- transparent PNGs of buttons, needle, and pin
5. Felt Craft - Stitch Effect Photoshop Action (PSD, PAT, ASL, ABR)
This stitch effect Photoshop action is great for holiday projects. Don't fall for a stitch effect Photoshop free download. Instead, get this complete set of felt crafts with everything you may need:
- 32 felt layer styles
- 10 stitch brushes
- repeat patterns included
- bonus high resolution felt texture
- examples and instruction files
Explore More Cool Photoshop Tutorials and Resources
You've learned how to make an embroidery effect in Photoshop. You've checked our top embroidery texture Photoshop actions. Now, all that's left to do is to give you more awesome tutorials:
Recommend
About Joyk
Aggregate valuable and interesting links.
Joyk means Joy of geeK