

Spring Security 学习之原理篇
source link: https://blog.duval.top/2020/12/01/Spring-Security-%E5%AD%A6%E4%B9%A0%E4%B9%8B%E5%8E%9F%E7%90%86%E7%AF%87/
Go to the source link to view the article. You can view the picture content, updated content and better typesetting reading experience. If the link is broken, please click the button below to view the snapshot at that time.

接上一篇,我们已经熟悉了Spring Security的基本使用,并且实操了几个范例。
本文我们将在这几个范例的基础上进行调试,并深入研究其在源码层面上的实现原理。只有知其然,知其所以然,才能在Spring Security的使用上更加得心应手。
本文主要参考了官方文档9-11章节,在文档基础上进行丰富、拓展和提炼。
Spring Security初始化
SecurityAutoConfiguration
按照Spring Boot Starter的套路,一定有一个Configuration提供一些默认的Bean注入。而在Spring Security中,SecurityAutoConfiguration承担着该角色:
@Configuration(proxyBeanMethods = false)
@ConditionalOnClass(DefaultAuthenticationEventPublisher.class)
@EnableConfigurationProperties(SecurityProperties.class)
@Import({ SpringBootWebSecurityConfiguration.class, WebSecurityEnablerConfiguration.class,
        SecurityDataConfiguration.class })
public class SecurityAutoConfiguration {
    @Bean
    @ConditionalOnMissingBean(AuthenticationEventPublisher.class)
    public DefaultAuthenticationEventPublisher authenticationEventPublisher(ApplicationEventPublisher publisher) {
        return new DefaultAuthenticationEventPublisher(publisher);
    }

}
重点关注导入了WebSecurityEnablerConfiguration.class :
/**
 * If there is a bean of type WebSecurityConfigurerAdapter, this adds the
 * {@link EnableWebSecurity @EnableWebSecurity} annotation. This will make sure that the
 * annotation is present with default security auto-configuration and also if the user
 * adds custom security and forgets to add the annotation. If
 * {@link EnableWebSecurity @EnableWebSecurity} has already been added or if a bean with
 * name {@value BeanIds#SPRING_SECURITY_FILTER_CHAIN} has been configured by the user,
 * this will back-off.
 *
 * @author Madhura Bhave
 * @since 2.0.0
 */
@Configuration(proxyBeanMethods = false)
@ConditionalOnBean(WebSecurityConfigurerAdapter.class)
@ConditionalOnMissingBean(name = BeanIds.SPRING_SECURITY_FILTER_CHAIN)
@ConditionalOnWebApplication(type = ConditionalOnWebApplication.Type.SERVLET)
@EnableWebSecurity
public class WebSecurityEnablerConfiguration {
}
从注释可以看出,WebSecurityEnablerConfiguration的意义是注入一个名为”springSecurityFilterChain”的bean。但如果用户已经指定了同名的bean,则这里就不注入。
再来关注下注解 @EnableWebSecurity
/**
 * Add this annotation to an {@code @Configuration} class to have the Spring Security
 * configuration defined in any {@link WebSecurityConfigurer} or more likely by extending
 * the {@link WebSecurityConfigurerAdapter} base class and overriding individual methods:
 *
 * <pre class="code">
 * @Configuration
 * @EnableWebSecurity
 * public class MyWebSecurityConfiguration extends WebSecurityConfigurerAdapter {
 *
 *     @Override
 *     public void configure(WebSecurity web) throws Exception {
 *         web.ignoring()
 *         // Spring Security should completely ignore URLs starting with /resources/
 *                 .antMatchers("/resources/**");
 *     }
 *
 *     @Override
 *     protected void configure(HttpSecurity http) throws Exception {
 *         http.authorizeRequests().antMatchers("/public/**").permitAll().anyRequest()
 *                 .hasRole("USER").and()
 *                 // Possibly more configuration ...
 *                 .formLogin() // enable form based log in
 *                 // set permitAll for all URLs associated with Form Login
 *                 .permitAll();
 *     }
 *
 *     @Override
 *     protected void configure(AuthenticationManagerBuilder auth) throws Exception {
 *         auth
 *         // enable in memory based authentication with a user named "user" and "admin"
 *         .inMemoryAuthentication().withUser("user").password("password").roles("USER")
 *                 .and().withUser("admin").password("password").roles("USER", "ADMIN");
 *     }
 *
 *     // Possibly more overridden methods ...
 * }
 * </pre>
 *
 * @see WebSecurityConfigurer
 * @see WebSecurityConfigurerAdapter
 *
 * @author Rob Winch
 * @since 3.2
 */
@Retention(value = java.lang.annotation.RetentionPolicy.RUNTIME)
@Target(value = { java.lang.annotation.ElementType.TYPE })
@Documented
@Import({ WebSecurityConfiguration.class,
        SpringWebMvcImportSelector.class,
        OAuth2ImportSelector.class })
@EnableGlobalAuthentication
@Configuration
public @interface EnableWebSecurity {

    /**
     * Controls debugging support for Spring Security. Default is false.
     * @return if true, enables debug support with Spring Security
     */
    boolean debug() default false;
}
注释里讲得很清楚,这个注解@EnableWebSecurity是为了向实现WebSecurityConfigurer或者是继承 WebSecurityConfigurerAdapter的实例暴露Spring Security的配置API入口。API入口分为三类:
public void configure(WebSecurity web) throws Exception {//...}

protected void configure(HttpSecurity http) throws Exception {//..}

protected void configure(AuthenticationManagerBuilder auth) throws Exception {// ...}
所以用户只要通过实现WebSecurityConfigurer接口(或者继承WebSecurityConfigurerAdapter)覆盖configure方法中的若干个,即可实现自定义登录安全逻辑。正如我们在上一篇文章所写的第一个样例:
public class GeneralSecurityConfiguration extends WebSecurityConfigurerAdapter {

    private static final String[] BY_PASS_URLS = {"/styles/**", "/views/**", "/img/**", "/i18n/**", "/health"};

    @Override
    protected void configure(HttpSecurity http) throws Exception {
        // 关闭跨站伪造攻击检查
        http.csrf().disable();

        // 设置X-Frame-Options: SAMEORIGIN
        http.headers().frameOptions().sameOrigin();

        // 部分访问路径进行权限控制
        http.authorizeRequests()
                .antMatchers(BY_PASS_URLS).permitAll()
                .antMatchers("/**").authenticated();
        // 自定义登录页面
        http.formLogin()
                .loginPage("/login")
                .defaultSuccessUrl("/index", true)
                .permitAll()
                .failureUrl("/login").and();

        // 自定义登出页面
        http.logout()
                .logoutUrl("/logout")
                .invalidateHttpSession(true)
                .clearAuthentication(true)
                .logoutSuccessUrl("/login");

        // 自定义异常跳转页面
        http.exceptionHandling()
                .authenticationEntryPoint(new LoginUrlAuthenticationEntryPoint("/login"))
                .and()
                .exceptionHandling().accessDeniedHandler(new AccessDeniedHandlerImpl());

        // 配置remember-me
        rememberMe(http);
    }

    protected void rememberMe(HttpSecurity http) throws Exception {
        http.rememberMe().rememberMeServices(new NullRememberMeServices());
    }
}
EnableWebSecurity
我们主要关注EnableWebSecurity注解注入了WebSecurityConfiguration.class以及引入了另外一个注解@EnableGlobalAuthentication。我们逐个来看看都做了哪些操作。
先来看看WebSecurityConfiguration的核心逻辑:
public class WebSecurityConfiguration implements ImportAware, BeanClassLoaderAware {
    private WebSecurity webSecurity;

    @Bean(name = AbstractSecurityWebApplicationInitializer.DEFAULT_FILTER_NAME)
    public Filter springSecurityFilterChain() throws Exception {
        boolean hasConfigurers = webSecurityConfigurers != null
                && !webSecurityConfigurers.isEmpty();
        if (!hasConfigurers) {
            WebSecurityConfigurerAdapter adapter = objectObjectPostProcessor
                    .postProcess(new WebSecurityConfigurerAdapter() {
                    });
            webSecurity.apply(adapter);
        }
        return webSecurity.build();
    }

    @Autowired(required = false)
    public void setFilterChainProxySecurityConfigurer(
            ObjectPostProcessor<Object> objectPostProcessor,
            @Value("#{@autowiredWebSecurityConfigurersIgnoreParents.getWebSecurityConfigurers()}") List<SecurityConfigurer<Filter, WebSecurity>> webSecurityConfigurers)
            throws Exception {
        webSecurity = objectPostProcessor
                .postProcess(new WebSecurity(objectPostProcessor));
        if (debugEnabled != null) {
            webSecurity.debug(debugEnabled);
        }

        webSecurityConfigurers.sort(AnnotationAwareOrderComparator.INSTANCE);

        Integer previousOrder = null;
        Object previousConfig = null;
        for (SecurityConfigurer<Filter, WebSecurity> config : webSecurityConfigurers) {
            Integer order = AnnotationAwareOrderComparator.lookupOrder(config);
            if (previousOrder != null && previousOrder.equals(order)) {
                throw new IllegalStateException(
                        "@Order on WebSecurityConfigurers must be unique. Order of "
                                + order + " was already used on " + previousConfig + ", so it cannot be used on "
                                + config + " too.");
            }
            previousOrder = order;
            previousConfig = config;
        }
        for (SecurityConfigurer<Filter, WebSecurity> webSecurityConfigurer : webSecurityConfigurers) {
            webSecurity.apply(webSecurityConfigurer);
        }
        this.webSecurityConfigurers = webSecurityConfigurers;
    }
    // ...
}
以上删减了大部分代码,只关心重要的两件事情:
- 第一件事,在方法setFilterChainProxySecurityConfigurer上注入用户自定义的WebSecurityConfigurers,并新建了一个WebSecurity,并将用户的configurers放进了WebSecurity中。这个步骤是通过@Autowire注入的,要比内部的@Bean的优先级更高。
- 第二件事,调用WebSecurity的build方法,生成并注入了一个名为”springSecurityFilterChain”的bean。这个bean是Spring Security的核心逻辑,后文会详细分析;
可以从build方法debug进去看看WebSecurity注入用户自定义配置的过程,这个不在本文的讨论范围之内,有时间再写一篇有关文章。
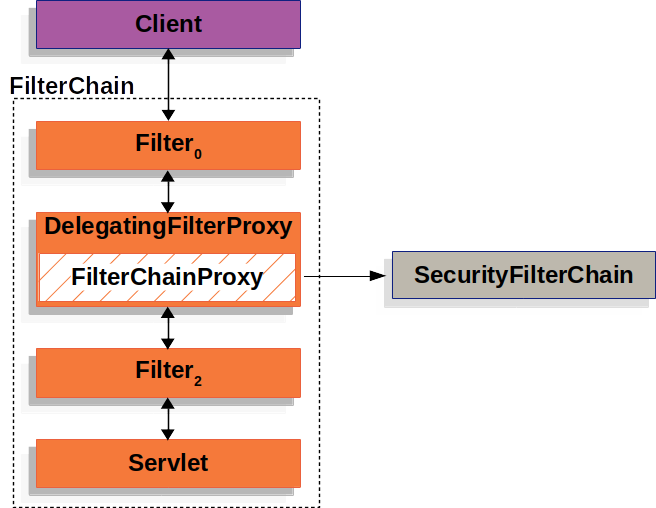
DelegatingFilterProxy
Spring Security会自动注册一个DelegatingFilterProxy到Servlet的过滤链中:
@Configuration(proxyBeanMethods = false)
@ConditionalOnWebApplication(type = Type.SERVLET)
@EnableConfigurationProperties(SecurityProperties.class)
@ConditionalOnClass({ AbstractSecurityWebApplicationInitializer.class, SessionCreationPolicy.class })
@AutoConfigureAfter(SecurityAutoConfiguration.class)
public class SecurityFilterAutoConfiguration {

    private static final String DEFAULT_FILTER_NAME = AbstractSecurityWebApplicationInitializer.DEFAULT_FILTER_NAME;

    @Bean
    @ConditionalOnBean(name = DEFAULT_FILTER_NAME)
    public DelegatingFilterProxyRegistrationBean securityFilterChainRegistration(
            SecurityProperties securityProperties) {
        DelegatingFilterProxyRegistrationBean registration = new DelegatingFilterProxyRegistrationBean(
                DEFAULT_FILTER_NAME);
        registration.setOrder(securityProperties.getFilter().getOrder());
        registration.setDispatcherTypes(getDispatcherTypes(securityProperties));
        return registration;
    }

    // ...
}
DelegatingFilterProxyRegistrationBean,顾名思义,就是为了注册DelegatingFilterProxy而存在的。getFilter 方法用来获取需要注册过滤器,方法里新建了一个DelegatingFilterProxy对象,入参包含了this.targetBeanName,也就是”springSecurityFilterChain” :
@Override
public DelegatingFilterProxy getFilter() {
    return new DelegatingFilterProxy(this.targetBeanName, getWebApplicationContext()) {

        @Override
        protected void initFilterBean() throws ServletException {
            // Don't initialize filter bean on init()
        }

    };
}
注册完毕后的过滤链是这样子的:

DelegatingFilterProxy 实现了Filter接口,并且也是一个代理类。所以它会将doFilter方法的调用透传给内部的被代理对象 Filter delegate 。此外,还能实现被代理对象的懒加载:
@Override
public void doFilter(ServletRequest request, ServletResponse response, FilterChain filterChain)
        throws ServletException, IOException {

    // Lazily initialize the delegate if necessary.
    Filter delegateToUse = this.delegate;
    if (delegateToUse == null) {
        // 懒加载
        synchronized (this.delegateMonitor) {
            delegateToUse = this.delegate;
            if (delegateToUse == null) {
                WebApplicationContext wac = findWebApplicationContext();
                if (wac == null) {
                    throw new IllegalStateException("No WebApplicationContext found: " +
                            "no ContextLoaderListener or DispatcherServlet registered?");
                }
                delegateToUse = initDelegate(wac);
            }
            this.delegate = delegateToUse;
        }
    }

    // Let the delegate perform the actual doFilter operation.
    invokeDelegate(delegateToUse, request, response, filterChain);
}
FilterChainProxy && Securityfilterchain
DelegatingFilterProxy内部的被代理对象delegate其实是一个FilterChainProxy。流程图可以更新为:
但为什么delegate不是SecurityFilterChain?那是因为WebSecurity在doBuild中,又给它包了一层代理:
@Override
protected Filter performBuild() throws Exception {
    Assert.state(
            !securityFilterChainBuilders.isEmpty(),
            () -> "At least one SecurityBuilder<? extends SecurityFilterChain> needs to be specified. "
                    + "Typically this done by adding a @Configuration that extends WebSecurityConfigurerAdapter. "
                    + "More advanced users can invoke "
                    + WebSecurity.class.getSimpleName()
                    + ".addSecurityFilterChainBuilder directly");
    int chainSize = ignoredRequests.size() + securityFilterChainBuilders.size();
    List<SecurityFilterChain> securityFilterChains = new ArrayList<>(
            chainSize);
    for (RequestMatcher ignoredRequest : ignoredRequests) {
        securityFilterChains.add(new DefaultSecurityFilterChain(ignoredRequest));
    }
    for (SecurityBuilder<? extends SecurityFilterChain> securityFilterChainBuilder : securityFilterChainBuilders) {
        securityFilterChains.add(securityFilterChainBuilder.build());
    }
    // 对securityFilterChains链表进行封装
    FilterChainProxy filterChainProxy = new FilterChainProxy(securityFilterChains);
    if (httpFirewall != null) {
        filterChainProxy.setFirewall(httpFirewall);
    }
    filterChainProxy.afterPropertiesSet();

    Filter result = filterChainProxy;
    if (debugEnabled) {
        logger.warn("\n\n"
                + "********************************************************************\n"
                + "**********        Security debugging is enabled.       *************\n"
                + "**********    This may include sensitive information.  *************\n"
                + "**********      Do not use in a production system!     *************\n"
                + "********************************************************************\n\n");
        result = new DebugFilter(filterChainProxy);
    }
    postBuildAction.run();
    return result;
}
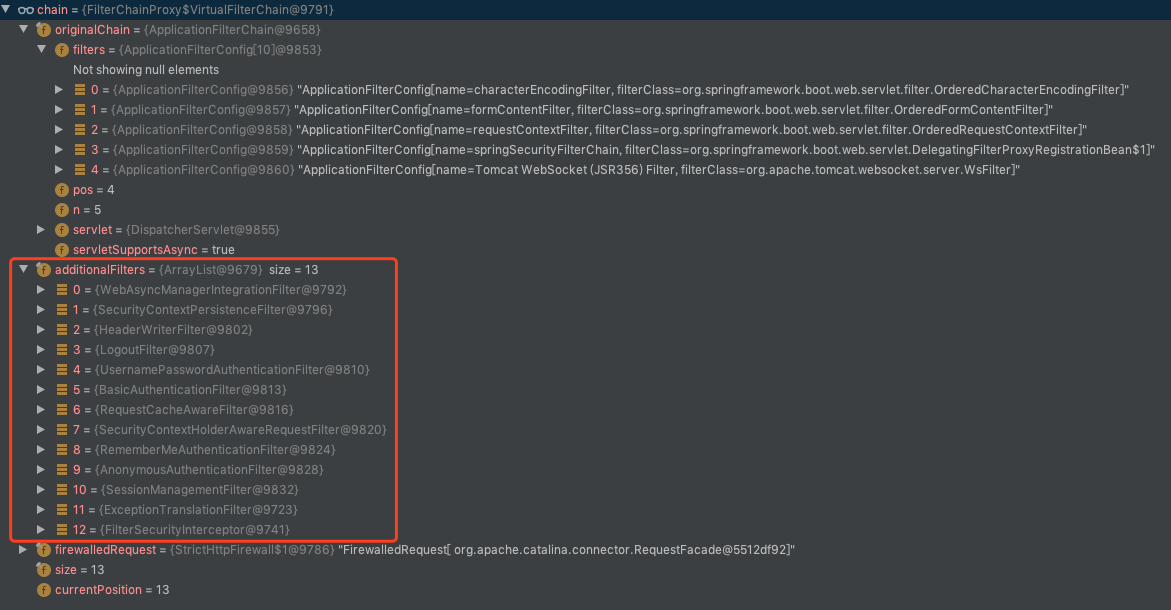
值得注意的是FilterChainProxy也是一个特殊的Filter,而且可以看出它是支持对多个securityFilterChain进行代理(详见下一节)!!!FilterChainProxy#doFilterInternal里会按顺序找到第一个满足条件的securityFilterChain,并构建一个VirtualFilterChain:
private void doFilterInternal(ServletRequest request, ServletResponse response,
            FilterChain chain) throws IOException, ServletException {
    // ...
    List<Filter> filters = getFilters(fwRequest);
    // ...
    VirtualFilterChain vfc = new VirtualFilterChain(fwRequest, chain, filters);
    vfc.doFilter(fwRequest, fwResponse);
}

/**
* Returns the first filter chain matching the supplied URL.
*
* @param request the request to match
* @return an ordered array of Filters defining the filter chain
*/
private List<Filter> getFilters(HttpServletRequest request) {
    for (SecurityFilterChain chain : filterChains) {
        if (chain.matches(request)) {
            // 返回第一个满足条件的chain内部所有的过滤器
            return chain.getFilters();
        }
    }
    return null;
}
而在VirtualFilterChain内部会按顺序触发该securityFilterChain内部的所有过滤器:
private static class VirtualFilterChain implements FilterChain {
    // 保存最开始的sevlet过滤链
    private final FilterChain originalChain;
    // securityFilterChain内部的所有过滤器
    private final List<Filter> additionalFilters;
    @Override
    public void doFilter(ServletRequest request, ServletResponse response)
            throws IOException, ServletException {
        if (currentPosition == size) {
            // securityFilterChain内部所有过滤器都已经处理完毕
            if (logger.isDebugEnabled()) {
                logger.debug(UrlUtils.buildRequestUrl(firewalledRequest)
                        + " reached end of additional filter chain; proceeding with original chain");
            }

            // Deactivate path stripping as we exit the security filter chain
            this.firewalledRequest.reset();
            // 返回继续处理最开始的sevlet过滤器
            originalChain.doFilter(request, response);
        }
        else {
            // 递增处理下一个过滤器
            currentPosition++;

            Filter nextFilter = additionalFilters.get(currentPosition - 1);

            if (logger.isDebugEnabled()) {
                logger.debug(UrlUtils.buildRequestUrl(firewalledRequest)
                        + " at position " + currentPosition + " of " + size
                        + " in additional filter chain; firing Filter: '"
                        + nextFilter.getClass().getSimpleName() + "'");
            }
            // 触发下一个过滤器
            nextFilter.doFilter(request, response, this);
        }
    }
}
所以,流程图更新为:

为什么使用FilterChainProxy?主要是有三点好处:
- 使用它作为过滤链的起点,可以方便排查故障的时候,将它作为debug入口。
- 使用它做一些公共操作。比如清空线程内的SecurityContext,避免内存泄漏;又比如使用HttpFirewall过滤部分类型的攻击请求。
- 使用它可以支持多个securityFilterChain,不同的securityFilterChain匹配不同的URL。这样可以提供更多的灵活性。如下图所示:

Security Filters
SecurityFilterChain 内部会包含多个Security Filters。这些 Security Filters都是用户通过configure注册,并通过WebSecurity的build过程生成的。
常见的一些Filter顺序如下:
- ChannelProcessingFilter
- ConcurrentSessionFilter
- WebAsyncManagerIntegrationFilter
- SecurityContextPersistenceFilter
- HeaderWriterFilter
- CorsFilter
- CsrfFilter
- LogoutFilter
- OAuth2AuthorizationRequestRedirectFilter
- Saml2WebSsoAuthenticationRequestFilter
- X509AuthenticationFilter
- AbstractPreAuthenticatedProcessingFilter
- CasAuthenticationFilter
- OAuth2LoginAuthenticationFilter
- Saml2WebSsoAuthenticationFilter
- UsernamePasswordAuthenticationFilter
- ConcurrentSessionFilter
- OpenIDAuthenticationFilter
- DefaultLoginPageGeneratingFilter
- DefaultLogoutPageGeneratingFilter
- DigestAuthenticationFilter
- BearerTokenAuthenticationFilter
- BasicAuthenticationFilter
- RequestCacheAwareFilter
- SecurityContextHolderAwareRequestFilter
- JaasApiIntegrationFilter
- RememberMeAuthenticationFilter
- AnonymousAuthenticationFilter
- OAuth2AuthorizationCodeGrantFilter
- SessionManagementFilter
- ExceptionTranslationFilter
- FilterSecurityInterceptor
- SwitchUserFilter
具体会用到哪些Filter,需要结合业务分析。本文只分析其中最关键的几个Filter(已加粗显示)。
例如在表单登录例子里,用到的filter如下图:
ExceptionTranslationFilter
ExceptionTranslationFilter是非常重要的过滤器之一,它主要功能是负责异常拦截,而且核心是对AccessDeniedException 和 AuthenticationException 捕获处理。
比如,所有第一次访问 https://xxxx.com/index.html 的未登录用户,都应该被重定向到登录页 https://xxxx.com/login.html 进行鉴定。
这个功能点实现就需要依赖ExceptionTranslationFilter对AuthenticationException 的处理。我们来看源码:
private void handleSpringSecurityException(HttpServletRequest request,
            HttpServletResponse response, FilterChain chain, RuntimeException exception)
            throws IOException, ServletException {
    if (exception instanceof AuthenticationException) {
        // 处理AuthenticationException(未鉴定异常)
        logger.debug(
                "Authentication exception occurred; redirecting to authentication entry point",
                exception);
        // 跳转到鉴定逻辑(一般是重定向到鉴定页面)
        sendStartAuthentication(request, response, chain,
                (AuthenticationException) exception);
    }
    else if (exception instanceof AccessDeniedException) {
        // 处理AccessDeniedException(访问拒绝异常)
        Authentication authentication = SecurityContextHolder.getContext().getAuthentication();
        if (authenticationTrustResolver.isAnonymous(authentication) || authenticationTrustResolver.isRememberMe(authentication)) {
            logger.debug(
                    "Access is denied (user is " + (authenticationTrustResolver.isAnonymous(authentication) ? "anonymous" : "not fully authenticated") + "); redirecting to authentication entry point",
                    exception);
            // 如果是默认的匿名用户,则尝试跳转到鉴定逻辑(一般是重定向到鉴定页面)
            sendStartAuthentication(
                    request,
                    response,
                    chain,
                    new InsufficientAuthenticationException(
                        messages.getMessage(
                            "ExceptionTranslationFilter.insufficientAuthentication",
                            "Full authentication is required to access this resource")));
        }
        else {
            logger.debug(
                    "Access is denied (user is not anonymous); delegating to AccessDeniedHandler",
                    exception);
            // 如果非默认的匿名用户(也就是已经登录过的用户),则跳转到访问拒绝逻辑,
            // 因为该用户的确没有权限访问该资源。
            accessDeniedHandler.handle(request, response,
                    (AccessDeniedException) exception);
        }
    }
}
这段代码的逻辑非常清晰,注释已经清楚这里不再赘言。而sendStartAuthentication方法再展开看看是这样的:
protected void sendStartAuthentication(HttpServletRequest request,
            HttpServletResponse response, FilterChain chain,
            AuthenticationException reason) throws ServletException, IOException {
    // SEC-112: Clear the SecurityContextHolder's Authentication, as the
    // existing Authentication is no longer considered valid
    // 清空已有的鉴定信息,这是一个防御性编程
    SecurityContextHolder.getContext().setAuthentication(null);
    // 缓存这次请求的上下文,因为准备进入鉴定逻辑,可能要跳转页面,
    // 而等鉴定完了还要继续处理这请求
    requestCache.saveRequest(request, response);
    // 调用鉴定逻辑
    logger.debug("Calling Authentication entry point.");
    authenticationEntryPoint.commence(request, response, reason);
}
用一张图总结以上流程:
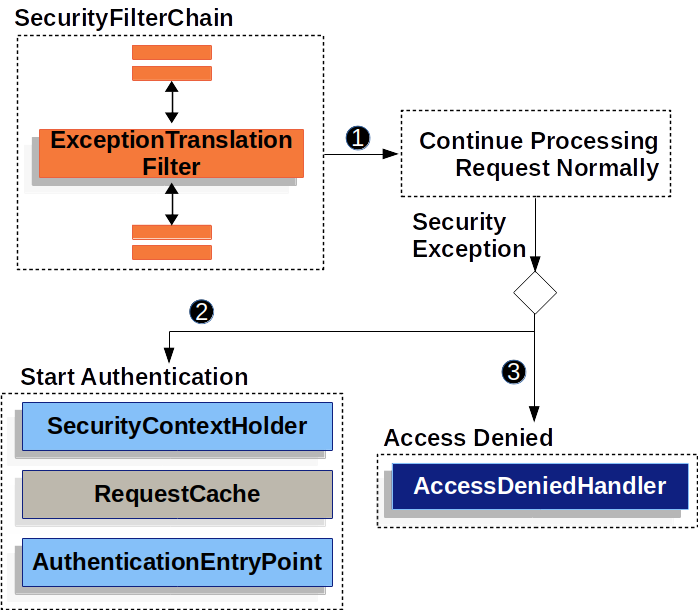
exceptiontranslationfilter.png
因此,用户可以自定义自己的异常跳转页面,例如:
// 自定义异常跳转页面
http.exceptionHandling()
        .authenticationEntryPoint(new LoginUrlAuthenticationEntryPoint("/login"))
        .and()
        .exceptionHandling().accessDeniedHandler(new AccessDeniedHandlerImpl());
UsernamePasswordAuthenticationFilter
UsernamePasswordAuthenticationFilter 是专门用来处理登录请求的过滤器。默认情况下,它只处理POST /login请求:
public UsernamePasswordAuthenticationFilter() {
    super(new AntPathRequestMatcher("/login", "POST"));
}
请求过滤是在父类实现的:
public void doFilter(ServletRequest req, ServletResponse res, FilterChain chain)
            throws IOException, ServletException {

    HttpServletRequest request = (HttpServletRequest) req;
    HttpServletResponse response = (HttpServletResponse) res;
    // 过滤请求,默认只处理 POST /login 请求
    if (!requiresAuthentication(request, response)) {
        chain.doFilter(request, response);

        return;
    }

    Authentication authResult;

    try {
        // 身份鉴定逻辑
        authResult = attemptAuthentication(request, response);
        if (authResult == null) {
            // return immediately as subclass has indicated that it hasn't completed
            // authentication
            return;
        }
        sessionStrategy.onAuthentication(authResult, request, response);
    }
    catch (InternalAuthenticationServiceException failed) {
        // 身份鉴定失败逻辑1
        logger.error(
                "An internal error occurred while trying to authenticate the user.",
                failed);
        unsuccessfulAuthentication(request, response, failed);

        return;
    }
    catch (AuthenticationException failed) {
        // 身份鉴定失败逻辑2
        unsuccessfulAuthentication(request, response, failed);

        return;
    }

    // 以下为身份鉴定成功后逻辑
    if (continueChainBeforeSuccessfulAuthentication) {
        chain.doFilter(request, response);
    }

    successfulAuthentication(request, response, chain, authResult);
}

protected boolean requiresAuthentication(HttpServletRequest request,
            HttpServletResponse response) {
    // 如果是登录请求,则返回true。默认是POST /login
    return requiresAuthenticationRequestMatcher.matches(request);
}
UsernamePasswordAuthenticationFilter 实现了父类的身份鉴定逻辑抽象方法:
public Authentication attemptAuthentication(HttpServletRequest request,
            HttpServletResponse response) throws AuthenticationException {
    if (postOnly && !request.getMethod().equals("POST")) {
        throw new AuthenticationServiceException(
                "Authentication method not supported: " + request.getMethod());
    }
    // 从请求中取出username和password
    String username = obtainUsername(request);
    String password = obtainPassword(request);

    if (username == null) {
        username = "";
    }

    if (password == null) {
        password = "";
    }

    username = username.trim();
    // 构建一个token实例
    UsernamePasswordAuthenticationToken authRequest = new UsernamePasswordAuthenticationToken(
            username, password);

    // Allow subclasses to set the "details" property
    setDetails(request, authRequest);
    // 交给AuthenticationManager进行身份鉴定
    return this.getAuthenticationManager().authenticate(authRequest);
}
可见,UsernamePasswordAuthenticationFilter只是个框架,真正的鉴定逻辑都是在AuthenticationManager中。
再回到父类看看鉴定成功后的处理逻辑,因为这逻辑为后文埋了伏笔:
protected void successfulAuthentication(HttpServletRequest request,
            HttpServletResponse response, FilterChain chain, Authentication authResult)
            throws IOException, ServletException {
    // 鉴定成功保存结果到线程上下文空间内
    SecurityContextHolder.getContext().setAuthentication(authResult);
    // 调用"记住我"服务保存用户鉴定信息
    rememberMeServices.loginSuccess(request, response, authResult);

    // Fire event
    if (this.eventPublisher != null) {
        eventPublisher.publishEvent(new InteractiveAuthenticationSuccessEvent(
                authResult, this.getClass()));
    }
    // 鉴定成功处理逻辑
    successHandler.onAuthenticationSuccess(request, response, authResult);
}
注意这里在上下文保存了鉴定结果。
RememberMeAuthenticationFilter
上边我们着重强调上下文空间会保存用户的鉴定信息,但是当用户关闭浏览器之后一段时间,session会自动超时销毁。那么上下文空间保存的鉴定信息自然丢失,此时用户就需要重新登录鉴定。
所以,常见一些安全风险不大的网页,会提供一个”记住我”的按钮。只要用户在一定时间内(比如24h)重新打开该网站,都为用户自动登录。RememberMeAuthenticationFilter的存在正是为了实现这个功能。
既然RememberMeAuthenticationFilter是个Filter,那么按照惯例,我们直接来看其doFilter方法:
public class RememberMeAuthenticationFilter extends GenericFilterBean implements
        ApplicationEventPublisherAware {
    private AuthenticationManager authenticationManager;
    private RememberMeServices rememberMeServices;

    public void doFilter(ServletRequest req, ServletResponse res, FilterChain chain)
            throws IOException, ServletException {
        HttpServletRequest request = (HttpServletRequest) req;
        HttpServletResponse response = (HttpServletResponse) res;

        if (SecurityContextHolder.getContext().getAuthentication() == null) {
            // 如果请求里没有身份鉴定信息,则尝试通过"记住我"自动登录
            Authentication rememberMeAuth = rememberMeServices.autoLogin(request,
                    response);

            if (rememberMeAuth != null) {
            // "记住我"里边获取到了用户鉴定信息
                try {
                    // 通过authenticationManager确定鉴定信息是否有效
                    rememberMeAuth = authenticationManager.authenticate(rememberMeAuth);

                    // 鉴定信息存进上下文空间
                    SecurityContextHolder.getContext().setAuthentication(rememberMeAuth);

                    onSuccessfulAuthentication(request, response, rememberMeAuth);
                    // ...

                    if (successHandler != null) {
                        successHandler.onAuthenticationSuccess(request, response,
                                rememberMeAuth);

                        return;
                    }

                }
                catch (AuthenticationException authenticationException) {
                    // 鉴定异常,则清除"记住我"里的token信息
                    rememberMeServices.loginFail(request, response);

                    onUnsuccessfulAuthentication(request, response,
                            authenticationException);
                }
            }

            chain.doFilter(request, response);
        }
        else {
            chain.doFilter(request, response);
        }
    }
}
从注释可以看出,doFilter里也是非常骨架的代码。核心的逻辑需要看看AuthenticationManager和RemeberMeService,这部分内容放在后文。请继续往下。
SecurityContextHolder && SecurityContext
SecurityContextHolder是Spring Security的核心模型,用来保存通过鉴定的用户信息。

默认情况下,用户信息保存在线程空间内(ThreadLocal)。可以通过以下方法保存和取出用户信息:
// 取出鉴定信息
Authentication authentication = SecurityContextHolder.getContext().getAuthentication();
// 保存鉴定信息
SecurityContextHolder.getContext().setAuthentication(authenticaiton);
Authentication
Authentication内部包含是三部分:
- principal : 保存用户信息,当通过用户和密码进行鉴定的时候,通常是一个UserDetails实例;
- credentials :保存密码,通常当用户通过鉴定后,该字段会被清空以免密码泄露;
- authorities :保存用户权限,通常是角色或者范围等较高抽象等级的权限,GrantedAuthority的实现类型;
Authentication有两个应用情景:
- 表示还没被鉴定的用户的信息。它作为AuthenticationManager的入参,这时候isAuthenticated()方法返回false;
- 表示已经被鉴定的用户信息。可以通过SecurityContext获取到当前用户的鉴定信息。
GrantedAuthority
GrantedAuthority是抽象程度较高的权限,一般是角色或者范围等级别。比方说可以是 ROLE_ADMINISTRATOR 或者 ROLE_HR_SUPERVISOR。这种级别的权限后续可以应用到URL授权或者方法访问授权上。但不建议用于更细粒度的权限控制。
AuthenticationManager && ProviderManager
AuthenticationManager是Spring Security的身份鉴定入口。通常的流程是Spring Security的Filter调用AuthenticationManager的API进行身份鉴定后获得一个用户鉴定信息(Authentication),然后将该 Authentication保存在线程空间(SecurityContextHolder)中。
而ProviderManager是最常用的一个AuthenticationManager实现。它将委托若干AuthenticationProvider进行身份鉴定。每一个AuthenticationProvider都有机会对该用户信息鉴定,如果鉴定不通过则交给下一个Provider。如果所有的Provider都不支持该Authentication的鉴定,则会抛出一个ProviderNotFoundException。

实际中每一个AuthenticationProvider只处理特定类型的authentication。例如,UsernamePasswordAuthenticationToken只能够鉴定用户密码类型的信息:
public boolean supports(Class<?> authentication) {
    return (UsernamePasswordAuthenticationToken.class
            .isAssignableFrom(authentication));
}
这样子的设计使得我们可以通过定制不同的AuthenticationProvider来支持多种鉴定方式。
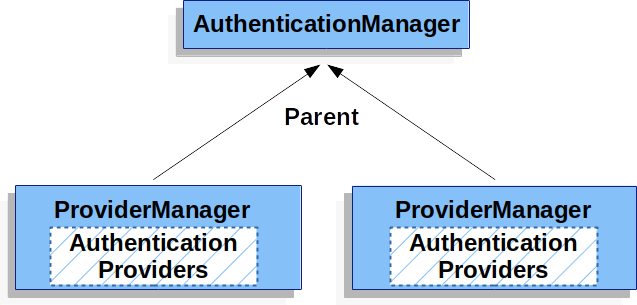
ProviderManager还支持指定一个可选的父AuthenticationManager,以应对所有的Provider都不支持该Authentication的鉴定的情景。父AuthenticationManager通常也是一个ProviderManager。

代码中也清晰体现了以上逻辑:
public Authentication authenticate(Authentication authentication)
            throws AuthenticationException {
        Class<? extends Authentication> toTest = authentication.getClass();
        // ...
        // 遍历所有的provider
        for (AuthenticationProvider provider : getProviders()) {
            if (!provider.supports(toTest)) {
                // 如果该provider不支持该类型鉴定信息,则跳过
                continue;
            }

            try {
                result = provider.authenticate(authentication);

                if (result != null) {
                    // 鉴定通过则终止循环
                    copyDetails(authentication, result);
                    break;
                }
            }
            catch (AccountStatusException | InternalAuthenticationServiceException e) {
                prepareException(e, authentication);
                // SEC-546: Avoid polling additional providers if auth failure is due to
                // invalid account status
                throw e;
            } catch (AuthenticationException e) {
                lastException = e;
            }
        }

        if (result == null && parent != null) {
            // result为null,意味着所有的provider都不支持鉴定,需要使用parent来鉴定,作为兜底。
            try {
                result = parentResult = parent.authenticate(authentication);
            }
            catch (ProviderNotFoundException e) {
                // ignore as we will throw below if no other exception occurred prior to
                // calling parent and the parent
                // may throw ProviderNotFound even though a provider in the child already
                // handled the request
            }
            catch (AuthenticationException e) {
                lastException = parentException = e;
            }
        }

        if (result != null) {
            if (eraseCredentialsAfterAuthentication
                    && (result instanceof CredentialsContainer)) {
                // 鉴定成功,尝试擦除用户密码信息
                ((CredentialsContainer) result).eraseCredentials();
            }

            // If the parent AuthenticationManager was attempted and successful than it will publish an AuthenticationSuccessEvent
            // This check prevents a duplicate AuthenticationSuccessEvent if the parent AuthenticationManager already published it
            if (parentResult == null) {
                eventPublisher.publishAuthenticationSuccess(result);
            }
            return result;
        }

        // Parent was null, or didn't authenticate (or throw an exception).

        if (lastException == null) {
            lastException = new ProviderNotFoundException(messages.getMessage(
                    "ProviderManager.providerNotFound",
                    new Object[] { toTest.getName() },
                    "No AuthenticationProvider found for {0}"));
        }

        // If the parent AuthenticationManager was attempted and failed than it will publish an AbstractAuthenticationFailureEvent
        // This check prevents a duplicate AbstractAuthenticationFailureEvent if the parent AuthenticationManager already published it
        if (parentException == null) {
            prepareException(lastException, authentication);
        }

        throw lastException;
    }
另外多个ProviderManager共享同一个父AuthenticationManager也是可行的,常常用于多个 SecurityFilterChain 对象 拥有部分公共的鉴定逻辑的情景。
AuthenticationProvider
如上所言,多个AuthenticationProvider会被注入到ProviderManager。但是单个AuthenticationProvider只能处理特定类型的鉴定信息。比如,DaoAuthenticationProvider支持包含用户名密码的鉴定信息,而JwtAuthenticationProvider 支持包含JWT token的鉴定信息。
AuthenticationEntryPoint
上文我们已经多次看见AuthenticationEntryPoint,一般它的作用是当发现来自未鉴定用户请求的时候进行重定向到登录页。
AbstractAuthenticationProcessingFilter
前文在介绍UsernamePasswordAuthenticationFilter的时候,其实已经介绍过AbstractAuthenticationProcessingFilter。它其实是用来鉴定用户身份信息的一个抽象Filter。用户可以继承该抽象基类,实现自定义的身份鉴定Filter,比如:UsernamePasswordAuthenticationFilter。通过分析该抽象基类源码,可以得到以下执行流程图:

abstractauthenticationprocessingfilter.png
总结流程如下:
- 1.当用户提交身份鉴定信息,AbstractAuthenticationProcessingFilter会从HttpServletRequest提供的信息构造一个Authentication。这个步骤是在 attemptAuthentication 抽象方法中完成的,也就是由AbstractAuthenticationProcessingFilter的实现类来实现。例如,UsernamePasswordAuthenticationFilter 构造了一个包含用户名和密码的UsernamePasswordAuthenticationToken作为身份鉴定信息;
- 2.接下来这个Authentication会被传递到AuthenticationManager进行身份鉴定;
- 3.如果鉴定失败:
- 清空 SecurityContextHolder;
- 调用RememberMeServices.loginFail;如果没有注册RememberMeServices,则忽略;
- 调用AuthenticationFailureHandler;
- 4.如果鉴定成功:
- 通知SessionAuthenticationStrategy有一个新的登录请求;
- 保存Authentication到SecurityContextHolder。稍后SecurityContextPersistenceFilter会保存SecurityContext到HttpSession中;
- 调用RememberMeServices.loginSuccess;如果没有注册RememberMeServices,则忽略;
- ApplicationEventPublisher发布一个InteractiveAuthenticationSuccessEvent事件。
从代码里也能一看端倪:
public void doFilter(ServletRequest req, ServletResponse res, FilterChain chain)
            throws IOException, ServletException {
    HttpServletRequest request = (HttpServletRequest) req;
    HttpServletResponse response = (HttpServletResponse) res;

    if (!requiresAuthentication(request, response)) {
        chain.doFilter(request, response);

        return;
    }

    Authentication authResult;

    try {
        authResult = attemptAuthentication(request, response);
        if (authResult == null) {
            // return immediately as subclass has indicated that it hasn't completed
            // authentication
            return;
        }
        sessionStrategy.onAuthentication(authResult, request, response);
    }
    catch (InternalAuthenticationServiceException failed) {
        logger.error(
                "An internal error occurred while trying to authenticate the user.",
                failed);
        unsuccessfulAuthentication(request, response, failed);

        return;
    }
    catch (AuthenticationException failed) {
        // Authentication failed
        unsuccessfulAuthentication(request, response, failed);

        return;
    }

    // Authentication success
    if (continueChainBeforeSuccessfulAuthentication) {
        chain.doFilter(request, response);
    }

    successfulAuthentication(request, response, chain, authResult);
}
UserDetails
UserDetails与Authentication的内部结构非常相似,读者需要注意区分。上文提到Authentication的两处应用场景,而UserDetails则只有唯一的应用场景,它是由 UserDetailsService返回的数据结构,携带着用户信息,包括用户名、密码(一般是加密后)、权限角色等。
UserDetailsService
先来看看接口定义:
/**
 * Core interface which loads user-specific data.
 * <p>
 * It is used throughout the framework as a user DAO and is the strategy used by the
 * {@link org.springframework.security.authentication.dao.DaoAuthenticationProvider
 * DaoAuthenticationProvider}.
 *
 * <p>
 * The interface requires only one read-only method, which simplifies support for new
 * data-access strategies.
 *
 * @see org.springframework.security.authentication.dao.DaoAuthenticationProvider
 * @see UserDetails
 *
 * @author Ben Alex
 */
public interface UserDetailsService {
    // ~ Methods
    // ========================================================================================================

    /**
     * Locates the user based on the username. In the actual implementation, the search
     * may possibly be case sensitive, or case insensitive depending on how the
     * implementation instance is configured. In this case, the <code>UserDetails</code>
     * object that comes back may have a username that is of a different case than what
     * was actually requested..
     *
     * @param username the username identifying the user whose data is required.
     *
     * @return a fully populated user record (never <code>null</code>)
     *
     * @throws UsernameNotFoundException if the user could not be found or the user has no
     * GrantedAuthority
     */
    UserDetails loadUserByUsername(String username) throws UsernameNotFoundException;
}
从注释可以看出,这个接口主要是提供给DaoAuthenticationProvider加载用户信息的,返回数据结构正是上文的UserDetails。当然这个接口还应用在了AbstractRememberMeServices等地方。
用户可以自定义自己UserDetailsService:
@Bean
CustomUserDetailsService customUserDetailsService() {
    return new CustomUserDetailsService();
}
PasswordEncoder
PasswordEncoder是用来对密码进行加解密的接口。Spring Security提供了非常多实现,可以看看 PasswordEncoderFactories类。
特别注意的是,DelegatingPasswordEncoder还支持根据密文前缀来动态选择加解密算法。
DaoAuthenticationProvider
如果用户没有指定AuthenticationProvider的话,Spring Security默认会以DaoAuthenticationProvider作为兜底。
DaoAuthenticationProvider使用UserDetailsService以及UserDetailsService来鉴定用户的身份信息。流程图大概如下:

- 1.Authentication Filter (比如UsernamePasswordAuthenticationFilter)构造一个
包含用户名和密码的UsernamePasswordAuthenticationToken,并传递给AuthenticationManager(通常是ProviderManager实现); - 2.ProviderManager会使用AuthenticationProvider列表去鉴定用户身份,列表里就可以有DaoAuthenticationProvider;
- 3.DaoAuthenticationProvider 通过 UserDetailsService 加载用户信息 UserDetails;
- 4.DaoAuthenticationProvider使用 PasswordEncoder 验证传入的用户身份信息和UserDetails是否吻合;
- 5.当身份鉴定成功,会返回一个包含UserDetails和Authorities的UsernamePasswordAuthenticationToken实例。最后这个token会在Authentication Filter里被保存到SecurityContextHolder中。
Basic Authentication
Spring Securtiy原生支持Basic HTTP Authentication。
这种认证方式不常用,而且分析思路和上文一致,因此,可以参考下官方文档10.10.2. Basic Authentication
Digest Authentication
同上,不常用而且分析思路一致,详见官方文档 10.10.3. Digest Authentication
LDAP Authentication
LDAP的接入例子我们在上一篇《Spring Security 学习之使用篇》已经学习过使用方式,现在回顾下:
@Profile("ldap")
@Component
public class SecurityLdapConfiguration extends GeneralSecurityConfiguration {

    @Bean
    public LdapContextSource ldapContextSource(LdapProperties ldapProperties) {
        LdapContextSource contextSource = new LdapContextSource();
        contextSource.setUrl(ldapProperties.getUrl());
        contextSource.setUserDn(ldapProperties.getUserDn());
        contextSource.setPassword(ldapProperties.getPassword());
        contextSource.setPooled(false);
        contextSource.afterPropertiesSet();
        return contextSource;
    }

    @Bean
    public BindAuthenticator authenticator(BaseLdapPathContextSource contextSource, LdapProperties ldapProperties) {
        String searchBase = ldapProperties.getSearchBase();
        String filter = ldapProperties.getSearchFilter();
        FilterBasedLdapUserSearch search =
                new FilterBasedLdapUserSearch(searchBase, filter, contextSource);
        BindAuthenticator authenticator = new BindAuthenticator(contextSource);
        authenticator.setUserSearch(search);
        return authenticator;
    }

    @Bean
    public LdapAuthenticationProvider authenticationProvider(LdapAuthenticator authenticator) {
        return new LdapAuthenticationProvider(authenticator);
    }
}
与之前不一样的是,这里LDAP需要自定义一个 LdapAuthenticationProvider ,用来取代兜底的DaoAuthenticationProvider。
这给我们一个启发,可以通过自定义AuthenticationProvider,实现更加丰富多样的身份鉴定逻辑。
RememberServices
RememberServices用来实现”记住我”功能,原理是从用户请求的Cookie中解析token信息,然后和本地缓存的token(或者根据用户密码生成的token)作比较,比较成功则为用户自动登录。
@Override
    public final Authentication autoLogin(HttpServletRequest request,
            HttpServletResponse response) {
    String rememberMeCookie = extractRememberMeCookie(request);

    if (rememberMeCookie == null) {
        return null;
    }

    if (rememberMeCookie.length() == 0) {
        logger.debug("Cookie was empty");
        cancelCookie(request, response);
        return null;
    }

    UserDetails user = null;

    try {
        // 从cookie信息解析出token信息
        String[] cookieTokens = decodeCookie(rememberMeCookie);
        // 根据cookieTokens执行自动登录
        user = processAutoLoginCookie(cookieTokens, request, response);
        userDetailsChecker.check(user);

        logger.debug("Remember-me cookie accepted");

        return createSuccessfulAuthentication(request, user);
    }
    catch (CookieTheftException cte) {
        cancelCookie(request, response);
        throw cte;
    }
    catch (UsernameNotFoundException noUser) {
        logger.debug("Remember-me login was valid but corresponding user not found.",
                noUser);
    }
    catch (InvalidCookieException invalidCookie) {
        logger.debug("Invalid remember-me cookie: " + invalidCookie.getMessage());
    }
    catch (AccountStatusException statusInvalid) {
        logger.debug("Invalid UserDetails: " + statusInvalid.getMessage());
    }
    catch (RememberMeAuthenticationException e) {
        logger.debug(e.getMessage());
    }

    cancelCookie(request, response);
    return null;
}
Spring Security提供了两个常用实现:PersistentTokenBasedRememberMeServices 和 TokenBasedRememberMeServices。前者支持将cookieToken持久化,而后者则是从UserDetailsService获取用户信息并生成cookieToken。
本文详细介绍了Spring Security实现原理。
首先,谈到Spring Security对Sevlet Filter的应用,并在Filter的基础上拓展出DelegatingFilterProxy、FilterChainProxy、SecurityFilterChain以及Security Filters。我们在实际生产中遇到这种责任链模式的时候,也可以参考这个丰富且灵活的案例。
然后,我们又深入了解了Spring Security的鉴定模块原理,掌握了各个内部组件的实现细节。
通过深入学习原理,我们可以大大提高对Spring Security的掌握程度,真正做到融会贯通、得心应手。
- 官方文档9-11章节:非常清晰的文档
- 杜瓦尔的博客:我的个人博客地址,可以去看看更多内容;
Recommend
-
30
-
34
-
19
-
13
-
16
[TOC] 在web应用开发中,安全无疑是十分重要的,选择Spring Security来保护web应用是一个非常好的选择。Spring Security 是spring项目之中的一个安全模块,可以非
-
27
-
13
通过前面章节的学习,我们掌握了使用Spring Boot框架进行实际应用开发的方法。在使用Spring Boot 的过程中,我们时常会为一些看似简单,但实际上蕴藏了强大功能的实现而惊呼,下面就让我们来揭开它的神秘面纱,做到知其然,进而知其所以然...
-
8
Spring Security 学习之使用篇 2020-11-26 Spring ...
-
4
本文通过MyBatis一个低版本的bug(3.4.5之前的版本)入手,分析MyBatis的一次完整的查询流程,从配置文件的解析到一个查询的完整执行过程详细解读MyBatis的一次查询流程,通过本文可以详细了解MyBatis的一次查询过程。在平时的代码编写中,发现了MyBatis一个低版本的...
-
0
本文通过MyBatis一个低版本的bug(3.4.5之前的版本)入手,分析MyBatis的一次完整的查询流程,从配置文件的解析到一个查询的完整执行过程详细解读MyBatis的一次查询流程,通过本文可以详细了解MyBatis的一次查询过程。在平时的代码编写中,发现了MyBatis一个低版本的...
About Joyk
Aggregate valuable and interesting links.
Joyk means Joy of geeK