

React Hooks 源码解析(4):useEffect
source link: https://me.ursb.me/archives/useEffect.html
Go to the source link to view the article. You can view the picture content, updated content and better typesetting reading experience. If the link is broken, please click the button below to view the snapshot at that time.

- React 源码版本: v16.11.0
- 源码注释笔记:airingursb/react
1. useEffect 简介
1.1 为什么要有 useEffect
我们在前文中说到 React Hooks 使得 Functional Component 拥有 Class Component 的特性,其主要动机包括:
- 在组件之间复用状态逻辑很难
- 复杂组件变得难以理解
- 难以理解的 class
对于第二点,首先,针对 Class Component 来说,我们写 React 应用时经常要在组件的各种生命周期中编写代码,如在 componentDidMount 和 componentDidUpdate 中发送 HTTP 请求、事件绑定、甚至做一些额外的逻辑,使得业务逻辑扎堆在组件的生命周期函数中。在这个时候,我们的编程思路是“在组件装载完毕时我们需要做什么”、“在组件更新时我们需要做什么”,这使得 React 开发成为了面向生命周期编程,而我们在生命周期中写的那些逻辑,则成了组件生命周期函数的副作用。
其次,面向生命周期编程会导致业务逻辑散乱在各生命周期函数里。比如,我们在 componentDidMount 进行的事件绑定又需要在 componentDidUnmount 解绑,那事件管理的逻辑就不统一,代码零散 review 起来会比较麻烦:
import React from 'react'
class A extends React.Componment {
  componmentDidMount() {
    document.getElementById('js_button')
      .addEventListener('click', this.log)
  }
  componentDidUnmount() {
    document.getElementById('js_button')
      .removeEventListener('click', this.log)
  }

  log = () => {
    console.log('log')
  }

  render() {
    return (
      <div id="js_button">button</div>
    )
  }
}
而 useEffect 的出现,则让开发者的关注点从生命周期重新抽离出来聚焦在业务逻辑之上,其实 effect 的全称就是 side effect,即副作用,useEffect 就是用来处理原本生命周期函数里的副作用逻辑。
接下来,我们看看 useEffect 的用法。
1.2 useEffect 的用法
上面那段代码用 useEffect 改写之后如下:
import React, { useEffect } from 'react'
function A() {
  log() {
    console.log('log')
  }
  useEffect(() => {
    document
      .getElementById('js_button')
      .addEventListener('click', log)
    return () => {
      document
        .getElementById('js_button')
        .removeEventListener('click', log)
    }
  })
  return (<div id="js_button">button</div>)
}
useEffect 接受两个参数,第一个参数是一个 function,其实现 bind 操作并将 unbind 作为一个 thunk 函数被返回。第二个参数是一个可选的 dependencies 数组,如果dependencies 不存在,那么 function 每次 render 都会执行;如果 dependencies 存在,只有当它发生了变化,function 才会执行。由此我们也可以推知,如果 dependencies 是一个空数组,那么当且仅当首次 render 的时候才会执行 function。
useEffect(
  () => {
    const subscription = props.source.subscribe();
    return () => {
      subscription.unsubscribe();
    };
  },
  [props.source],
);
更多用法请阅读 React 官网的 useEffect API 介绍: https://reactjs.org/docs/hooks-reference.html#useeffect
2. useEffect 的原理与简单实现
根据 useEffect 的用法,我们可以自己实现一个简单的 useEffect:
let _deps;

function useEffect(callback, dependencies) {
  const hasChanged = _deps
    && !dependencies.every((el, i) => el === _deps[i])
    || true;
  // 如果 dependencies 不存在,或者 dependencies 有变化,就执行 callback
  if (!dependencies || hasChanged) {
    callback();
    _deps = dependencies;
  }
}
3. useEffect 源码解析
3.1 mountEffect & updateEffect
useEffect 的入口和上一节中 useState 的一样,都在 ReactFiberHooks.js 这个文件中,并且同 useState 一样,在首次加载时 useEffect 实际执行的是 mountEffect,之后每次渲染执行的是 updateEffect,此处不再赘述。那我们需要重点看看 mountEffect 和 updateEffect 实际做了什么。
对于 mountEffect:
function mountEffect(
  create: () => (() => void) | void,
  deps: Array<mixed> | void | null,
): void {
  return mountEffectImpl(
    UpdateEffect | PassiveEffect,
    UnmountPassive | MountPassive,
    create,
    deps,
  );
}
对于 updateEffect:
function updateEffect(
  create: () => (() => void) | void,
  deps: Array<mixed> | void | null,
): void {
  return updateEffectImpl(
    UpdateEffect | PassiveEffect,
    UnmountPassive | MountPassive,
    create,
    deps,
  );
}
mountEffect 和 updateEffect 的入参是一个 function 和一个 array,对应的就是我们前文 useEffect 传的 callback 和 deps。同时,我们可以发现 mountEffect 和 updateEffect 实际调用的是 mountEffectImpl 和 updateEffectImpl,它们接受的四个参数一模一样的,后面两个参数直接透传的不用说,主要是前面的 UpdateEffect | PassiveEffect、UnmountPassive | MountPassive 究竟是什么?
阅读代码可知他们是从 ReactSideEffectTags 与 ReactHookEffectTags 中引入的。
import {
  Update as UpdateEffect,
  Passive as PassiveEffect,
} from 'shared/ReactSideEffectTags';
import {
  NoEffect as NoHookEffect,
  UnmountPassive,
  MountPassive,
} from './ReactHookEffectTags';
看一下 ReactSideEffectTags.js 与 ReactHookEffectTags.js 中的定义:
// Don't change these two values. They're used by React Dev Tools.
export const NoEffect = /*              */ 0b0000000000000;
export const PerformedWork = /*         */ 0b0000000000001;

// You can change the rest (and add more).
export const Placement = /*             */ 0b0000000000010;
export const Update = /*                */ 0b0000000000100;
export const PlacementAndUpdate = /*    */ 0b0000000000110;
export const Deletion = /*              */ 0b0000000001000;
export const ContentReset = /*          */ 0b0000000010000;
export const Callback = /*              */ 0b0000000100000;
export const DidCapture = /*            */ 0b0000001000000;
export const Ref = /*                   */ 0b0000010000000;
export const Snapshot = /*              */ 0b0000100000000;
export const Passive = /*               */ 0b0001000000000;
export const Hydrating = /*             */ 0b0010000000000;
export const HydratingAndUpdate = /*    */ 0b0010000000100;

export const NoEffect = /*             */ 0b00000000;
export const UnmountSnapshot = /*      */ 0b00000010;
export const UnmountMutation = /*      */ 0b00000100;
export const MountMutation = /*        */ 0b00001000;
export const UnmountLayout = /*        */ 0b00010000;
export const MountLayout = /*          */ 0b00100000;
export const MountPassive = /*         */ 0b01000000;
export const UnmountPassive = /*       */ 0b10000000;
这么设计是为了简化类型比较与类型复合,如果项目开发的过程中有过一些复合权限系统的设计经验,那么可能第一眼就能反应过来,所以 UnmountPassive | MountPassive 就是 0b11000000。如果对应的位为非零,则表示 tag 实现了指定的行为。这个在未来会用到,我们这里先不涉及,所以就先放在这里了解即可。
3.2 mountEffectImpl & updateEffectImpl
接着我们来看看 mountEffectImpl 与 updateEffectImpl 的具体实现。
3.2.1 mountEffectImpl
首先是 mountEffectImpl:
function mountEffectImpl(fiberEffectTag, hookEffectTag, create, deps): void {
  const hook = mountWorkInProgressHook(); // 创建一个新的 Hook 并返回当前 workInProgressHook
  const nextDeps = deps === undefined ? null : deps;
  sideEffectTag |= fiberEffectTag;
  hook.memoizedState = pushEffect(hookEffectTag, create, undefined, nextDeps);
}
mountWorkInProgressHook 我们在第 3 篇 4.3.3: mountWorkInProgressHook 中解析过,其就是创建一个新的 Hook 并返回当前 workInProgressHook,具体原理不再赘述。
sideEffectTag 是按位或上 fiberEffectTag 然后赋值,在 renderWithHooks 中挂载在 renderedWork.effectTag 上,并在每次渲染后重置为 0。
renderedWork.effectTag |= sideEffectTag;
sideEffectTag = 0;
具体 renderedWork.effectTag 有什么用,我们后续会说到。
renderWithHooks 在 第 3 篇 4.3.1: renderWithHooks 中解析过,此处不再赘述。
hook.memoizedState 记录 pushEffect 的返回结果,这个同记录 useState 中的 newState 的原理是一致的。那么现在的重点转移到了 pushEffect 究竟做了什么。
3.3.2 updateEffectImpl
接下来我们看看 updateEffectImpl 又做了些什么工作呢?
function updateEffectImpl(fiberEffectTag, hookEffectTag, create, deps): void {
  const hook = updateWorkInProgressHook(); // 获取当前正在工作中的 Hook
  const nextDeps = deps === undefined ? null : deps;
  let destroy = undefined;

  if (currentHook !== null) {
    const prevEffect = currentHook.memoizedState;
    destroy = prevEffect.destroy;
    if (nextDeps !== null) {
      const prevDeps = prevEffect.deps;
      if (areHookInputsEqual(nextDeps, prevDeps)) {
        pushEffect(NoHookEffect, create, destroy, nextDeps);
        return;
      }
    }
  }

  sideEffectTag |= fiberEffectTag;
  hook.memoizedState = pushEffect(hookEffectTag, create, destroy, nextDeps);
}
updateWorkInProgressHook 我们在第 3 篇 4.4.3: updateWorkInProgressHook 中解析过,其就是获取当前正在工作中的 Hook,具体原理不再赘述。
可以发现在 currentHook 为空的时候,updateEffectImpl 的逻辑与 mountEffectImpl 的逻辑是一模一样的;当 currentHook 不为空的时候,pushEffect 的第三个参数不是 undefined,而是 destroy。并且,在这个分支存在 areHookInputsEqual(nextDeps, prevDeps),即如果当前 useEffect 的 deps 和上一阶段的 useEffect 的 deps 相等(areHookInputsEqual 所做的事情就是遍历比较两个 deps 是否相等,这里就不展开解读了),那就执行 pushEffect(NoHookEffect, create, destroy, nextDeps);,大胆猜测 NoHookEffect 的意思就是不执行这次的 useEffect。如此,这段代码的逻辑就和我们之前自己实现的 useEffect 是一致的。
根据 第 3 篇 4.4.3: updateWorkInProgressHook,我们得知 currentHook 就是当前阶段正在处理的 Hook,其正常逻辑下不会为空。那我们接下来需要重点关注的应该是 pushEffect 做了什么,其第三个参数有什么含义?
3.3 pushEffect
function pushEffect(tag, create, destroy, deps) {

  // 声明一个新的 effect
  const effect: Effect = {
    tag,
    create,
    destroy,
    deps,
    // Circular
    next: (null: any), // 函数组件中定义的下一个 effect 的引用
  };
  if (componentUpdateQueue === null) {
    componentUpdateQueue = createFunctionComponentUpdateQueue(); // 初始化 componentUpdateQueue
    componentUpdateQueue.lastEffect = effect.next = effect;
  } else {
    const lastEffect = componentUpdateQueue.lastEffect;
    if (lastEffect === null) {
      componentUpdateQueue.lastEffect = effect.next = effect;
    } else {
      const firstEffect = lastEffect.next;
      lastEffect.next = effect;
      effect.next = firstEffect;
      componentUpdateQueue.lastEffect = effect;
    }
  }
  return effect;
}
type Effect = {
tag: HookEffectTag, // 一个二进制数,它将决定 effect 的行为
create: () => (() => void) | void, // 绘制后应该运行的回调
destroy: (() => void) | void, // 用于确定是否应销毁和重新创建 effect
deps: Array<mixed> | null, // 决定重绘制后是否执行的 deps
next: Effect, // 函数组件中定义的下一个 effect 的引用
};这个函数首先根据入参声明了一个新的 effect,数据结构也给出来了,它同样也是一个循环链表。tag 是
接下来根据 componentUpdateQueue 是否为空走两套逻辑,而 componentUpdateQueue 的结构其实很简单:
export type FunctionComponentUpdateQueue = {
  lastEffect: Effect | null,
};
可见,componentUpdateQueue 其实就是一个存储 Effect 的全局变量。
-
componentUpdateQueue 为空:这种情况就是 mountEffect 时候的逻辑,它会创建一个空的 componentUpdateQueue,它其实只是
{lastEffect: null},之后将componentUpdateQueue.lastEffect指向effect.next,其实就是存了一下 effect。 - componentUpdateQueue 不为空:这种情况就是 updateEffect 时候会走到的逻辑
- lastEffect 为空:这种情况是新的渲染阶段的第一个 useEffect,逻辑处理和 componentUpdateQueue 为空时一致。
- lastEffect 不为空:这种情况意味着这个组件有多个 useEffect,是第二个及其之后的 useEffect 会走到的分支,将 lastEffect 指向下一个 effect。
最后 return 一个 effect。
3.4 React Fiber 流程分析
看似源码到这里就结束了,但我们还存留几个问题没有解决:
effect.tag的那些二进制数是什么意思?pushEffect之后还有什么逻辑?componentUpdateQueue存储 Effect 之后会在哪里被用到?
在 renderWithHooks 中,componentUpdateQueue 会被赋值到 renderedWork.updateQueue 上,包括我们 3.2 中的 sideEffectTag 也会赋值到 renderedWork.effectTag 上。
renderedWork.updateQueue = (componentUpdateQueue: any);
renderedWork.effectTag |= sideEffectTag;在第 3 篇 4.3.1: renderWithHooks中,我们分析出 renderWithHooks 是在函数组件更新阶段(updateFunctionComponent)执行的函数,这里我们要想知道上面三个问题的答案,必须要把整个 Reconciler 的流程走一遍才能解析清楚。我个人认为 Fiber 是 React 16 中最复杂的一块逻辑了,所以在前面几篇中我只是略微提及,并没有展开篇幅解析。Fiber 里面的内容很多,如果展开的话足够写几篇文章了,因此这里也尽量简单快捷的走一遍流程,忽略本文不相关的细节,只梳理部分逻辑的实现,重点关注我们调用 useEffect 之后的逻辑。
注:如果对这部分不感兴趣的同学可以直接跳到 3.5 继续阅读。
React Fiber 优秀的文章有很多,这里再推荐阅读几篇文章和视频来帮助有兴趣的同学来了解
那我们开始吧!
3.4.1 ReactDOM.js
页面渲染的唯一入口便是 ReactDOM.render,
ReactRoot.prototype.render = ReactSyncRoot.prototype.render = function(
  children: ReactNodeList,
  callback: ?() => mixed,
): Work {
  // ... 忽略无关代码
  updateContainer(children, root, null, work._onCommit);
  return work;
};
render 的核心是调用 updateContainer,这个函数来自于 react-reconciler 中的 ReactFiberReconciler.js。
3.4.2 ReactFiberReconciler.js
这个文件其实也是 react-reconciler 的入口,我们先看看 updateContainer 究竟是什么:
export function updateContainer(
  element: ReactNodeList,
  container: OpaqueRoot,
  parentComponent: ?React$Component<any, any>,
  callback: ?Function,
): ExpirationTime {
  // ... 忽略无关代码
  return updateContainerAtExpirationTime(
    element,
    container,
    parentComponent,
    expirationTime,
    suspenseConfig,
    callback,
  );
}
忽略无关代码发现它其实只是 updateContainerAtExpirationTime 的一层封装,那我们看看这个是什么:
export function updateContainerAtExpirationTime(
  element: ReactNodeList,
  container: OpaqueRoot,
  parentComponent: ?React$Component<any, any>,
  expirationTime: ExpirationTime,
  suspenseConfig: null | SuspenseConfig,
  callback: ?Function,
) {
  // ... 忽略无关代码
  return scheduleRootUpdate(
    current,
    element,
    expirationTime,
    suspenseConfig,
    callback,
  );
}
再次忽略一些无关代码,发现它又是 scheduleRootUpdate 的一层封装……那我们再看看 scheduleRootUpdate 是什么:
function scheduleRootUpdate(
  current: Fiber,
  element: ReactNodeList,
  expirationTime: ExpirationTime,
  suspenseConfig: null | SuspenseConfig,
  callback: ?Function,
) {
  // ... 忽略无关代码
  enqueueUpdate(current, update);
  scheduleWork(current, expirationTime);

  return expirationTime;
}忽略一小段无关代码,发现它的核心是做两件事,enqueueUpdate 我们这里暂时先不管,重点看看任务调度 scheduleWork,它相当于是 Fiber 逻辑的入口了,在 ReactFiberWorkLoop.js 中定义。
3.4.3 ReactFiberWorkLoop.js - render
ReactFiberWorkLoop.js 的内容非常长,有 2900 行代码,是包含任务循环主逻辑,不过我们刚才弄清楚要从 scheduleWork 开始着手那就慢慢梳理:
export function scheduleUpdateOnFiber(
  fiber: Fiber,
  expirationTime: ExpirationTime,
) {
  // ... 忽略无关代码
  const priorityLevel = getCurrentPriorityLevel();

  if (expirationTime === Sync) {
    if (
      (executionContext & LegacyUnbatchedContext) !== NoContext &&
      (executionContext & (RenderContext | CommitContext)) === NoContext
    ) {
      schedulePendingInteractions(root, expirationTime);
      let callback = renderRoot(root, Sync, true);
      while (callback !== null) {
        callback = callback(true);
      }
    } else {
      scheduleCallbackForRoot(root, ImmediatePriority, Sync);
      if (executionContext === NoContext) {
        flushSyncCallbackQueue();
      }
    }
  } else {
    scheduleCallbackForRoot(root, priorityLevel, expirationTime);
  }
  // ... 忽略特殊情况的处理
}
export const scheduleWork = scheduleUpdateOnFiber;
其实这段代码大部分分支都会收回到 renderRoot 上,再对 renderRoot 的回调做 while 循环处理。所以我们与其说 scheduleWork 是 Fiber 逻辑的入口,不如说 renderRoot 是入口。renderRoot 就是大名鼎鼎的 Fiber 两个阶段中的 render 阶段。
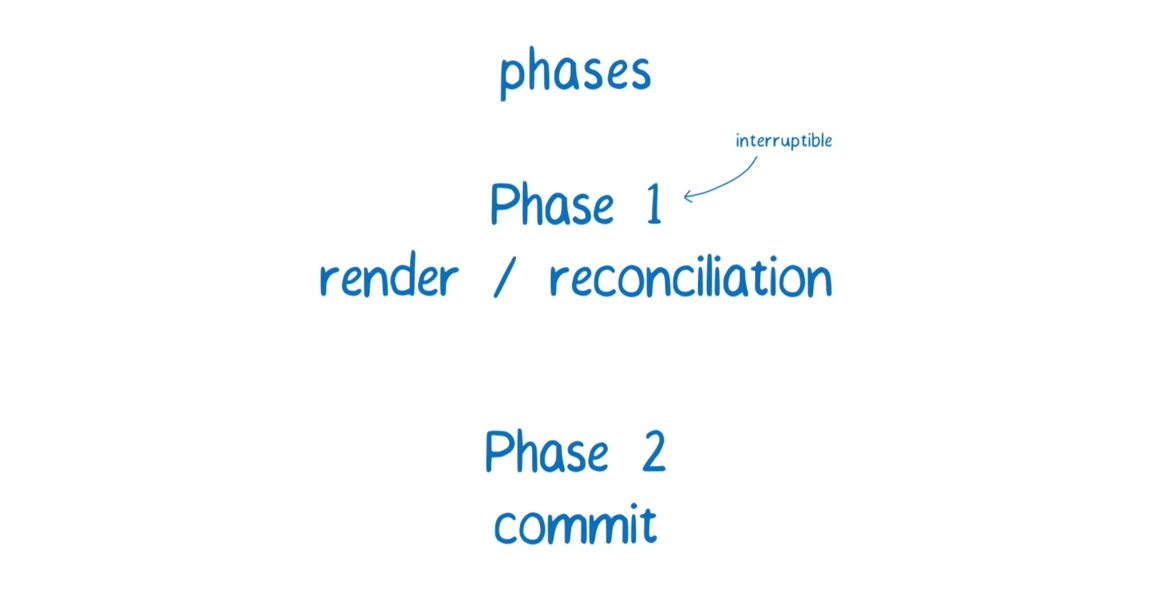
图源 A Cartoon Intro to Fiber - React Conf 2017
其实 debug 一下也容易看出这两个阶段:
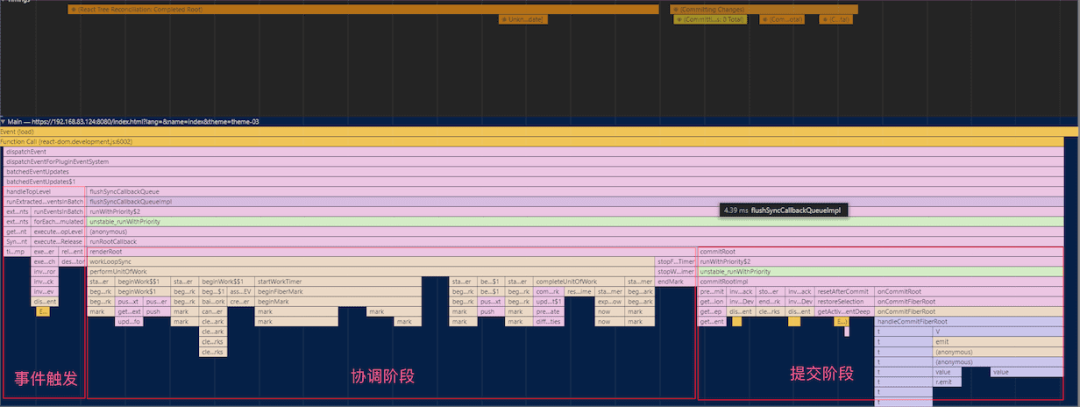
renderRoot 中的代码也非常复杂,我们重点关注和本文有关的逻辑:
function renderRoot(
  root: FiberRoot,
  expirationTime: ExpirationTime,
  isSync: boolean,
): SchedulerCallback | null {
  if (isSync && root.finishedExpirationTime === expirationTime) {
    // There's already a pending commit at this expiration time.
    return commitRoot.bind(null, root); // 进入 commit 阶段
  }
  // ...
  do {
    try {
      if (isSync) {
        workLoopSync();
      } else {
        workLoop(); // 核心逻辑
      }
      break;
    } catch (thrownValue) {
      // ...
  } while (true);
  // ...
}
把一些多余的代码略去之后,我们关注到两个重要的点:
workLoop是代码的核心部分,配合循环来实现任务循环。- 在超时的情况下,会进入 commit 阶段。
我们先看看 workLoop 的逻辑:
function workLoop() {
  while (workInProgress !== null && !shouldYield()) {
    workInProgress = performUnitOfWork(workInProgress);
  }
}
看来我们重点是需要看看 performUnitOfWork:
function performUnitOfWork(unitOfWork: Fiber): Fiber | null {
  const current = unitOfWork.alternate;

  // ... 忽略计时逻辑

  let next;
  if (enableProfilerTimer && (unitOfWork.mode & ProfileMode) !== NoMode) {
    next = beginWork(current, unitOfWork, renderExpirationTime);
  } else {
    next = beginWork(current, unitOfWork, renderExpirationTime);
  }

  // ... 忽略特殊逻辑

  ReactCurrentOwner.current = null;
  return next;
}
我们忽略计时逻辑,发现这段代码的内容其实就是两个 beginWork(这里解答了我们在第3篇中 4.3.1 中留下的问题)。这个 beginWork 引自 ReactFiberBeginWork.js。
3.4.4 ReactFiberBeginWork.js
本节代码分析同 第 3 篇 4.3.1: renderWithHooks,不再赘述。
也就是现在我们 renderedWork 上的 updateQueue(还记得它吗?它的内容是 Effect 链表) 和 effectTag 挂到了 Fiber 上,跳过这部分逻辑,我们看看 Fiber 最后怎么处理它们。
3.4.5 ReactFiberWorkLoop.js - commit
在刚才分析 renderRoot 的过程中,我们关注到任务超时之后会直接进入 commit 阶段。我们先看看 commitRoot 的代码:
function commitRoot(root) {
  const renderPriorityLevel = getCurrentPriorityLevel();
  runWithPriority(
    ImmediatePriority,
    commitRootImpl.bind(null, root, renderPriorityLevel),
  );
  return null;
}
好的,这里发现我们应该关注 commitRootImpl,来看看:
function commitRootImpl(root, renderPriorityLevel) {

  // ...
  startCommitTimer();

   // Get the list of effects.
  let firstEffect;
  if (finishedWork.effectTag > PerformedWork) {
    if (finishedWork.lastEffect !== null) {
      finishedWork.lastEffect.nextEffect = finishedWork;
      firstEffect = finishedWork.firstEffect;
    } else {
      firstEffect = finishedWork;
    }
  } else {
    firstEffect = finishedWork.firstEffect;
  }

  if (firstEffect !== null) {
    do {
      try {
        commitBeforeMutationEffects();
      } catch (error) {
        invariant(nextEffect !== null, 'Should be working on an effect.');
        captureCommitPhaseError(nextEffect, error);
        nextEffect = nextEffect.nextEffect;
      }
    } while (nextEffect !== null);
    stopCommitSnapshotEffectsTimer();

    if (enableProfilerTimer) {
      // Mark the current commit time to be shared by all Profilers in this
      // batch. This enables them to be grouped later.
      recordCommitTime();
    }

    // The next phase is the mutation phase, where we mutate the host tree.
    startCommitHostEffectsTimer();
    nextEffect = firstEffect;
    do {
      try {
        commitMutationEffects(root, renderPriorityLevel);
      } catch (error) {
        invariant(nextEffect !== null, 'Should be working on an effect.');
        captureCommitPhaseError(nextEffect, error);
        nextEffect = nextEffect.nextEffect;
      }
    } while (nextEffect !== null);
    stopCommitHostEffectsTimer();
    resetAfterCommit(root.containerInfo);

    // The work-in-progress tree is now the current tree. This must come after
    // the mutation phase, so that the previous tree is still current during
    // componentWillUnmount, but before the layout phase, so that the finished
    // work is current during componentDidMount/Update.
    root.current = finishedWork;

    // The next phase is the layout phase, where we call effects that read
    // the host tree after it's been mutated. The idiomatic use case for this is
    // layout, but class component lifecycles also fire here for legacy reasons.
    startCommitLifeCyclesTimer();
    nextEffect = firstEffect;
    do {
      try {
        commitLayoutEffects(root, expirationTime);
      } catch (error) {
        invariant(nextEffect !== null, 'Should be working on an effect.');
        captureCommitPhaseError(nextEffect, error);
        nextEffect = nextEffect.nextEffect;
      }
    } while (nextEffect !== null);
    stopCommitLifeCyclesTimer();

    nextEffect = null;

    // Tell Scheduler to yield at the end of the frame, so the browser has an
    // opportunity to paint.
    requestPaint();

    if (enableSchedulerTracing) {
      __interactionsRef.current = ((prevInteractions: any): Set<Interaction>);
    }
    executionContext = prevExecutionContext;
  } else {
    // No effects.
    // ...
  }

  stopCommitTimer();

  nextEffect = firstEffect;
  while (nextEffect !== null) {
    const nextNextEffect = nextEffect.nextEffect;
    nextEffect.nextEffect = null;
    nextEffect = nextNextEffect;
  }

  // ...

  return null;
}
commitRootImpl 的代码是真的很长,我这里忽略了一些和 effect 处理无关的代码,剩下我们阅读一下,发现当 effect 存在的时候,有三段逻辑要处理,它们的逻辑基本相同,循环 effect 链表传给三个不同的函数,分别是:
- commitBeforeMutationEffects
- commitMutationEffects
- commitLayoutEffects
最后将循环 effect,将 nextEffect 赋值成 nextNextEffect。
限于篇幅问题,且第三个函数关于 useLayoutEffect,所以左右这里这三个函数我们这里都不一一展开解释了,留给下篇文章中分析 useLayoutEffect 再来详解。所以 3.4 中我们留下的问题—— effect.tag 的那些二进制数是什么意思?这个问题也需要等到下一篇文章中来解释了。
我们这里只需要知道这三个函数的核心代码分别引用了 ReactFiberCommitWork.js 中的 commitWork,commitBeforeMutationLifeCycles,commitLifeCycles,而这三个函数的核心代码在处理 FunctionCompoment 的逻辑时都走到了 commitHookEffectList 中即可。
3.5 commitHookEffectList
分析了一大圈,最后我们看看 ReactFiberCommitWork.js 中 commitHookEffectList 的逻辑,这里便是 useEffect 终点了:
function commitHookEffectList(
  unmountTag: number,
  mountTag: number,
  finishedWork: Fiber,
) {
  const updateQueue: FunctionComponentUpdateQueue | null = (finishedWork.updateQueue: any);
  let lastEffect = updateQueue !== null ? updateQueue.lastEffect : null;
  if (lastEffect !== null) {
    const firstEffect = lastEffect.next;
    let effect = firstEffect;
    do {
      if ((effect.tag & unmountTag) !== NoHookEffect) {
        // Unmount
        const destroy = effect.destroy;
        effect.destroy = undefined;
        if (destroy !== undefined) {
          destroy();
        }
      }
      if ((effect.tag & mountTag) !== NoHookEffect) {
        // Mount
        const create = effect.create;
        effect.destroy = create();
      }
      effect = effect.next;
    } while (effect !== firstEffect);
  }
}
可以发现,这里的代码很清楚,这里把 renderedWork.updateQueue 上的 effect 取了下来,在 unmount 的时候执行 effect.destory(也就是 useEffect 第一个参数的返回值),在 mount 的时候执行 effect.create(也就是 useEffect 传入的第一个参数)。并且,循环所有的 effect 直到结束。
同时这里也印证了我们之前的猜想:当 tag 是 NoHookEffect 的时候什么也不做。
这里我们把 useEffect 的源码解释清楚了,但是遗留了一个问题:effect.tag 这个参数究竟有什么用?目前我们仅仅知道当它是 NoHookEffect 时的作用是不执行 useEffect 的内容,但是其他的值我们还没有分析到,它们分析逻辑主要在我们 3.4.5 略过的那三个函数里。在下篇文章中,我们分析 useLayoutEffect 中会拿出来详细分析。
大家再见。
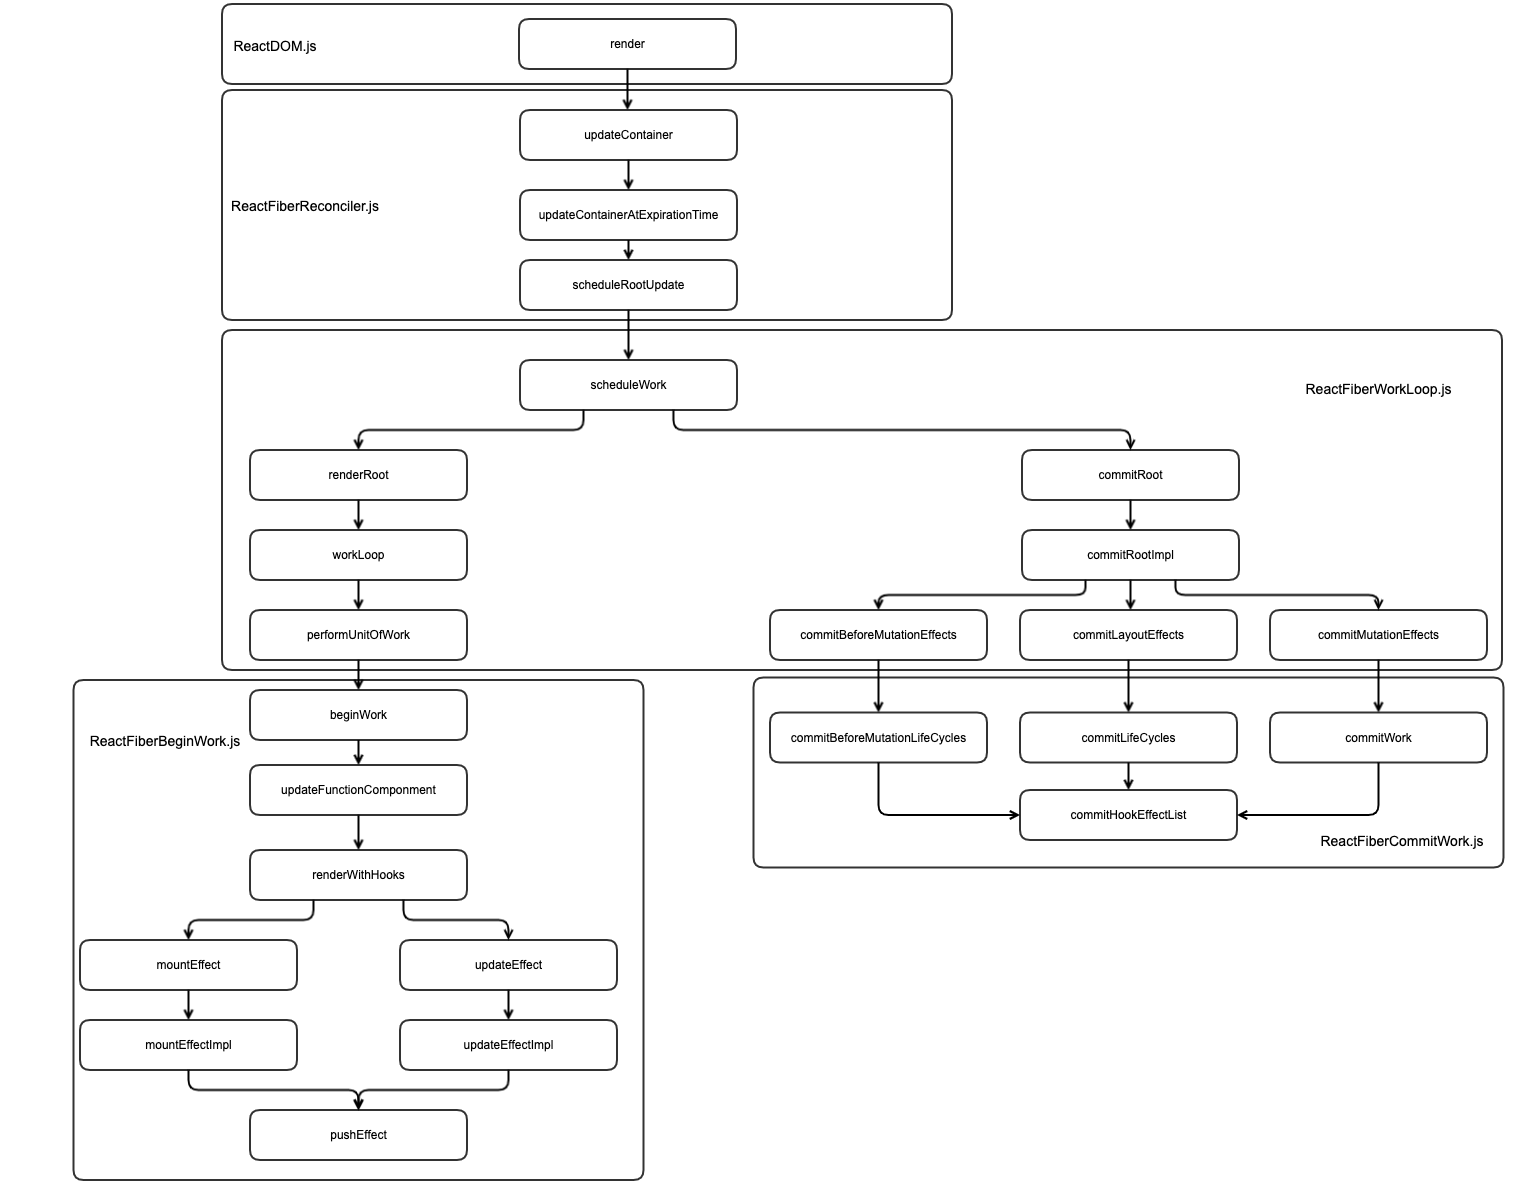
最后附上 3.4 节分析的流程图:
本文由 Airing 创作,采用 知识共享署名4.0 国际许可协议进行许可
本站文章除注明转载/出处外,均为本站原创或翻译,转载前请务必署名
最后编辑时间为: Dec 17, 2019 at 11:26 am
Recommend
About Joyk
Aggregate valuable and interesting links.
Joyk means Joy of geeK