

SwiftUI Previews on macOS Catalina and Xcode 11 - NSHipster
source link: https://nshipster.com/swiftui-previews/
Go to the source link to view the article. You can view the picture content, updated content and better typesetting reading experience. If the link is broken, please click the button below to view the snapshot at that time.

SwiftUI Previews on macOS Catalina and Xcode 11
Working on a large iOS codebase often involves a lot of waiting: Waiting for Xcode to index your files, waiting for Swift and Objective-C code to compile, waiting for the Simulator to boot and your app to launch…
And after all of that, you spend even more time getting your app into a particular state and onto a particular screen, just to see whether the Auto Layout constraint you just added fixes that regression you found. It didn’t, of course, so you jump back into Xcode, tweak the Content Hugging Priority, hit ⌘R, and start the whole process again.
We might relate our sorry predicament to that one xkcd comic, but for those of us who don’t so much relish in the stop-and-go nature of app development, there’s an old Yiddish joke about Shlemiel the painter (provided below with a few -specific modifications; for the uninitiated, please refer to Joel Spolsky’s original telling):
Shlemiel gets a job as a software developer, implementing a new iOS app. On the first sprint he opens Xcode and implements 10 new screens of the app. “That’s pretty good!” says his manager, “you’re a fast worker!” and pays him a Bitcoin.
The next sprint Shlemiel only gets 5 screens done. “Well, that’s not nearly as good as yesterday, but you’re still a fast worker. 5 screens is respectable,” and pays him a Bitcoin.
The next sprint Shlemiel implements 1 screen. “Only 1!” shouts his manager. “That’s unacceptable! On the first day you did ten times that much work! What’s going on?”
“I can’t help it,” says Shlemiel. “Each sprint I get further and further away from
application(_:didFinishLaunchingWithOptions:)!”
Over the years,
there have been some developments that’ve helped things slightly,
including
@IBInspectable and @IBDesignable
and Xcode Playgrounds.
But with Xcode 11,
our wait is finally over —
and it’s all thanks to SwiftUI.
The functionality described in this article requires the following:
- Xcode 11
- macOS Catalina
-
iOS 13 set as the Deployment Target for your app’s Debug configuration
(In Xcode, navigate your project’s Build Settings; under the Deployment heading, expand the iOS Deployment Target setting and set Debug to iOS 13.0 or later)
Without these three things, your code either won’t compile or won’t render live previews.
Although many of us have taken a “wait and see” approach to SwiftUI, we can start using its capabilities today to radically speed up and improve our development process — without changing a line of code in our UIKit apps.
Consider a subclass of UIButton
that draws a border around itself:
final class BorderedButton: UIButton {
    var cornerRadius: CGFloat { … }
    var borderWidth: CGFloat { … }
    var borderColor: UIColor? { … }
}
Normally,
if we wanted to test how our UI element performs,
we’d have to add it to a view in our app,
build and run,
and navigate to that screen.
But with Xcode 11,
we can now see a preview side-by-side with the code editor
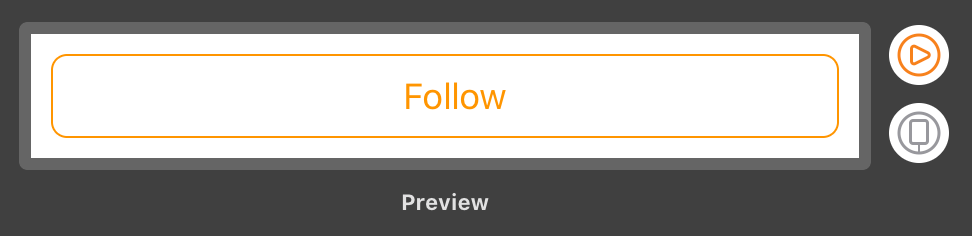
by adding the following under the original declaration of BorderedButton:
#if canImport(SwiftUI) && DEBUG
import SwiftUI

@available(iOS 13.0, *)
struct BorderedButton_Preview: PreviewProvider {
  static var previews: some View {
    UIViewPreview {
      let button = BorderedButton(frame: .zero)
      button.setTitle("Follow", for: .normal)
      button.tintColor = .systemOrange
      button.setTitleColor(.systemOrange, for: .normal)
      return button
    }.previewLayout(.sizeThatFits)
     .padding(10)
  }
}
#endif
Using a new feature called dynamic replacement, Xcode can update this preview without recompiling — within moments of your making a code change. This lets you rapidly prototype changes like never before.
Want to see how your button handles long titles?
Bang away on your keyboard within the call to setTitle(_:for:)
in your preview,
and test out potential fixes in your underlying implementation
without so much as leaving your current file!
UIViewPreview is a custom, generic structure
that we created to conveniently host previews of UIView subclasses.
Feel free to download the source
and add it to your project directly.
Incorporating a proper dependency would be complicated by the conditional import and iOS 13 Deployment Target settings required to make Xcode Previews work for non-SwiftUI apps, so in this particular instance, we think it’s best to embed these files directly.
Expand for the full implementation ofUIViewPreview:Previewing Multiple States
Let’s say our app had a FavoriteButton —
a distant cousin (perhaps by composition) to BorderedButton.
In its default state,
it shows has the title “Favorite”
and displays a ♡ icon.
When its isFavorited property is set to true,
the title is set to “Unfavorite”
and displays a ♡̸ icon.
We can preview both at once
by wrapping two UIViewPreview instances within a single SwiftUI Group:
Group {
  UIViewPreview {
    let button = FavoriteButton(frame: .zero)
    return button
  }
  UIViewPreview {
    let button = FavoriteButton(frame: .zero)
    button.isFavorited = true
    return button
  }
}.previewLayout(.sizeThatFits)
 .padding(10)
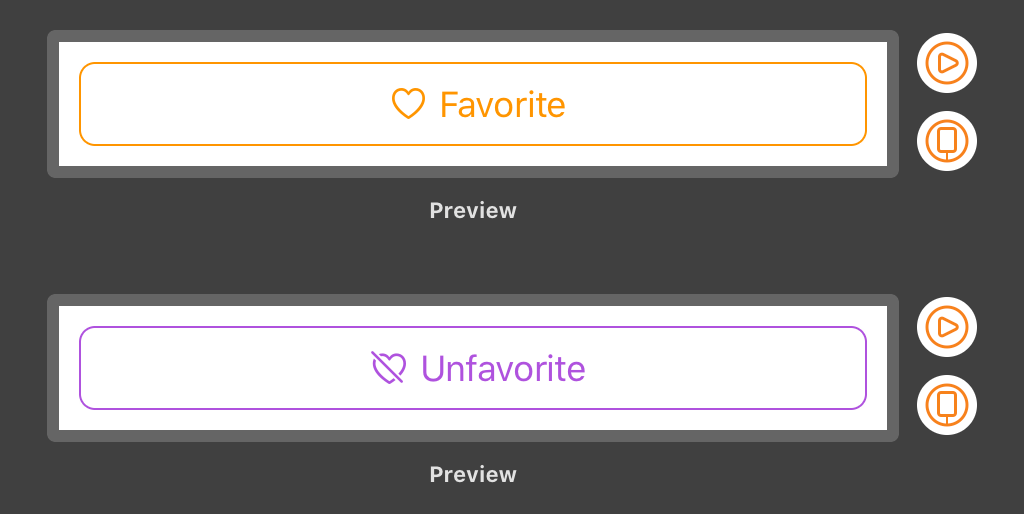
The chained previewLayout and padding methods
apply to each member of the Group.
You can use these and
other View methods
to change the appearance of your previews.
Previewing Dark Mode
With Dark Mode in iOS 13, it’s always a good idea to double-check that your custom views are configured with dynamic colors or accommodate both light and dark appearance in some other way.
An easy way to do this
would be to use a ForEach element
to render a preview for each case in the ColorScheme enumeration:
ForEach(ColorScheme.allCases, id: \.self) { colorScheme in
    UIViewPreview {
      let button = BorderedButton(frame: .zero)
      button.setTitle("Subscribe", for: .normal)
      button.setImage(UIImage(systemName: "plus"), for: .normal)
      button.setTitleColor(.systemOrange, for: .normal)
      button.tintColor = .systemOrange
      return button
  }.environment(\.colorScheme, colorScheme)
   .previewDisplayName("\(colorScheme)")
}.previewLayout(.sizeThatFits)
 .background(Color(.systemBackground))
 .padding(10)
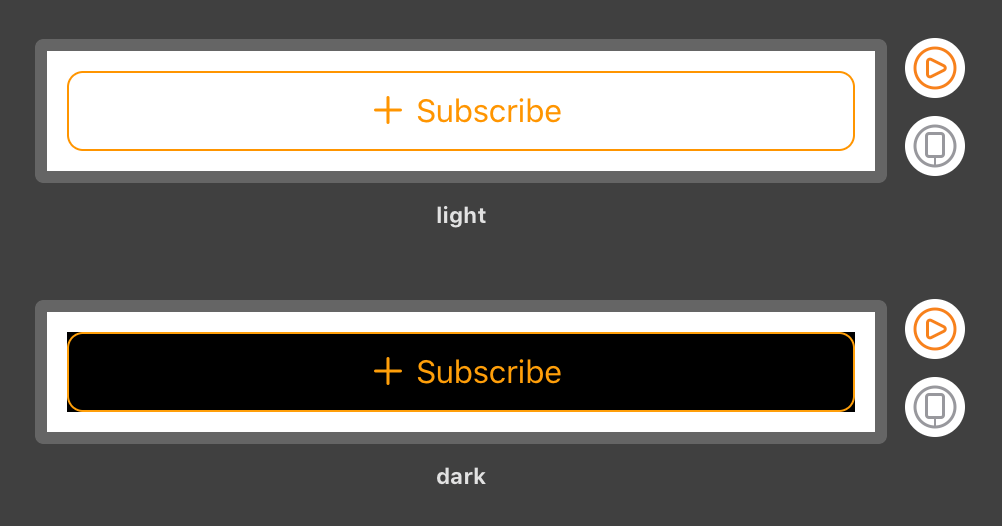
When rendering previews with ForEach,
use the previewDisplayName method to help distinguish among
all of the enumerated values.
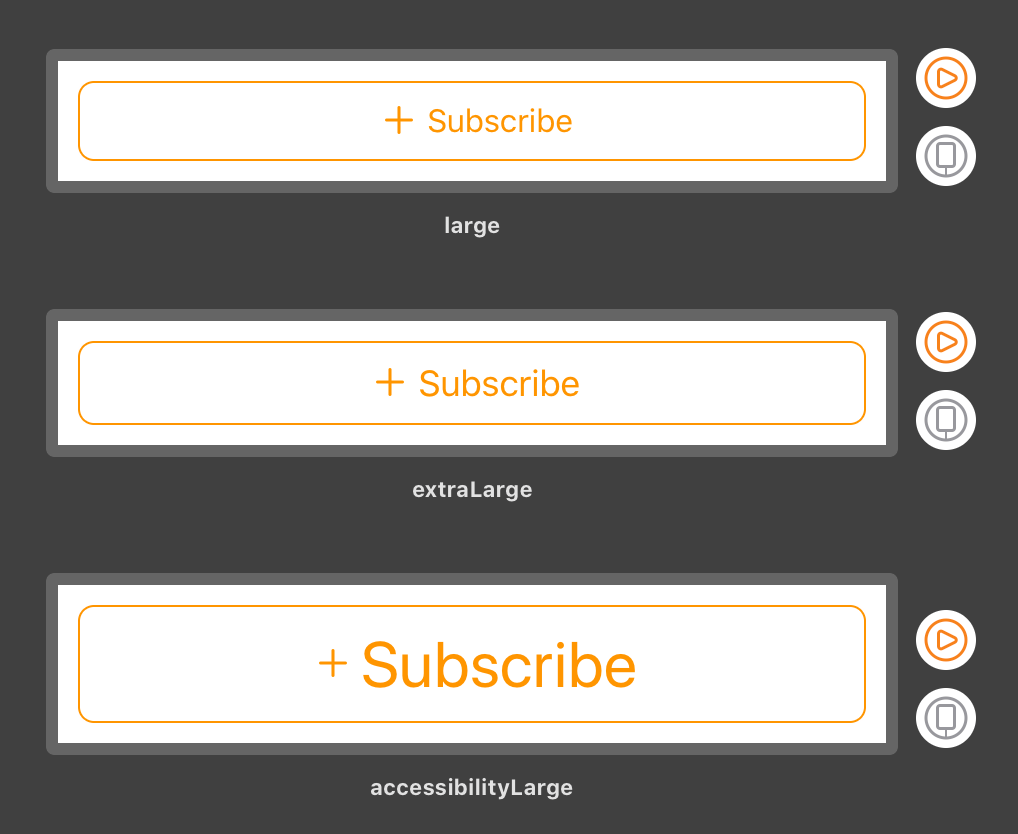
Previewing Dynamic Type Size Categories
We can use the same approach to preview our views in various Dynamic Type Sizes:
ForEach(ContentSizeCategory.allCases, id: \.self) { sizeCategory in
  UIViewPreview {
      let button = BorderedButton(frame: .zero)
      button.setTitle("Subscribe", for: .normal)
      button.setImage(UIImage(systemName: "plus"), for: .normal)
      button.setTitleColor(.systemOrange, for: .normal)
      button.tintColor = .systemOrange
      return button
  }.environment(\.sizeCategory, sizeCategory)
   .previewDisplayName("\(sizeCategory)")
}.previewLayout(.sizeThatFits)
 .padding(10)
Previewing Different Locales
Xcode Previews are especially time-saving when it comes to localizing an app into multiple languages. Compared to the hassle of configuring Simulator back and forth between different languages and regions, this new approach makes a world of difference.
Let’s say that, in addition to English, your app supported various right-to-left languages. You could verify that your RTL logic worked as expected like so:
let supportedLocales: [Locale] = [
  "en-US", // English (United States)
  "ar-QA", // Arabic (Qatar)
  "he-IL", // Hebrew (Israel)
  "ur-IN"  // Urdu (India)
].map(Locale.init(identifier:))

func localizedString(_ key: String, for locale: Locale) -> String? { … }

return ForEach(supportedLocales, id: \.identifier) { locale in
  UIViewPreview {
    let button = BorderedButton(frame: .zero)
    button.setTitle(localizedString("Subscribe", for: locale), for: .normal)
    button.setImage(UIImage(systemName: "plus"), for: .normal)
    button.setTitleColor(.systemOrange, for: .normal)
    button.tintColor = .systemOrange
    return button
  }.environment(\.locale, locale)
   .previewDisplayName(Locale.current.localizedString(forIdentifier: locale.identifier))
}.previewLayout(.sizeThatFits)
 .padding(10)
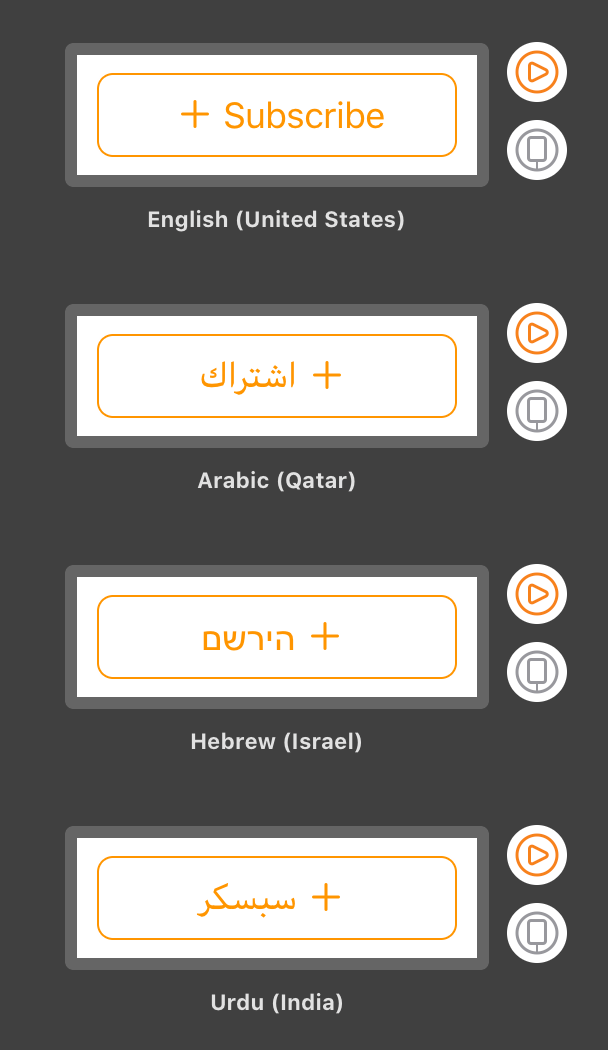
We don’t know of an easy way to use NSLocalizedString with an explicit locale.
You could go to the trouble of retrieving localized strings
from a strings file in your bundle,
but in most cases,
you’ll be just fine hard-coding text in your previews.
Previewing View Controllers on Different Devices
SwiftUI previews aren’t limited to views,
you can also use them with view controllers.
By creating a custom UIViewControllerPreview type
and taking advantage of some
new UIStoryboard class methods in iOS 13,
we can easily preview our view controller
on various devices —
one on top of another:
#if canImport(SwiftUI) && DEBUG
import SwiftUI

let deviceNames: [String] = [
    "iPhone SE",
    "iPhone 11 Pro Max",
    "iPad Pro (11-inch)"
]

@available(iOS 13.0, *)
struct ViewController_Preview: PreviewProvider {
  static var previews: some View {
    ForEach(deviceNames, id: \.self) { deviceName in
      UIViewControllerPreview {
        UIStoryboard(name: "Main", bundle: nil)
            .instantiateInitialViewController { coder in
            ViewController(coder: coder)
        }!
      }.previewDevice(PreviewDevice(rawValue: deviceName))
        .previewDisplayName(deviceName)
    }
  }
}
#endif
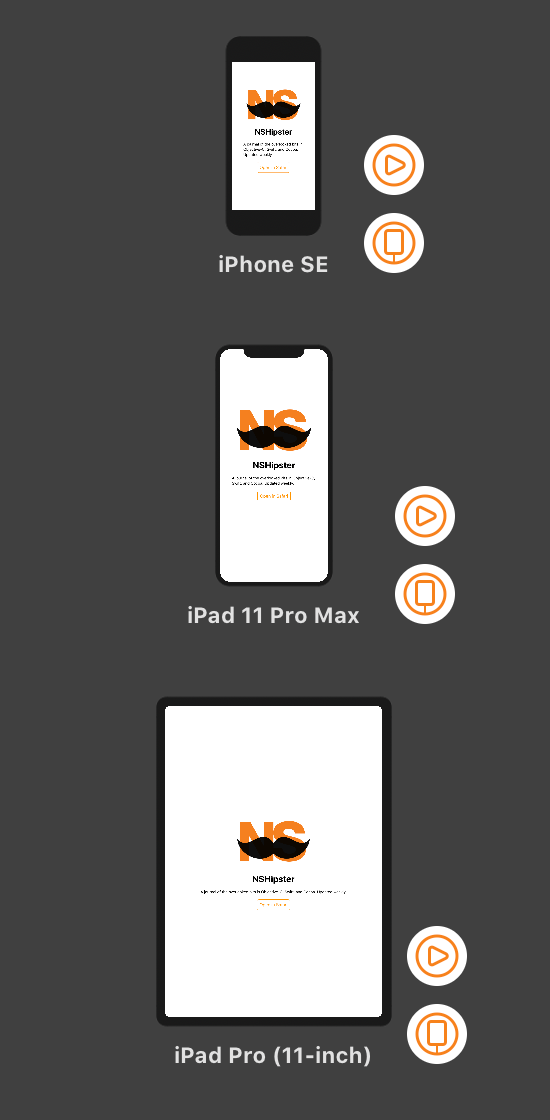
There’s currently no way to get SwiftUI device previews in landscape orientation. Although you can approximate this with a fixed size preview layout, be aware that it won’t respect Safe Area on iPhone or render split views correctly on iPad.
Although most of us are still some years away from shipping SwiftUI in our apps (whether by choice or necessity), we can all immediately benefit from the order-of-magnitude improvement it enables with Xcode 11 on macOS Catalina.
By eliminating so much time spent waiting for things to happen, we not only get (literally) hours more time each week, but we unlock the possibility of maintaining an unbroken flow state during that time. Not only that, but the convenience of integrated tests fundamentally changes the calculus for testing: instead of being a rare “nice to have,” they’re the new default. Plus: these inline previews serve as living documentation that can help teams both large and small finally get a handle on their design system.
It’s hard to overstate how much of a game-changer Xcode Previews are for iOS development, and we couldn’t be happier to incorporate them into our workflow.
Recommend
About Joyk
Aggregate valuable and interesting links.
Joyk means Joy of geeK