
Medhat Elmasry
source link: https://blog.medhat.ca/search/label/ASP.NET
Go to the source link to view the article. You can view the picture content, updated content and better typesetting reading experience. If the link is broken, please click the button below to view the snapshot at that time.
Saturday, December 12, 2020
Exploring GitHub Codespaces
In this tutorial I will introduce you to GitHub Codespaces. We will first create an ASP.NET Core MVC application on your local computer. We will then push the application to GitHub. Once the application source code is on GitHub, we will use Visual Studio Code in GitHub Codespaces to modify the app and test it out - all in the cloud.
What is GitHub codespaces?
GitHub codespaces is an online development environment, hosted by GitHub and powered by Visual Studio Code. It allows you to develop entirely in the cloud. Codespaces is currently in limited public beta and subject to change.
You can signup for access to GitHub Codespaces at: https://github.com/features/codespaces/signup
Let's get started.
1) Create a repository in GitHub. I named mine MvcOnCodespaces.
2) Create an ASP.NET Core MVC application on your local computer. These are the commands I used to create the application named MvcOnCodespaces.
Create a directory for your application
mkdir MvcOnCodespaces
Change to the directory you just created.
cd MvcOnCodespaces
At the moment, the default version of .NET Core that is available on GitHub Codespaces is version 3.1. Therefore, to ensure that we create an application that uses .NET Core 3.1, we will create a global.json file specifying .NET Core version as follows:
dotnet new globaljson --sdk-version 3.1.401
NOTE: Find out the version of .NET Core 3.1 that exists on your computer using command:
dotnet --list-sdks
Use the appropriate version in the 'dotnet new globaljson ..." command.
This was necessary for me to do because the default version of .NET Core on my computer was 5.0 at the time of writing this post.
Now we can create an ASP.NET Core MVC 3.1 app with:
dotnet new mvc
If you inspect your .csproj file, you will find that it, indeed, targets .NET Core 3.1 (netcoreapp3.1).
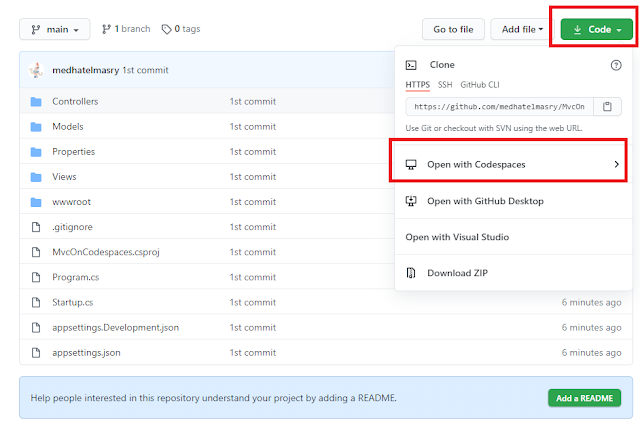
At this point, you can go ahead and delete global.json because it served its purpose and we do not need it anymore.4) Create a Codespace. In your GitHub repository, click on Code followed by "Open with Codespaces".
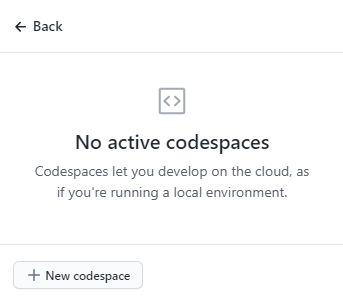
On the next dialog, click on the "+ New codespace" button.
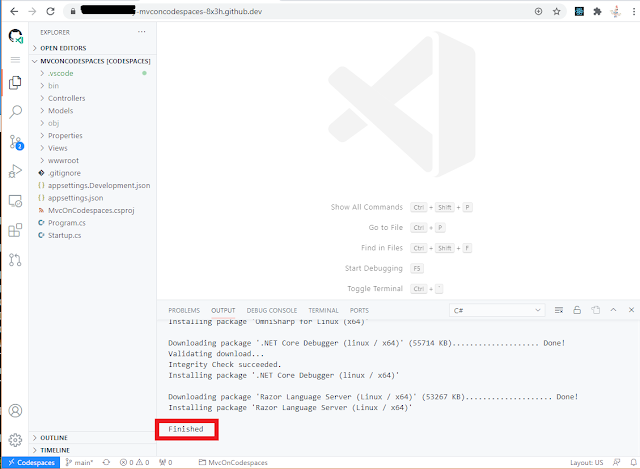
At the top right side you will see a progress bar that indicates that a Codespace is being prepared for you.
Click on Yes when you see this dialog:Querying the .NET environment in your Codespace
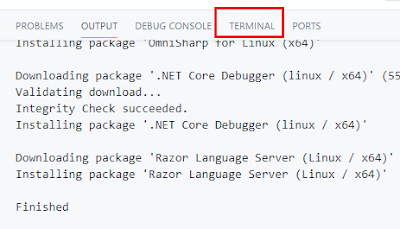
Let us query the .NET Core environment in a terminal window. Click on the TERMINAL tab.In the terminal window, type:Build & run your web app
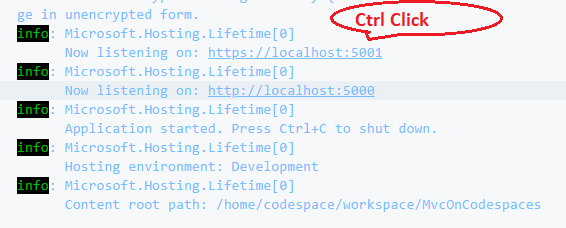
You can also go ahead and build with: dotnet buildTo run your application, hit CTRL F5. In the "DEBUG CONSOLE" pane, do a "CTRL Click" on the https://localhost:5001 link.Port forwarding happens and the web app opens in a separate tab in your browser.Debugging
Cleanup
Friday, July 24, 2020
Deploy Blazor SPA & Azure Functions API to Azure Static Web Apps (preview)
You can access the source code for this walkthrough from https://github.com/medhatelmasry/blazor-az-static-web-apps.
Related Video: https://youtu.be/zU1GeIUx9TY
In this post I will give you a step-by-step tutorial on how to develop an application with the following ingredients:
- a Cosmos backend database
- an Azure Functions REST API based on Node.js
- a client-side Blazor application that represents the SPA
- the API & SPA will be placed in a GitHub repository. A GitHub Actions workflow will then be used to deploy the code to a Azure Static Web App service
- VS Code will be the editor used so that this tutorial will work on any OS including Linux, macOS and Windows
Before we proceed, it is assumed that you have the following:
- a Microsoft Azure account
- a GitHub account
- Node.js is installed on your local computer
- Postman will be used for testing our REST API
- VS Code Editor is installed on your local computer
Disclaimer:
Host data in Azure Cosmos DB
Log into the Azure portal and click on the "+ Create a resource" button.Click on the blue Create button.
On the "Create Azure Cosmos DB Account" page, enter the account details then click on "Review + create". This is what it looked like for me: Click Create on the next confirmation page. Once you click on Create, it will take a while before the database is provisioned. When provisioning is done, you will see the following under Notifications. Click on “Go to resource” then click on Keys on the left-side navigation menu. To access Cosmos DB from our application, we will need to obtain the first two values (URL and PRIMARY KEY):Azure Functions CRUD REST API
- Azure Functions Rest API
- Client-side Blazor application
mkdir az-static-web-apps
cd az-static-web-apps
mkdir api
cd api
code .
The above commands create a solution directory named az-static-web-apps, create a sub-directory named api then open VS Code in the az-static-web-apps/api workspace.
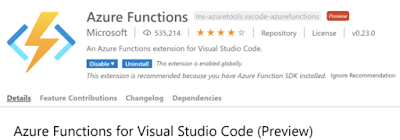
Make sure you install the following 'Azure Functions' extension for VS Code:
Stop the application by clicking on the Disconnect tool.
Edit function.json. Delete “post”. Also, just below the methods methods section, add:
Add following code to data/data-context.js:
/*
// This script ensures that the database is setup and populated correctly
*/
async function create(client, databaseId, containerId, partitionKey) {
/**
* Create the database if it does not exist
*/
let { database } = await client.databases.createIfNotExists({
id: databaseId
});
console.log(`Created database:\n${database.id}\n`);
/**
* Create the container if it does not exist
*/
let { container } = await client
.database(databaseId)
.containers.createIfNotExists(
{ id: containerId, partitionKey },
{ offerThroughput: 400 }
);
console.log(`Created container:\n${container.id}\n`);
}
module.exports = { create };
Also, in the data folder, create another file named seed-data.js, which will be used to seed the database container with some sample product data consisting of name, description and quantity.
Add following code to data/seed-data.js:
const data = {
products: [
{
name: 'Strawberries',
description: '16oz package of fresh organic strawberries',
quantity: '1',
},
{
name: 'Sliced bread',
description: 'Loaf of fresh sliced wheat bread',
quantity: 11,
},
{
name: 'Apples',
description: 'Bag of 7 fresh McIntosh apples',
quantity: 12,
},
{
name: 'Banana',
description: 'Fresh Baby Nino Bananas',
quantity: 13,
},
{
name: 'Potatoes',
description: 'Russet Potatoes',
quantity: 14,
},
{
name: 'Baking Powder',
description: 'Baker\'s Supply HouseOrganic Baking Powder',
quantity: 15,
},
{
name: 'Sugar',
description: 'Rogers Sugar Cubes',
quantity: 16,
},
{
name: 'Milk',
description: 'Dairyland 1% Skim Milk',
quantity: 17,
},
{
name: 'Peppermint Tea',
description: 'Tetley Pure Peppermint Tea',
quantity: 18,
},
{
name: 'Feta Cheese',
description: 'Shepherd Gourmet Dairy Greek Sheep Feta Cheese',
quantity: 19,
},
],
};
const getSeedProductData = () => {
return data.products;
};
module.exports = { getSeedProductData };
All the functions that will used to read, insert, update and delete data will be placed in a file named product-data.js in a shared folder. Create a folder under api named shared.
Create a file named product-data.js in the shared folder and add to it the following code that seeds and reads data:
const CosmosClient = require("@azure/cosmos").CosmosClient;
const DbContext = require("../data/data-context");
const SeedData = require("../data/seed-data");
const { ENDPOINT, KEY, DATABASE, CONTAINER, PARTITION_KEY } = process.env;
const client = new CosmosClient({ endpoint: ENDPOINT, key: KEY });
const database = client.database(DATABASE);
const container = database.container(CONTAINER);
const seedProducts = async () => {
let partition_key = JSON.parse(PARTITION_KEY);
await DbContext.create(client, DATABASE, CONTAINER, partition_key);
let iterator = container.items.readAll();
let { resources } = await iterator.fetchAll();
if (resources.length > 0) {
return { "message": `The database is already seeded with ${resources.length} products.` };
} else {
const products = SeedData.getSeedProductData();
products.forEach(async function (item) {
const { resource: createdItem } = await container.items.create(item);
console.log(item);
})
return { "message": `The database has been seeded with ${products.length} products.` };
}
};
const getProducts = async () => {
let iterator = container.items.readAll();
let { resources } = await iterator.fetchAll();
return resources;
};
module.exports = {
seedProducts,
getProducts
};
Edit api/local.settings.json and add to it the following cosmos database settings in the Values section:
"ENDPOINT": "https://cosmos-node.documents.azure.com:443/",
"PARTITION_KEY": "{ \"kind\": \"Hash\", \"paths\": [\"/name\"] }",
"KEY": "IioHwrKY5D7vcDmsSL05861234567890oQe0oqKdVh4Hrdk1234567890a7bmDFNUU7x1234567890kqxhIHEQ==",
"DATABASE": "Catalog",
"CONTAINER": "Products"
IMPORTANT NOTE: The values for ENDPOINT and KEY depend on your environment and matches the keys values for your Cosmos database instance. Also add this new section:
"Host": {
"CORS": "*"
}
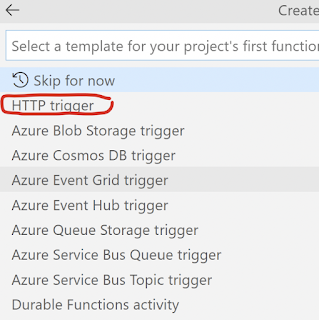
Let us add an Azure Function API endpoint that is responsible for seeding data. Click on the "Create Function..." icon as shown below. Choose "HTTP trigger".
const data = require('../shared/product-data');
module.exports = async function (context, req) {
try {
const result = await data.seedProducts();
context.res.status(200).json(result);
} catch (error) {
context.res.status(500).send(error);
}
};
The above code calls the seedProducts() function in shared/product-data.js.
Replace api/products-get/index.js with the following code:
const data = require('../shared/product-data');
module.exports = async function (context, req) {
try {
const products = await data.getProducts();
context.res.status(200).json(products);
} catch (error) {
context.res.status(500).send(error);
}
};
The above code reads all products from the Cosmos database.
Run your Azure Functions in VS Code by hitting CTRL F5 on your keyboard.
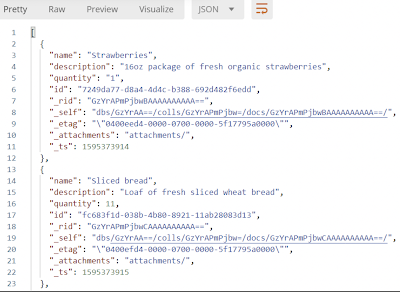
Let us seed some real data. Start Postman. Choose POST and enter the below endpoint: If all goes well, the response will look like this: Next, let's try a get request to read all the products: You should see that all products are returned: To complete the APIs, let us add these CRUD endpoints:
const addProduct = async (productToAdd) => {
// remove 'id' property from the JSON object
delete productToAdd.id;
let { product } = await container.items.create(productToAdd);
return product;
};
const updateProduct = async (id, product) => {
return await container.item(id, product.name).replace(product);
};
const readProduct = async (id) => {
// query to return all items
const querySpec = {
query: "SELECT * FROM c WHERE c.id='" + id + "'"
};
// read all items in the Items container
const { resources: items } = await container.items
.query(querySpec)
.fetchAll();
if (items.length > 0)
return items[0];
else
return {};
};
const deleteProduct = async (id, name) => {
return await container.item(id, name).delete();
};
Remember to add these to the module.exports at the bottom of shared/product-data.js:
addProduct,
updateProduct,
deleteProduct,
readProduct
To complete the APIs needed, create four more Azure Functions named products-delete, products-get-one, products-post and products-put. Below is the code for each.
1) products-delete
function.json
"methods": ["delete"],"route": "products/{id}"
index.js
const data = require('../shared/product-data');module.exports = async function (context, req) {
const id = req.params.id;
const product = await data.readProduct(id);
const name = product.name;
try {
const { result } = await data.deleteProduct(id, name);
context.res.status(200).json(result);
} catch (error) {
context.res.status(500).send(error);
}
};
2) products-get-one
function.json
"methods": ["get"],"route": "products/{id}"
index.js
const data = require('../shared/product-data');module.exports = async function (context, req) {
const id = req.params.id;
try {
const product = await data.readProduct(id);
context.res.status(200).json(product);
} catch (error) {
context.res.status(500).send(error);
}
};
3) products-post
function.json
"methods": ["post"],"route": "products"
index.js
const data = require('../shared/product-data');module.exports = async function (context, req) {
const product = req.body;
try {
const newProduct = await data.addProduct(product);
context.res.status(201).json(newProduct);
} catch (error) {
context.res.status(500).send(error);
}
};
4) products-put
function.json
"methods": ["put"],"route": "products/{id}"
index.js
const data = require('../shared/product-data');module.exports = async function (context, req) {
const id = req.params.id;
const product = req.body;
try {
const { updatedProduct } = await data.updateProduct(id, product);
context.res.status(200).json(updatedProduct);
} catch (error) {
context.res.status(500).send(error);
}
};
Blazor Client
Close VS Code and open a terminal window in the az-static-web-apps directory. Create a Blazor application in a blazor-app sub-directory with the following command:dotnet new sln
dotnet sln add blazor-app/blazor-app.csproj
You can run the new Blazor application to see what the default template looks like by executing the below commands and then going to https://localhost:5001.
cd blazor-app
dotnet run
Open VS Code in the az-static-web-apps workspace directory.
Create a Models folder under blazor-app and add to it these new files:
Constants.cs
Product.cs
Content of Constants.cs:
namespace blazor_app.Models {
public class Constants {
public static string BaseURL {
get {
return "http://localhost:7071/";
//return "/";
}
}
}
}
Content of Product.cs:
namespace blazor_app.Models {
public class Product {
public string Id { get; set; }
public string Name { get; set; }
public string Description { get; set; }
//public int Quantity { get; set; }
}
}
Add the following to _imports.razor so that the above classes are visible in the .razor pages.
Copy Index.razor to Add.razor.
Copy Index.razor to Delete.razor.
Copy Index.razor to Edit.razor.
Content of Index.razor
@page "/"
@inject HttpClient httpClient
<h1>Products</h1>
@if (products == null)
{
<NavLink class="btn btn-primary" href="/add">Add</NavLink>
}
else
{
<NavLink class="btn btn-primary" href="/add">Add</NavLink>
<table class='table table-hover'>
<thead>
<tr>
<th>Id</th>
<th>Name</th>
<th>Description</th>
@*<th>Quantity</th>*@
<th>Edit</th>
<th>Delete</th>
</tr>
</thead>
<tbody>
@foreach (var item in products)
{
<tr>
<td>@item.Id</td>
<td>@item.Name</td>
<td>@item.Description</td>
@*<td>@item.Quantity</td>*@
<td><a type="button" class="btn btn-success" href="/edit/@item.Id">Edit</a></td>
<td><a type="button" class="btn btn-danger" href="/delete/@item.Id">Delete</a></td>
</tr>
}
</tbody>
</table>
}
@code {
Product[] products;
string baseUrl = Constants.BaseURL;
protected override async Task OnInitializedAsync()
{
products = await httpClient.GetFromJsonAsync<Product[]>($"{baseUrl}api/products");
}
}
Content of Add.razor
@page "/Add"
@inject HttpClient httpClient
@inject NavigationManager NavigationManager
<h1>Add a New Speaker</h1>
<EditForm Model="@product" OnValidSubmit="@HandleAdd" class="form-group">
<DataAnnotationsValidator />
<ValidationSummary />
First Name
<InputText placeholder="Name" id="name" @bind-Value="@product.Name" class="form-control"/>
<br />
Last Name
<InputText placeholder="Description" id="description" @bind-Value="@product.Description" class="form-control"/>
<br />
<button type="submit" class="btn btn-primary">Submit</button>
</EditForm>
<NavLink class="btn btn-success" href="/">Back</NavLink>
@code {
private Product product = new Product();
private async void HandleAdd() {
string baseUrl = Constants.BaseURL;
string endpoint = $"{baseUrl}api/products";
await httpClient.PostAsJsonAsync(endpoint, product);
NavigationManager.NavigateTo("/");
}
}
Content of Edit.razor
@page "/edit/{id}"
@inject HttpClient httpClient
@inject NavigationManager NavigationManager
<h1>Edit Product</h1>
<EditForm Model="@product" OnValidSubmit="@edit" class="form-group">
<DataAnnotationsValidator />
<ValidationSummary />
First Name
<InputText placeholder="Name" id="firstName" @bind-Value="@product.Name" class="form-control" />
<br />
Last Name
<InputText placeholder="Last Name" id="lastName" @bind-Value="@product.Description" class="form-control" />
<br />
<button type="submit" class="btn btn-primary">Submit</button>
</EditForm>
<NavLink class="btn btn-success" href="/">Back</NavLink>
@code {
[Parameter]
public string id { get; set; }
Product product = new Product();
string baseUrl = Constants.BaseURL;
protected override async Task OnInitializedAsync()
{
product = await httpClient.GetFromJsonAsync<Product>($"{baseUrl}api/products/{id}");
}
private async void edit()
{
await httpClient.PutAsJsonAsync($"{baseUrl}api/Products/{id}", product);
NavigationManager.NavigateTo("/");
}
Content of Delete.razor
@page "/delete/{id}"
@inject HttpClient httpClient
@inject NavigationManager NavigationManager
<h1>Delete</h1>
@if (product != null)
{
<p>Are your sure you want to delete</p>
<p>@product.Name <br /> @product.Description</p>
<button type="button" @onclick="@del" class="btn btn-danger">Confirm Delete</button>
<NavLink class="btn btn-success" href="/">Back</NavLink>
}
@code {
[Parameter]
public string id { get; set; }
Product product;
string baseUrl = Constants.BaseURL;
protected override async Task OnInitializedAsync()
{
product = await httpClient.GetFromJsonAsync<Product>($"{baseUrl}api/products/{id}");
}
private async void del()
{
await httpClient.DeleteAsync($"{baseUrl}api/products/{id}");
NavigationManager.NavigateTo("/");
}
}
Replace Shared/MainLayout.razor with the following:
@inherits LayoutComponentBase
<div class="main">
<div class="content px-4">
@Body
</div>
</div>
Replace Shared/NavMenu.razor with the following:
@code {
private bool collapseNavMenu = true;
private string NavMenuCssClass => collapseNavMenu ? "collapse" : null;
private void ToggleNavMenu()
{
collapseNavMenu = !collapseNavMenu;
}
}
Let us test our solution to make sure that our Blazor app knows how to talk to the backend Node. js Azure Functions API.
In the api directory terminal window, run the following command to run the Azure Functions project:
Routing of URLs may not work all the time. You need to supply a routes.json file located in your Blazor app’s wwwroot directory to provide the global rewrite rule so that URLs will always work. The wwwroot/routes.json file should look like this:
{
"routes": [
{
"route": "/*",
"serve": "/index.html",
"statusCode": 200
}
]
}
GitHub repo
Stop both the Azure Functions & Blazor applications.Now that our application works, we are ready to do the most exciting part of this walk-through, which is to deploy our solution to Azure Static Web Apps through GitHub.
Edit the Models/Constants.cs file in blazor-app.
Change:
Let us upload our code into a GitHub repo. We need a suitable .gitignore file. The api directory already contains a .gitignore file. We do, however, need a .gitignore file in the blazor-app directory. Therefore, inside a terminal window in the blazor-app directory, execute the following command to create a suitable .gitignore file for our Blazor app.
Since the main repo directory will be parent directory of both api and blazor-app, delete the .git directory in the api folder.
dotnet new gitignore
Create a repository in GitHub and push your code into it.
Azure Static Web Apps
Let us use the new Azure service named “Azure Static Web Apps” announced by Microsoft at Build 2020.Back in the Azure Portal, click on "+ Create a resource".
When you click on the link beside "Workflow file", you will be led to a .yml workflow file in the GitHub repository.
When you click on Actions tab, you will notice that the workflow fails because it is missing values for app_location and app_artifact_location in the .yml file.
Before we set these values, we need to publish our Blazor application so that we only push release artifacts to Azure.
Edit the .github/workflows/??????.yml file and add the following two "Setup SDK and Build App" tasks to the .yml file before - name: Build And Deploy:
- name: Setup .NET SDK
uses: actions/setup-dotnet@v1
with:
dotnet-version: 3.1.302
- name: Build App
run: dotnet publish -c Release -o published
NOTE: Tab the above tasks until you eliminate validation errors in the online GitHub editor.
Next set the values for app_location and app_artifact_location to:app_locationpublished/wwwrootapp_artifact_location published/wwwroot
Commit your changes then click on the Actions tab. It is suggested that you make a pull on your source code in VS Code so that the latest changes involving the .yml file are updated.
Click on the workflow that was automatically triggered:
Remember to do a pull on your code from the GitHub repository because there is a new and updated .yml created in Github.
Testing your deployed web app
Back in Azure, click on your web application’s endpoint: There is a problem because products do not get loaded on the home page. This is because we did not add the environment variables that are required by the API app. Click on Configuration on the left-side navigation.After adding the following environment variables, click on the Save button at the top:ENDPOINThttps://blazor-with-static-web-apps.documents.azure.com:443/ PARTITION_KEY{ \"kind\": \"Hash\", \"paths\": [\"/name\"] } KEYcAPYGRKQEvmh1234567890irFKXOS9PkjXcrInMpnFD12344567890nWkcT6D3n1234567890v3FMyZ8at6rfaw== DATABASECatalog CONTAINERProducts
If you run the application again you will find that it is working OK:
References:
Recommend
About Joyk
Aggregate valuable and interesting links.
Joyk means Joy of geeK


