

SQLite in Flutter [FREE]
source link: https://www.raywenderlich.com/9376629-sqlite-in-flutter
Go to the source link to view the article. You can view the picture content, updated content and better typesetting reading experience. If the link is broken, please click the button below to view the snapshot at that time.

You’ll often find that you need to save data in your Flutter applications between app launches. If the data is simple enough, you might be able to get away with using a key value storage system. But as your data grows more complex and more interdependent, you’ll need to use a more formal data storage system, like SQLite.
SQLite is a variation of the SQL database language that allows you to save your data in a relational database and persist that data between app sessions. It allows you to to do everything you know and love with SQL – perform joins on tables, migrations, updates and much more.
Say you wanted to watch one of your favorite movies and ask your friend to join you. They say yes, and you’re excited until they want to know when you last watched it and how many times you’ve watched it. Now, you’re facing the dilemma of answering these questions accurately. In this tutorial you’ll write an application called Cinephile to track movies you’ve watched. You’ll learn how to:
Use the sqflite Flutter plugin to interact with an SQL database Insert, delete, update data in the database Perform migrations and schema versioning in your databaseNote : This tutorial assumes you’re already familiar with the basics of Flutter development. If you’re new to Flutter, read through the Getting Started With Flutter tutorial. You should also have knowledge of using Android Studio with Flutter, which you can learn about in this Getting Started with Flutter in Android Studio screencast.
Getting Started
Download the starter project by clicking the Download Materials button at the top or bottom of this tutorial. Then, open it in Android Studio 3.5 or later. You can also use VS Code, but the instructions in this tutorial will be using Android Studio.
Use Flutter 1.12 or above. If you get a ‘Packages get’ has not been run message, open the pubspec.yaml file and run the get dependencies for Flutter command.
The starter project provides the interface and some logic for the movie tracking app.
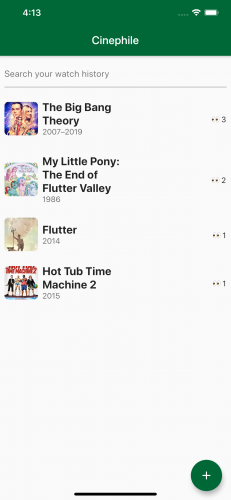
Build and run the starter project. If you encounter issues running the project on iOS, run pod install && pod update inside a Terminal window at the project root. You’ll see the movie tracking app’s main screen, like this:

Click the add floating button to see a new screen where you can add one of your watched movies. There’s a search bar where you can find movies using an online API. Add a movie you’ve recently watched and you’ll see a screen like this:

Next, add the movie by clicking the row. You’ll see it closes the movie page, but your list is still empty.
The app hasn’t persisted your data. Your SQLite in Flutter journey begins here.
The Flutter SQFlite Plugin
The sqflite plugin is one way to use SQLite in Flutter. While it’s not a first-party plugin, it’s recommended in the official Flutter cookbook .
Create, Read, Update and Delete or CRUD
sqflite lets you perform the basic CRUD operations. Here’s an overview of the operations you’ll use in this tutorial.
Create
You can create entries using this function:
Future<int> insert(String table, Map<String, dynamic> values,
      {String nullColumnHack, ConflictAlgorithm conflictAlgorithm})
Here’s a code breakdown:
table
values
nullColumnHack
conflictAlgorithm
enum ConflictAlgorithm {
  rollback,
  abort,
  fail,
  ignore,
  replace,
}
These conflict algorithm options are well documented. Here’s a quick breakdown:
rollback
abort
fail
ignore
replace
For more detail, check the documentation in the sql_builder.dart file inside the plugin sources.
Read
You can call reading entries with the function below.
Future<List<Map<String, dynamic>>> query(String table,
      {bool distinct,
      List<String> columns,
      String where,
      List<dynamic> whereArgs,
      String groupBy,
      String having,
      String orderBy,
      int limit,
      int offset});
This function is also very well documented, so you can check specifics for each parameter. Two parameters, where and whereArgs , are used together to substitute values in the where clause while preventing SQL injection. It returns the matching entries as a list.
Update
You can also update entries with this function:
Future<int> update(String table, Map<String, dynamic> values,
      {String where,
      List<dynamic> whereArgs,
      ConflictAlgorithm conflictAlgorithm});
The update function has a similar structure to insert but allows you to specify a where clause, like the query method above. It also has whereArgs , used in the same way to prevent SQL injection.
The last parameter, conflictAlgorithm , is the same as in insert . It returns the number of changes made.
Delete
Finally, you can delete entries with the function below:
Future<int> delete(String table, {String where, List<dynamic> whereArgs});
You use where and whereArgs to provide a where clause that’s safe. It returns the number of entries deleted.
These are the basic CRUD methods you can call in the plugin. However, for more advanced uses, you can also use raw SQL statements.
Raw SQL CRUD Operations
Earlier, you learned how to use the basic CRUD methods. If they aren’t enough for your purposes, you can use raw SQL statements with these methods:
Future<int> rawInsert(String sql, [List<dynamic> arguments]);
  Future<List<Map<String, dynamic>>> rawQuery(String sql, [List<dynamic> arguments]);
  Future<int> rawUpdate(String sql, [List<dynamic> arguments]);
  Future<int> rawDelete(String sql, [List<dynamic> arguments]);
These return the same things that the previous non-raw functions did. However, you can provide a raw SQL statement for each of them. To supply arguments, you can insert ? placeholder strings in your sql statement. You then use the arguments parameter to substitute all ? s in the SQL statement. You’ll see an example later on.
Transactions and Batch Support
Transactions allow rolling back operations if one of the operations encounters an unexpected error. This ensures either the whole transaction or nothing is applied. You can call the transaction method to start a transaction:
Future<T> transaction<T>(Future<T> action(Transaction txn), {bool exclusive});

  // For example
  await database.transaction((txn) async {
    await txn.insert('Little Bobby Tables', { 'name': 'bobby', 'lastname': 'tables' });
    await txn.insert('Little Bobby Tables', { 'name': 'Robert");', 'lastname': 'DROP TABLE STUDENTS; --' });
  });
Make sure not to use the database instance inside of a transaction, because it will cause your app to hang. Instead, use the transaction object supplied in the action callback parameter.
If the operations inside action throws an error, the transaction won’t be committed and the whole transaction will be roll ed back for you.
Notice that the operations are asynchronous. This is a side effect of calling native code via Platform Channels. It means data is going from dart to native code, multiple times.
To prevent the multiple back and forth trips and to improve performance, you can use batch support:
batch = db.batch();
batch.insert('Little Bobby Tables', { 'name': 'bobby', 'lastname': 'tables' });
batch.insert('Little Bobby Tables', { 'name': 'Robert");', 'lastname': 'DROP TABLE STUDENTS; --' });
results = await batch.commit();
You can also call the batch inside a transaction so it can rollback if the batch operation throws an error.
Versioned Schema and Migrations
SQFlite supports basic schema migration on open. When opening the database, you can specify several callbacks to customize behavior. The openDatabase method looks like this:
Future<Database> openDatabase(String path,
    {int version,
    OnDatabaseConfigureFn onConfigure,
    OnDatabaseCreateFn onCreate,
    OnDatabaseVersionChangeFn onUpgrade,
    OnDatabaseVersionChangeFn onDowngrade,
    OnDatabaseOpenFn onOpen,
    bool readOnly = false,
    bool singleInstance = true})
When the schema version is upgraded, onUpgrade is called. Inside this callback, you can perform a raw SQL query to alter the database.
Asynchronous Reads and Writes
The operations are asynchronous, as marked by the Future return types, so you don’t have to block the main thread with your operations.
Now that you’ve committed a batch of information to memory, you’re ready to implement it. ;]
Setting Up SQFlite
SQFlite is already in pubspec.yaml , so start setting up the database. First, open the SqlitePersistence.dart file and add the path import at the top of the file:
import 'package:path/path.dart';
Next, you’ll create the table with the proper schema and then open it. In SqlitePersistence.dart , replace the existing create method with:
// 1
static Future<SqlitePersistence> create() async => SqlitePersistence._(await database());

// 2
static Future<Database> database() async {
  return openDatabase(join(await getDatabasesPath(), DatabaseName),
    // 4
    onCreate: (db, version) {
      // 5
      return db.execute(
        '''CREATE TABLE $MoviesWatchedTableName(
           id INTEGER PRIMARY KEY,
           imdbId INTEGER,
           name STRING,
           imageUrl STRING,
           year STRING,
           watchedOn INTEGER
        )''',
      );
    },
    // 6
    version: 1,
  );
}
There’s quite some code here, so here’s a breakdown:
- First, you change the
createmethod to return aSqlitePersistencefrom an async method calleddatabase. - Second, you create a new static method called
database. Inside it, you callopenDatabasewhile providing a path for the database. - Third, you declare an
onCreatecallback. - Fourth, you perform a
create tableSQL query. You also specify the schema of the entries. The functionexecuteruns a raw SQL query asynchronously without any return value. - Finally, you provide a version, which can be used for schema migration later on.
Build and run the app and see that it builds successfully. There won’t be any visual changes, but make sure there aren’t any errors.

Inserting Data
Next, you’ll add entries to the database. Still in SqlitePersistence.dart , replace the contents of createOrUpdateObject with:
void createOrUpdateObject(int key, Map<String, dynamic> object) async {
  await db.insert(MoviesWatchedTableName, object,
      conflictAlgorithm: ConflictAlgorithm.replace);
}
Here, you insert the movie object as a map, and provide MoviesWatchedTableName as the table name. You use the conflict algorithm replace, but any of them would work for this use case.
Again, build and run the app. See that it builds successfully. Try adding some movies or shows. You still won’t see a visual changes, but you know deep in your heart that it’s there.
Reading Data
At this point, it’s good to see the inserted data in the interface.
To show all the movies or shows you’ve watched, add the following to getUniqueObjects in SqlitePersistence.dart :
Future<List<Map<String, dynamic>>> getUniqueObjects() async {
  final ret = await db.rawQuery('SELECT *, COUNT(*) as watchedTimes FROM $MoviesWatchedTableName group by imdbId');
  return ret;
}
Here you perform a raw SQL query. First, you get all entries from the MoviesWatchedTableName table, then add a column named watchedTimes . You compute that column by counting entries with the same imdbId value.
Build and run the app. Or, because Flutter is awesome, you could use hot restart. Notice that the entries you added before show up now:
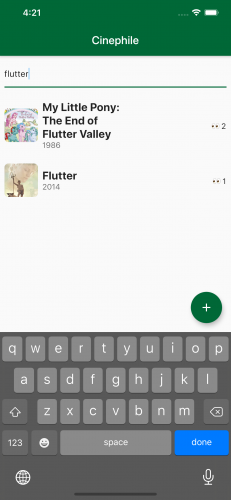
Now, try to search the list by tapping the search bar and typing some words. Notice that the search doesn’t work. This is because it uses a different method to get the entries.
To implement search, add the following to findObjects :
Future<List<Map<String, dynamic>>> findObjects(String query) async {
  final ret = await db.rawQuery(
      'SELECT *, COUNT(*) as watchedTimes FROM $MoviesWatchedTableName where name like ? group by imdbId',
      ['%$query%']);
  return ret;
}
Here, you still use a raw SQL query on the same table. Similar to the previous query, you select all columns and add the watchedTimes column. However, now you provide a where clause to match the name column. You also provide a where argument, which is the search term surrounded by '%' , to allow matching to any string before and after the word.
Build and run the app, or use hot reload. Try searching now and you’ll see this:
Cool, right? However, say you accidentally add a movie that you didn’t watch. You’d want a function to delete existing entries. You’ll add that next.
Deleting Data
To delete entries, add the following to removeObject in SqlitePersistence.dart :
Future<void> removeObject(int key) async {
  await db.delete(
    MoviesWatchedTableName,
    where: 'id = ?',
    whereArgs: [key],
  );
}
The delete method you’re using takes a table name and a where clause with some arguments. removeObject will take in a key and insert it into the where clause, allowing you to delete entries in the database.
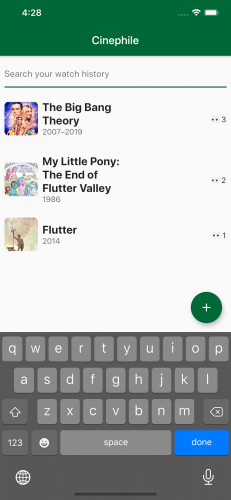
Save and do a hot reload. That’s better. Click one of the movies or shows and you’ll see an interface like this:

If you scroll to the bottom of the page, you’ll see a button to remove your most recent entry. After clicking the I did not watch this button, the app will redirect you to the main page. Then, you’ll see the list is now updated.
Time to celebrate! Watch a new movie or tv show or keep binge-watching. :]
Where to Go From Here?
You can download the completed project by clicking the Download Materials button at the top or bottom of the tutorial.
To learn more about SQLite, checkout the cookbook Flutter created. The SQFlite plugin github repository is also a great resource.
Another interesting way to use SQLite is via dart ffi which allows calling C libraries. You can check out the dart ffi and a plugin that makes an dart interface from ffi here .
I hope you enjoyed this tutorial on SQLite in Flutter! If you have any questions or comments, please join the forum discussion below.
Recommend
About Joyk
Aggregate valuable and interesting links.
Joyk means Joy of geeK