

Getting Started with SwiftUI Animations [FREE]
source link: https://www.raywenderlich.com/5815412-getting-started-with-swiftui-animations
Go to the source link to view the article. You can view the picture content, updated content and better typesetting reading experience. If the link is broken, please click the button below to view the snapshot at that time.

SwiftUI brings a ton of new features and an easier way of writing UI code to all of Apple’s platforms. As an added bonus, it also has a new way of animating state transitions.
If you’re used to UIView
animations, you may find these easier to write and understand. If you’re jumping in with SwiftUI, congratulations! This will let you “easeIn” to it. That’s an animation joke! :]
In this tutorial, you’ll learn the basics of SwiftUI animation, including:
animation
withAnimation
It’s best to use Xcode 11.2.1 or later, which contains fixes for known animation bugs in the SwiftUI code. You’ll have an easier time if you’re running macOS Catalina, because Xcode will show the code and live preview side-by-side in the Canvas pane.
However, if you still have Mojave, that’s fine too; you can just build and run to see how code changes affect the app. In fact, this technique is still handy on Catalina, as the preview window can be buggy.
This tutorial assumes a working knowledge of SwiftUI. You should be comfortable with components such as Text
, Image
, HStack
and VStack
. If you’re just getting started with SwiftUI, check outthis tutorial first.
Getting Started
Use the Download Materials button at the top or bottom of this tutorial to download the projects for this tutorial.
The tutorial app, MySolarSystem , is a simple inventory of the planets in your solar system (assuming you’re reading this on Earth). Once completed, tapping a row will show each planet with a list of that planet’s largest moons. From there, tapping a moon will provide additional information about the planet to the user.

ContentView
represents the main screen of the app. It is a List
that makes a table from the array of Planet
s. Each element in the list is an HStack
with several controls: an Image
for the planet’s picture, a Text
for the planet’s name, a Spacer
and finally a Button
, if the planet has any moons. The purpose of this button is to show information about the moons.

Later in this tutorial, you’ll put the optional MoonList
in the VStack
. Tapping the moon button will show or hide it. This will be the first thing you’ll add and animate.
Preview Window
If you’re running on macOS Catalina, you have access to the Canvas in the editor pane. If you don’t see it, enable it by selecting Editor ▸ Canvas . This will show the view and live update as you change the code.

If you click the Live Preview button, aka the play icon, it will make the preview interactive. Once you add animations and interactivity, you’ll be able to click buttons and observe state changes.
Note
: As of this writing, the preview window is not 100% reliable. If the preview stops updating, check the top of the Canvas for the message: Automatic preview updating paused
. If you see that, just click Resume
to rebuild the preview. Also, if an animation doesn’t appear to be working, double check by running the app in the simulator or on a device. The live app is the source of truth for any UI behaviors.
Basic Animations
To add animations, the first thing you need is something to animate. So to start, you’ll create a state change that triggers an update to the UI.
Open ContentView.swift
and add the following to the end of the VStack
in makePlanetRow(planet:)
:
if self.toggleMoons(planet.name) {
  MoonList(planet: planet)
}
This checks toggleMoons(_:)
to determine if that planet’s row should be toggled. If the moons are toggled on, then a MoonList
view will appear in the VStack
. This method is tied to the state property, showMoon
.
Next, complete the action by setting the showMoon
property. In the button’s action
callback, add the following code:
self.showMoon = self.toggleMoons(planet.name) ? nil : planet.name
This code either clears showMoon
if the user already pressed the button or sets it to the new planet if the user selects a different row.
Build and run the app. Tapping a row with a “moon disclosure” icon will show a cartoon map and a list of some that planet’s largest moons. The button also doubles in size to call attention to it. This is so the user knows where to tap to close the row.

This flashes the moon list view in and out, which is hardly a great user experience. Fortunately, adding a little animation is easy.
Start by creating a smooth animation for the button size. After the scaleEffect
modifier on the moon Image
, add the following modifier:
.animation(.default)
This adds a default animation to the scale effect. If you expand or collapse a row, the button will now grow or shrink smoothly. If you notice some issues in the instantaneous appearance and disappearance of the moon view, don’t worry. You’ll fix that in the Animating State Changes section below.
Animation Timing
The animation(_:)
modifier takes an Animation
parameter.
There are several options that you can use for an animation. The basic ones are simple timing curves that describe how the speed of animation changes over the duration. These all modify the changing attributes, interpolating smoothly between the start and end values.
You have the following options:
-
.linear
: This transitions the attribute from the start to end value evenly over time. This is a good timing curve for repeating animations, but it doesn’t look as natural as the eased functions.

-
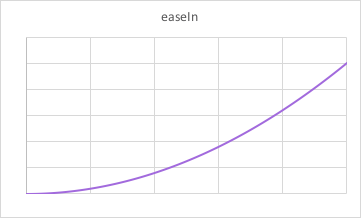
.easeIn
: An eased-in animation starts off slow and picks up speed over time. This is good for animations that start from a resting point and finish off-screen.
-
.easeOut
: Eased-out animations start fast and end slow. This is good for animating something coming to a steady state or final position.

-
.easeInOut
: Ease in and out curves combine both
easeInandeaseOut. This is good for animations that start in one steady spot and end at another equilibrium. This is best for most applications. That is why this is timing curve used by.default.
- .timingCurve : This allows you to specify a custom timing curve. This is rarely needed and is out of the scope of this tutorial.
Most of the time, .default
will be good enough for your needs. If you need something more, one of the basic timing functions will give you a little extra refinement. Give them a try by replacing .default
with one of these to find out what’s best for you.
The graphs above show velocity over time for each of the timing curves. But how will the animations actually display? Here’s how each of the curves looks over time when you apply it to the scaleEffect
of the moon button.

Linear

EaseIn

EaseOut

EaseInOut
Tinkering With Timing
If you’re having trouble seeing the subtle differences, you can slow down the animation by making it take more time. Replace the animation
modifier with:
.animation(.easeIn(duration: 5))
Specifying a longer duration will make the timing curve more noticeable.
An advantage of building and running in the simulator instead of the SwiftUI preview window is that you can enable the Debug ▸ Slow Animations
flag. This will drastically slow down any animation so you can see the subtle differences more clearly. This way, you don’t have to add extra duration
parameters.
You can use a few other levers to control the timing of an animation, besides the timing curve and duration. First, there’s speed
.
Create a new property at the top of ContentView
:
let moonAnimation = Animation.easeInOut.speed(0.1)
This constant just stores the animation so you can use it more easily in the code later. It also gives you a single spot to change things around.
Next, replace the Image
animation modifier:
.animation(moonAnimation)
Now, the moon will resize very slowly. Try changing the speed to 2
and the animation will be quite zippy.
In addition to speed, you can also add delay
. Change moonAnimation
to:
let moonAnimation = Animation.easeInOut.delay(1)
Now, the animation has a one-second delay. Tapping the row flashes in the moon list, then later, the button will change size. Delay
is most useful when animating multiple properties or objects at once, as you’ll see later.
Finally, you can use modifiers to repeat an animation. Change the animation to:
let moonAnimation = Animation.easeInOut.repeatForever(autoreverses: true)
The button will now pulse forever. You can also use repeatCount(autoreverses:)
to repeat the animation a limited number of times.
When you’re done experimenting, set the animation back to:
let moonAnimation = Animation.default
Simultaneous Animations
.animation
is a modifier that stacks on to a SwiftUI View
like any other. If a view has multiple changing attributes, a single Animation
can apply to all of them.
Add the following rotation effect by placing it between the Image
and scaleEffect
lines:
.rotationEffect(.degrees(self.toggleMoons(planet.name) ? -50 : 0))
This adds a little rotation to the moon button so the crescent lines up sideways when the moon view appears. These will animate together since you add the animation at the end.

Of course, you can specify separate animations for each attribute. For example, add the following modifier after the rotationEffect
modifier:
.animation(.easeOut(duration: 1))
This gives the rotation a one-second animation, so you’ll notice the rotation ending slightly later compared to the scaling effect. Next, change moonAnimation
to:
let moonAnimation = Animation.default.delay(1)
This delays the size animation by one second, so the scale starts after the rotation finishes. Try it out.
Finally, you can choose not to animate a particular attribute change by specifying nil
for animation. Change the rotationEffect
animation to:
.animation(nil)
And change the moonAnimation
back to:
let moonAnimation = Animation.default
Now, only the size animates.
Animating State Changes
You’ve spent a while perfecting the animation of the moon button, but what about that big view that drops in with all the circles?
Well, you can animate any state transition with a simple withAnimation
block. Replace the content of the button’s action block with:
withAnimation {
  self.showMoon = self.toggleMoons(planet.name) ? nil : planet.name
}
withAnimation
explicitly tells SwiftUI what to animate. In this case, it animates the toggling of showMoon
and any views that have attributes that depend on it.
If you watch the animation now, you’ll see the moons view fade in using the default appear animation and the list row slides out of the way to make room for it.
You can also supply a specific animation to the explicit animation block. Replace withAnimation
with:
withAnimation(.easeIn(duration: 2))
This now uses an eased-in animation with a two-second duration instead of the default.
If you try this out, the slowed animation probably doesn’t look right. There are better ways to animate views coming in and out of the hierarchy.
Before moving on, change the withAnimation
to:
withAnimation(.easeInOut)
Transitions
A transition covers how a view is inserted or removed. To see how it works, add this modifier to the MoonList
in the if self.toggleMoons(planet.name)
block:
.transition(.slide)
Now, instead of fading in, the view will slide in. Slide
animates in from the leading edge and out through the trailing.
Transitions are of the AnyTransition
type. SwiftUI comes with a few pre-made transitions:
- .slide : You’ve already seen this one in action — it slides the view in from the side.
- .opacity : This transition fades the view in and out.
- .scale : This animates by enlarging or shrinking the view.
-
.move
: This is like
slide, except that you can specify the edge. - .offset : Moves the view in an arbitrary direction.
Go ahead and try some of these transitions to get a sense of how they work.
Combining Transitions
You can also combine transitions to compose your very own custom effects. At the top of ContentView.swift , add this extension:
extension AnyTransition {
  static var customTransition: AnyTransition {
    let transition = AnyTransition.move(edge: .top)
      .combined(with: .scale(scale: 0.2, anchor: .topTrailing))
      .combined(with: .opacity)
    return transition
  }
}
This combines three transitions: a move
from the top
edge, a scale
from 20% anchored to the top trailing corner and an opacity
fade effect.
To use it, change the transition
line at the MoonList
instance to:
.transition(.customTransition)
Build and run your project and try opening a moon list. The combined effect is as if the view swoops in and out from the moon button.

Asynchronous Transitions
If you want, you can also make your entrance transition different from your exit transition.
In ContentView.swift
, replace the definition of customTransition
with:
static var customTransition: AnyTransition {
  let insertion = AnyTransition.move(edge: .top)
    .combined(with: .scale(scale: 0.2, anchor: .topTrailing))
    .combined(with: .opacity)
  let removal = AnyTransition.move(edge: .top)
  return .asymmetric(insertion: insertion, removal: removal)
}
This keeps the swoop in insertion, but now the moon view exits the screen by moving to the top.
Springs
Right now, the moons list just shows the moons stacked on top of each other in concentric circles. It would look a lot nicer if they were spaced out, and maybe even animated in.
In MoonView.swift
, add the following modifier to the end of the body
chain:
.onAppear {
  withAnimation {
    self.angle = self.targetAngle
  }
}
This causes a random angle to be set on the orange ball representing the moon. The moon will then animate from zero degrees on the circle to the new location, in a straight line.

This animation isn’t awesome yet, so you’ll need to add a little bit more pizazz. Spring animations allow you to add a little bounce and jiggle to make your views feel alive.
In SolarSystem.swift
add this method to SolarSystem
:
func animation(index: Double) -> Animation {
  return Animation.spring(dampingFraction: 0.5)
}
This helper method creates a spring animation.
Then, in makeSystem(_:)
, in the last ForEach
, append the following modifier to the self.moon
line:
.animation(self.animation(index: Double(index)))
This adds the animation to each of the moon circles. Don’t worry about the index
right now; you’ll use it in the next section.
Next time you load the view, there will be a little bounce as the moons take their final positions.
Using SwiftUI’s Pre-Built Spring Options
Like everything else in SwiftUI, there are a few built-in options for springs:
- spring() : Default spring behavior. This is a good starting point.
- spring(response:dampingFraction:blendDuration) : A spring animation with more options to fine tune its behavior.
- interpolatingSpring(mass:stiffness:damping:initialVelocity:) : A very customizable spring based on physical modeling.

Default spring animation
Spring animations use the real-world physics of springs as their basis. Imagine, if you will, a hanging spring coil with a heavy block attached to the end of it. If that block has a large mass, then releasing the spring will cause a large displacement as it drops, causing it to bounce farther and longer.
A stiffer spring has the opposite effect — the stiffer the spring, the farther it will travel. Increasing the damping is like increasing the friction: It will result in less travel and a shorter bounce period. The initial velocity sets the speed of the animation: A larger velocity will move the view more and have it bounce longer.

spring(response:dampingFraction:) curves for various parameters
It can be hard to map the physics to how the animation will actually work. That’s why it’s useful to play around with the parameters one at a time to get a nice animation.
This is also why there is spring(response:dampingFraction:blendDuration)
, which is an easier-to-understand way of writing a spring animation. Under the hood, it still uses the physical model, but it has fewer levers.
The dampingFraction
controls how long the view will bounce. Zero damping is an undamped
system, meaning it will bounce forever. A dampingFraction
value that’s more than 1 will not spring at all. If you’re using a spring, you’ll usually choose a value somewhere between 0 and 1. Larger values will slow down faster.
The response
is the amount of time to complete a single oscillation. This will control how long the animation lasts. These two values work together to tune how far and fast and often the view will bounce. The blendDuration
affects the animation if you change the response
or combine multiple springs. This is an advanced maneuver.

Response curves for various interpolating spring parameters
Refining the Animation
Now that you have a better idea of how springs work, take a moment to clean up the animation. One thing that’s nice to do when you’re animating in a bunch of relatively independent views is to give them slightly different timings. This helps your animation feel more alive.
In SolarSystem.swift
, change animation(index:)
to the following:
func animation(index: Double) -> Animation {
  return Animation
    .spring(response: 0.55, dampingFraction: 0.45, blendDuration: 0)
    .speed(2)
    .delay(0.075 * index)
}
This adds a rolling delay to each “moon,” so they start falling in 75 milliseconds after each other, giving it a little fancy effect.

Animatable
This looks great, but it would be more realistic if the moons moved along their orbits rather than bouncing down from the top. You can do this by using a custom modifier, a GeometryEffect
. Geometry effects describe an animation that modifies a view’s position, shape or size.
Add the following struct
to SolarSystem.swift
:
struct OrbitEffect: GeometryEffect {
  let initialAngle = CGFloat.random(in: 0 ..< 2 * .pi)

  var percent: CGFloat = 0
  let radius: CGFloat

  var animatableData: CGFloat {
    get { return percent }
    set { percent = newValue }
  }

  func effectValue(size: CGSize) -> ProjectionTransform {
    let angle = 2 * .pi * percent + initialAngle
    let pt = CGPoint(
      x: cos(angle) * radius,
      y: sin(angle) * radius)
    return ProjectionTransform(CGAffineTransform(translationX: pt.x, y: pt.y))
  }
}
This OrbitEffect
moves its view around in a circle. It does this through the effectValue(size:)
method of GeometryEffect
. This method returns a ProjectionTransform
, which is a coordinate transform. In this case, a translation CGAffineTransform
creates it, where the translation corresponds to a point on a circle.
The magic piece of a GeometryEffect
is that it conforms to Animatable
. That means it needs a property called animatableData
. In this case, it wraps a CGFloat
property named percent
. Animatable data can be any value that conforms to VectorArithmetic
, which means it can be interpolated between a start and an end value. For this effect, you’ll choose an animation between 0 and 100 percent.
You apply the percentage to the effectValue
by calculating a relative value between 0 and 2π. There’s also a random initialAngle
. This way each “moon” will start at a different position; otherwise, it looks weird to have them all in lockstep.
To apply this effect, you’ll need to change the SolarSystem
view a bit. First, add a new state property to it:
@State private var animationFlag = false
Animations happen in response to a state change. Since the orbit animation will be constant when the view is present, this simple Boolean acts as the trigger for the animation.
Next, add this helper method:
func makeOrbitEffect(diameter: CGFloat) -> some GeometryEffect {
  return OrbitEffect(
    percent: self.animationFlag ? 1.0 : 0.0,
    radius: diameter / 2.0)
}
This creates an OrbitEffect
, which starts its percentage at 0 and will change to 1 once the flag is toggled.
To call this method, in the individual moon ForEach
, replace the .animation
modifier with the following:
.modifier(self.makeOrbitEffect(
  diameter: planetSize + radiusIncrement * CGFloat(index)
))
.animation(Animation
  .linear(duration: Double.random(in: 10 ... 100))
  .repeatForever(autoreverses: false)
)
This applies the OrbitEffect
to each moon’s circle through the use of a helper method. It also applies a linear animation of a random duration that repeats forever. This way, each moon will orbit indefinitely, each at a separate speed. It’s not a realistic view of a planet, but it is a pretty one to look at. :]
Next, replace the implementation of moon(planetSize:moonSize:radiusIncrement:index:)
so it looks like this:
func moon(planetSize: CGFloat,
          moonSize: CGFloat,
          radiusIncrement: CGFloat,
          index: CGFloat) -> some View {
  return Circle()
    .fill(Color.orange)
    .frame(width: moonSize, height: moonSize)
}
The previous helper method used a MoonView
, which took care of placing itself at the right radius. Now, OrbitEffect
handles this placement, so changing the helper function clears up a conflict.
Finally, at the end of the ZStack
in makeSystem(_:)
, apply the following modifier:
.onAppear {
  self.animationFlag.toggle()
}
This toggles the flag and will kick off the animations when the view appears.
Now, build and run once again. The moon balls will now circle the planet, each at a different speed.

An Alternate Look at Animatable Data
In the previous step, you animated the effect by changing the percentage from 0 to 1. This is a good generic strategy for animating anything. For example, you could do the same for a progress bar and use GeometryEffect
to extend the bar’s width across the screen.
Or, you could just animate the angle directly and save a step.
In OrbitEffect
, rename percentage
to angle
, which you’ll now animate from 0 to 2π. Make sure you also replace percentage
with angle
n the definition of animatableData
.
Next, change the calculation in effectValue(size:)
to:
func effectValue(size: CGSize) -> ProjectionTransform {
  let pt = CGPoint(
    x: cos(angle + initialAngle) * radius,
    y: sin(angle + initialAngle) * radius)
  let translation = CGAffineTransform(translationX: pt.x, y: pt.y)
  return ProjectionTransform(translation)
}
This uses the angle property directly instead of computing the angle based on percentages.
Then, change makeOrbitEffect(diameter:)
to:
func makeOrbitEffect(diameter: CGFloat) -> some GeometryEffect {
  return OrbitEffect(
    angle: self.animationFlag ? 2 * .pi : 0,
    radius: diameter / 2.0)
}
Here instead of 0 to 1, the change will be from 0 to 2π when the animationFlag
is toggled.
Build and run now, but you won’t notice a difference in the animation.
Using the value versus a percentage for the animation works best when the start and end points are arbitrary, such as animating a view between two locations set by the user or by other views.
Other Ways to Animate
The animation types you’ve seen so far happen either implicitly or explicitly when a view changes due to a state change. You can also animate a view by explicitly controlling a view’s attributes. For example, you can loop in a change to a view’s offset
to move it from one location to another.
Tapping a moon name in the moon list will bring up a detail screen for the planet with a scrollable list of moon thumbnails. Right now, this list is pretty boring.

You can spice up the list by giving it a CoverFlow-like interface using a rotation3DEffect
.
In MoonFlow.swift
add the following to the end of the VStack
, in the middle of body
:
.rotation3DEffect(
  .degrees(Double(moonGeometry
    .frame(in: .global).midX - geometry.size.width / 2) / 3),
  axis: (x: 0, y: 1, z: 0)
)
This applies a rotation effect along the y-axis, depending on how far off the center of the whole view an individual VStack
is. As a user scrolls, the geometry of that stack will constantly change, causing updates to the rotation effect. This results in a smooth alteration of the rotation — making an animation.

Through the combination of GeometryReader
and an effect such as projectionEffect
, transformEffect
, scaleEffect
or rotationEffect
, you can alter a view’s position and shape as it changes position on-screen.
Where to Go From Here?
You’ve just scratched the surface of all the things you can do with SwiftUI animations. Fortunately, adding a .animation(.default)
or .animation(.spring())
will usually get you pretty far.
If you want to go further and learn more about SwiftUI and SwiftUI animations, check out the SwiftUI: Getting Started tutorial, theSwiftUI by Tutorials book and theSwiftUI video course.
If you have any questions, feel free to leave them in the comments below.
Recommend
About Joyk
Aggregate valuable and interesting links.
Joyk means Joy of geeK