

Photo Stacking in iOS with Vision and Metal [FREE]
source link: https://www.tuicool.com/articles/i2ququ7
Go to the source link to view the article. You can view the picture content, updated content and better typesetting reading experience. If the link is broken, please click the button below to view the snapshot at that time.

What is Photo Stacking? Well, imagine this. You’re on vacation, somewhere magical. You’re traveling around the UK visiting all the Harry Potter filming locations!
It’s time to see the sites and capture the most amazing photos. How else are you going to rub it in your friends’ faces that you were there? There’s only one problem: There are so many people. :[
Ugh! Every single picture you take is full of them. If only you could cast a simple spell, like Harry, and make all those people disappear. Evanesco! And, poof! They’re gone. That would be fantastic. It would be the be[a]st. ;]
Maybe there is something you can do. Photo Stacking is an emerging computational photography trend all the cool kids are talking about. Do you want to know how to use this?
In this tutorial, you’ll use the Vision framework to learn how to:
VNTranslationalImageRegistrationRequest
CIFilter
Exciting, right? Well, what are you waiting for? Read on!
Getting Started
Click the Download Materials button at the top or bottom of this tutorial. Open the starter project and run it on your device.
Note : Since you need to use the camera and Metal for this tutorial, you’ll have to run it on an actual device and not the simulator.

Evanesco startup screenshot
You should see something that looks like a simple camera app. There’s a red record button with a white ring around it and it’s showing the camera input full screen.
Surely you’ve noticed that the camera seems a bit jittery. That’s because it’s set to capture at five frames per second. To see where this is defined in code, open CameraViewController.swift
and find the following two lines in configureCaptureSession()
:
camera.activeVideoMaxFrameDuration = CMTime(value: 1, timescale: 5)
camera.activeVideoMinFrameDuration = CMTime(value: 1, timescale: 5)
The first line forces the maximum frame rate to be five frames per second. The second line defines the minimum frame rate to be the same. The two lines together require the camera to run at the desired frame rate.
If you tap the record button, you should see the outer white ring fill up clockwise. However, when it finishes, nothing happens.
You’re going to have to do something about that right now.
Saving Images to the Files App
To help you debug the app as you go along, it would be nice to save the images you’re working with to the Files app. Fortunately, this is much easier than it sounds.
Add the following two keys to your Info.plist :
- Application supports iTunes file sharing.
- Supports opening documents in place.
Set both their values to YES
. Once you’re done, the file should look like this:
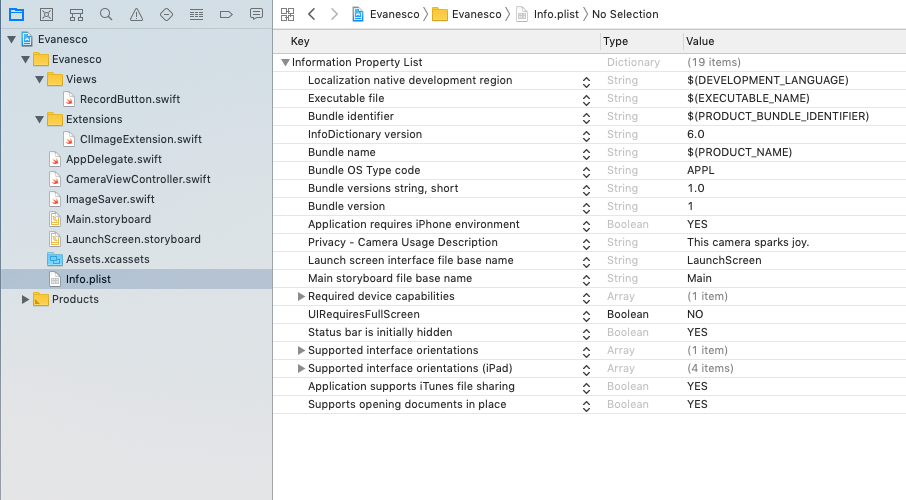
The first key enables file sharing for files in the Documents directory. The second lets your app open the original document from a file provider instead of receiving a copy. When both of these options are enabled, all files stored in the app’s Documents directory appear in the Files app. This also means that other apps can access these files.
Now that you’ve given the Files app permission to access the Documents directory, it’s time to save some images there.
Bundled with the starter project is a helper struct
called ImageSaver
. When instantiated, it generates a Universally Unique Identifier (UUID) and uses it to create a directory under the Documents
directory. This is to ensure you don’t overwrite previously saved images. You’ll use ImageSaver
in your app to write your images to files.
In CameraViewController.swift , define a new variable at the top of the class as follows:
var saver: ImageSaver?
Then, scroll to recordTapped(_:)
and add the following to the end of the method:
saver = ImageSaver()
Here you create a new ImageSaver
each time the record button is tapped, which ensures that each recording session will save the images to a new directory.
Next, scroll to captureOutput(_:didOutput:from:)
and add the following code after the initial if
statement:
// 1
guard
  let imageBuffer = CMSampleBufferGetImageBuffer(sampleBuffer),
  let cgImage = CIImage(cvImageBuffer: imageBuffer).cgImage()
  else {
    return
}
// 2
let image = CIImage(cgImage: cgImage)
// 3
saver?.write(image)
With this code, you:
-
Extract the
CVImageBufferfrom the captured sample buffer and convert it to aCGImage. -
Convert the
CGImageinto aCIImage. - Write the image to the Documents directory.
Note
: Why did you have to convert the sample buffer to a CIImage
, then to a CGImage
, and finally back into a CIImage
again? This has to do with who owns the data. When you convert the sample buffer into a CIImage
, the image stores a strong reference to the sample buffer. Unfortunately, for video capture, this means that after a few seconds, it will start dropping frames because it runs out of memory allocated to the sample buffer. By rendering the CIImage
to a CGImage
using a CIIContext
, you make a copy of the image data and the sample buffer can be freed to be used again.
Now, build and run the app. Tap the record button and, after it finishes, switch to the Files app. Under the Evanesco folder, you should see a UUID-named folder with 20 items in it.
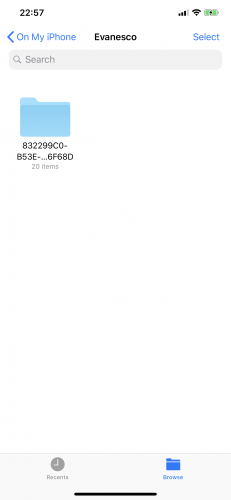
UUID named folder
If you look in this folder, you’ll find the 20 frames you captured during the 4 seconds of recording.
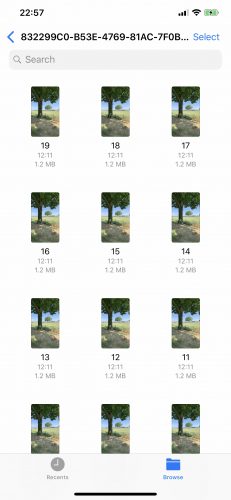
Captured frames
Note : If you don’t see the folder right away, use the search bar at the top of the Files app.
OK, cool. So what can you do with 20 nearly identical images?
Photo Stacking
In computational photography, photo stacking is a technique where multiple images are captured, aligned and combined to create different desired effects.
For instance, HDR images are obtained by taking several images at different exposure levels and combining the best parts of each together. That’s how you can see detail in shadows as well as in the bright sky simultaneously in iOS.
Astrophotography also makes heavy use of photo stacking. The shorter the image exposure, the less noise is picked up by the sensor. So astrophotographers usually take a bunch of short exposure images and stack them together to increase the brightness.
In macro photography, it is difficult to get the entire image in focus at once. Using photo stacking, the photographer can take a few images at different focal lengths and combine them to produce an extremely sharp image of a very small object.
To combine the images together, you first need to align them. How? iOS provides some interesting APIs that will help you with it.
Using Vision to Align Images
The Vision
framework has two different APIs for aligning images: VNTranslationalImageRegistrationRequest
and VNHomographicImageRegistrationRequest
. The former is easier to use and, if you assume that the user of the app will hold the iPhone relatively still, it should be good enough.
Note : If you’ve never worked with the Vision framework, check out Face Detection Tutorial Using the Vision Framework for iOS for some information about how Vision requests work.
To make your code more readable, you’ll create a new class to handle the alignment and eventual combining of the captured images.
Create a new, empty Swift File and name it ImageProcessor.swift .
Remove any provided import statements and add the following code:
import CoreImage
import Vision

class ImageProcessor {
  var frameBuffer: [CIImage] = []
  var alignedFrameBuffer: [CIImage] = []
  var completion: ((CIImage) -> Void)?
  var isProcessingFrames = false

  var frameCount: Int {
    return frameBuffer.count
  }
}
Here, you import the Vision
framework and define the ImageProcessor
class along with some necessary properties:
- frameBuffer will store the original captured images.
- alignedFrameBuffer will contain the images after they have been aligned.
- completion is a handler that will be called after the images have been aligned and combined.
- isProcessingFrames will indicate whether images are currently being aligned and combined.
- frameCount is the number of images captured.
Next, add the following method to the ImageProcessor
class:
func add(_ frame: CIImage) {
  if isProcessingFrames {
    return
  }
  frameBuffer.append(frame)
}
This method adds a captured frame to the frame buffer, but only if you’re currently not processing the frames in the frame buffer.
Still within the class, add the processing method:
func processFrames(completion: ((CIImage) -> Void)?) {
  // 1
  isProcessingFrames = true
  self.completion = completion
  // 2
  let firstFrame = frameBuffer.removeFirst()
  alignedFrameBuffer.append(firstFrame)
  // 3
  for frame in frameBuffer {
    // 4
    let request = VNTranslationalImageRegistrationRequest(targetedCIImage: frame)

    do {
      // 5
      let sequenceHandler = VNSequenceRequestHandler()
      // 6
      try sequenceHandler.perform([request], on: firstFrame)
    } catch {
      print(error.localizedDescription)
    }
    // 7
    alignImages(request: request, frame: frame)
  }
  // 8
  cleanup()
}
It seems like a lot of steps but this method is relatively straightforward. You will call this method after you’ve added all the captured frames. It will process each frame and align them using the Vision framework. Specifically, in this code, you:
-
Set the
isProcessingFramesBoolean variable to prevent adding more frames. You also save the completion handler for later. - Remove the first frame from the frame buffer and add it to the frame buffer for aligned images. All other frames will be aligned to this one.
- Loop through each frame in the frame buffer.
- Use the frame to create a new Vision request to determine a simple translational alignment.
- Create the sequence request handler, which will handle your alignment requests.
- Perform the Vision request to align the frame to the first frame and catch any errors.
-
Call
alignImages(request:frame:)with the request and the current frame. This method doesn’t exist yet and you’ll fix that soon. - Clean up. This method also still needs to be written.
Ready to tackle alignImages(request:frame:)
?
Add the following code just below processFrames(completion:)
:
func alignImages(request: VNRequest, frame: CIImage) {
  // 1
  guard
    let results = request.results as? [VNImageTranslationAlignmentObservation],
    let result = results.first
    else {
      return
  }
  // 2
  let alignedFrame = frame.transformed(by: result.alignmentTransform)
  // 3
  alignedFrameBuffer.append(alignedFrame)
}
Here you:
-
Unwrap the first result from the alignment request you made within the
forloop inprocessFrames(completion:). - Transform the frame using the affine transformation matrix calculated by the Vision framework.
- Append this translated frame to the aligned frame buffer.
These last two methods are the meat of the Vision code your app needs. You perform the requests and then use the results to modify the images. Now all that’s left is to clean up after yourself.
Add this following method to the end of the ImageProcessor
class:
func cleanup() {
  frameBuffer = []
  alignedFrameBuffer = []
  isProcessingFrames = false
  completion = nil
}
In cleanup()
, you simply clear out the two frame buffers, reset the flag to indicate that you’re no longer processing frames and set the completion handler to nil
.
Before you can build and run your app, you need to use the ImageProcessor
in your CameraViewController
.
Open CameraViewController.swift . At the top of the class, define the following property:
let imageProcessor = ImageProcessor()
Next, find captureOutput(_:didOutput:from:)
. You’ll make two small changes to this method.
Add the following line just below the let image = ...
line:
imageProcessor.add(image)
And below the call to stopRecording()
, still within the if
statement, add:
imageProcessor.processFrames(completion: displayCombinedImage)
Build and run your app and… nothing happens. No worries, Mr. Potter. You still need to combine all of these images into a single masterpiece. To see how to do that, you’ll have to read on!
NOTE
: If you want to see how your aligned images compare to the original captures, you could instantiate an ImageSaver
in your ImageProcessor
. This would allow you to save the aligned images to the Documents folder and see them in the Files app.
How Photo Stacking works
There are several different ways to combine or stack images together. By far the simplest method is to just average the pixels for each location in the image together.
For instance, if you have 20 images to stack, you would average together the pixel at coordinate (13, 37) across all 20 images to get the mean pixel value for your stacked image at (13, 37).
Pixel stacking
If you do this for every pixel coordinate, your final image will be the average of all images. The more images you have the closer the average will be to the background pixel values. If something moves in front of the camera, it will only appear in the same spot in a couple of images, so it won’t contribute much to the overall average. That’s why moving objects disappear.
This is how you’ll implement your stacking logic.
Stacking Images
Now comes the really fun part! You’re going to combine all of these images into a single fantastic image. You’re going to create your own Core Image kernel using the Metal Shading Language (MSL) .
Your simple kernel will calculate a weighted average of the pixel values for two images. When you average a bunch of images together, any moving objects should just disappear. The background pixels will appear more often and dominate the average pixel value.
Creating a Core Image Kernel
You’ll start with the actual kernel, which is written in MSL. MSL is very similar to C++.
Add a new Metal File to your project and name it AverageStacking.metal . Leave the template code in and add the following code to the end of the file:
#include <CoreImage/CoreImage.h>

extern "C" { namespace coreimage {
  // 1
  float4 avgStacking(sample_t currentStack, sample_t newImage, float stackCount) {
    // 2
    float4 avg = ((currentStack * stackCount) + newImage) / (stackCount + 1.0);
    // 3
    avg = float4(avg.rgb, 1);
    // 4
    return avg;
  }
}}
With this code, you:
-
Define a new function called
avgStacking, which will return an array of 4 float values, representing the pixel colors red, green and blue and an alpha channel. The function will be applied to two images at a time, so you need to keep track of the current average of all images seen. ThecurrentStackparameter represents this average, whilestackCountis a number indicating how images were used to create thecurrentStack. -
Calculate the weighted average of the two images. Since
currentStackmay already include information from multiple images, you multiply it by thestackCountto give it the proper weight. - Add an alpha value to the average to make it completely opaque.
- Return the average pixel value.
Note
: It’s really important to understand that this function will be called once for every pair of corresponding pixels between the two images. The sample_t
data type is a pixel sample from an image.
OK, now that you have a kernel function, you need to create a CIFilter
to use it! Add a new Swift File
to the project and name it AverageStackingFilter.swift
. Remove the import statement and add the following:
import CoreImage

class AverageStackingFilter: CIFilter {
  let kernel: CIBlendKernel
  var inputCurrentStack: CIImage?
  var inputNewImage: CIImage?
  var inputStackCount = 1.0
}
Here you’re defining your new CIFilter
class and some properties you need for it. Notice how the three input variables correspond to the three parameters in your kernel function. Coincidence? ;]
By this point, Xcode is probably complaining about this class missing an initializer. So, time to fix that. Add the following to the class:
override init() {
  // 1
  guard let url = Bundle.main.url(forResource: "default",
                                  withExtension: "metallib") else {
    fatalError("Check your build settings.")
  }
  do {
    // 2
    let data = try Data(contentsOf: url)
    // 3
    kernel = try CIBlendKernel(
      functionName: "avgStacking",
      fromMetalLibraryData: data)
  } catch {
    print(error.localizedDescription)
    fatalError("Make sure the function names match")
  }
  // 4
  super.init()
}
With this initializer, you:
- Get the URL for the compiled and linked Metal file.
- Read the contents of the file.
-
Try to create a
CIBlendKernelfrom theavgStackingfunction in the Metal file and panic if it fails. -
Call the super
init.
Wait just a minute… when did you compile and link your Metal file? Unfortunately, you haven’t yet. The good news, though, is you can have Xcode do it for you!
Compiling Your Kernel
To compile and link your Metal file, you need to add two flags to your Build Settings . So head on over there.
Search for Other Metal Compiler Flags and add -fcikernel to it:
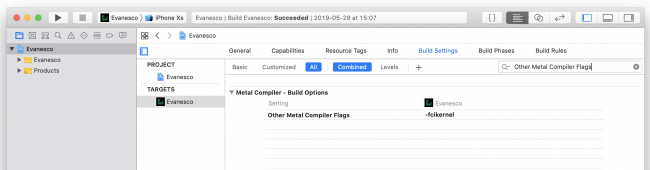
Metal compiler flag
Next, click the + button and select Add User-Defined Setting :

Add user-defined setting
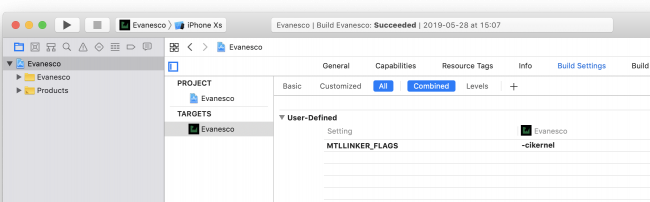
Call the setting MTLLINKER_FLAGS and set it to -cikernel :
Metal linker flag
Now, the next time you build your project, Xcode will compile your Metal files and link them in automatically.
Before you can do this, though, you still have a little bit of work to do on your Core Image filter.
Back in AverageStackingFilter.swift , add the following method:
func outputImage() -> CIImage? {
  guard
    let inputCurrentStack = inputCurrentStack,
    let inputNewImage = inputNewImage
    else {
      return nil
  }
  return kernel.apply(
    extent: inputCurrentStack.extent,
    arguments: [inputCurrentStack, inputNewImage, inputStackCount])
}
This method is pretty important. Namely, it will apply your kernel function to the input images and return the output image! It would be a useless filter, if it didn’t do that.
Ugh, Xcode is still complaining! Fine. Add the following code to the class to calm it down:
required init?(coder aDecoder: NSCoder) {
  fatalError("init(coder:) has not been implemented")
}
You don’t need to be able to initialize this Core Image filter from an unarchiver, so you’ll just implement the bare minimum to make Xcode happy.
Using Your Filter
Open ImageProcessor.swift
and add the following method to ImageProcessor
:
func combineFrames() {
  // 1
  var finalImage = alignedFrameBuffer.removeFirst()
  // 2
  let filter = AverageStackingFilter()
  //3
  for (i, image) in alignedFrameBuffer.enumerated() {
    // 4
    filter.inputCurrentStack = finalImage
    filter.inputNewImage = image
    filter.inputStackCount = Double(i + 1)
    // 5
    finalImage = filter.outputImage()!
  }
  // 6
  cleanup(image: finalImage)
}
Here you:
cleanup(image:)
You may have noticed that cleanup()
doesn’t take any parameters. Fix that by replacing cleanup()
with the following:
func cleanup(image: CIImage) {
  frameBuffer = []
  alignedFrameBuffer = []
  isProcessingFrames = false
  if let completion = completion {
    DispatchQueue.main.async {
      completion(image)
    }
  }
  completion = nil
}
The only changes are the newly added parameter and the if
statement that calls the completion handler on the main thread. The rest remains as it was.
At the bottom of processFrames(completion:)
, replace the call to cleanup()
with:
combineFrames()
This way, your image processor will combine all the captured frames after it aligns them and then pass on the final image to the completion function.
Phew! Build and run this app and make those people, cars, and anything that moves in your shot disappear!

And poof! The cars disappear!
For more fun, wave a wand and yell Evanesco! while you use the app. Other people will definitely not think you’re weird. :]
Where to Go From Here?
Congratulations! You’ve made it through a lot of concepts in this tutorial. You’re now ready to work your magic in the real world!
However, if you want to try to improve your app, there are a couple of ways to do so:
VNHomographicImageRegistrationRequest
If you’re interested in more information about Metal, check out Metal Tutorial: Getting Started and theMetal by Tutorials book.
We hope you enjoyed this tutorial, and if you have any questions or comments, please join the forum discussion below!
Recommend
About Joyk
Aggregate valuable and interesting links.
Joyk means Joy of geeK