

Text Kit Tutorial: Getting Started [FREE]
source link: https://www.tuicool.com/articles/hit/mEvmE3M
Go to the source link to view the article. You can view the picture content, updated content and better typesetting reading experience. If the link is broken, please click the button below to view the snapshot at that time.

Update Note : Bill Morefield updated this tutorial for Swift 4.2, Xcode 10 beta 5, and iOS 12 beta 5. It was previously updated by Gabriel Hauber and originally written by Colin Eberhardt.
Early versions of iOS often used web views to render text with advanced styling such as bold
, italics
, and colors
as they were easier to work with than the alternatives. The release of iOS 7 brought with it a new framework for working with text and text attributes: Text Kit
. All text-based UIKit controls (apart from UIWebView
) use Text Kit as shown in the following diagram:

In this Text Kit tutorial, you’ll explore the various features of Text Kit as you create a simple note-taking app for the iPhone that features on-the-fly text styling, re-flowing text and dynamic-text resizing.
Getting Started
Use the Download Materials button at the top or bottom of this tutorial to download the materials for this tutorial. The starter project implements the user interface for the app so that you can stay focused on Text Kit.
Open the starter project in Xcode, and build and run the app. It will look like the following:

The app creates an initial array of Note
instances and renders them in a table view controller. Storyboards and segues detect cell selection in the table view and transition to the view controller where users can edit the selected note. Browse through the source code and play with the app a little to get a feel for how the app is structured and how it functions. When you’re done with that, move on to the next section, which discusses the use of dynamic type in your app.
Understanding Dynamic Type
iOS offers the option to enhance the legibility of text by increasing font weight and setting the preferred font size for apps. This feature is known as Dynamic Type and places the onus on your app to conform to user-selected font sizes and weights.
In iOS, open the Settings app and navigate to General ▸ Accessibility ▸ Larger Text to access Dynamic Type text sizes.

To make use of dynamic type, you app needs to specify fonts using styles
rather than explicitly stating the font name and size. You use preferredFont(forTextStyle:)
on UIFont
to create a font for the given style using the user’s font preferences. You can see the six different font styles in this diagram:

The text on the left uses the smallest user selectable text size. The text in the center uses the largest, and the text on the right shows the effect of enabling the accessibility bold text feature.
Implementing Basic Support
Implementing basic support for dynamic text is straightforward. Instead of specifying exact fonts in your app, you request a font for a specific style. At runtime, iOS selects a suitable font based on the given style and the user’s text preferences.
Build and run the starter project app. Try changing the default text size in Preferences to various values. You’ll notice that the text size in list of notes changes. And you didn’t have to do a thing!
Open Main.storyboard to find out why. Locate the NotesListViewController and select the Title label in the prototype cell. You can see that the font is HeadLine . Since it’s a dynamic type, the system resizes it according to the user preferences.
If you click on a note and see the detail view, you’ll also notice that the notes do not reflect changes to the text size settings. You’ll fix that now.
Open NoteEditorViewController.swift
and add the following to the end of viewDidLoad()
:
textView.font = .preferredFont(forTextStyle: .body)
Notice that you’re not specifying an exact font such as Helvetica Neue. Instead, you’re asking for an appropriate font for body
text style using the .body
constant.
Build and run the app again. The text view now honors the system text size. You can see the difference between the two in the screenshots below:

That looks pretty good, but there is one issue. Change the text size again under Settings ▸ General ▸ Accessibility ▸ Larger Text . Switch back to the app — without re-launching it — and you’ll notice that the note didn’t change the text size.
Responding to Updates
Like the table views, text views have built-in support for Dynamic Type; making it respond to the changes is as easy as setting a property.
Open NoteEditorViewController.swift
and add the following code at the end of viewDidLoad()
:
textView.adjustsFontForContentSizeCategory = true
With that single line, you just told the text view to automatically reload the font when the system configuration changes. Isn’t it great when iOS does all the hard work for you?
Build and run your app. Change the text-size setting and verify that your app responds to the new user preferences.
Changing Layout
If you select a really small font size, your table view ends up looking a little sparse. When you select a really large font size, it ends up looking a bit crowded. These screenshots demonstrate the problem:

To ensure your table view looks good across the range of font sizes, your layout needs to be responsive to the user’s text settings. This is easy because Auto Layout and self-sizing cells do most of the work for you.
Add the following method to NotesListViewController
:
override func viewDidLoad() {
  tableView.rowHeight = UITableView.automaticDimension
  tableView.estimatedRowHeight = 44.0
}
This code configures the table view to calculate the row height based on the cell content. You need to set an estimated height, which iOS will use as a default height before calculating the actual value.
Note : If you are not familiar with Self-sizing cells, you can learn more about them in our Self-sizing Table View Cells tutorial .
Build and run your app. Change the text size setting once more, and the table rows now change dynamically to fit the text size as shown in the screenshot below:

Now, it’s time to give a new style to your app.
Implementing Letterpress Effect
The letterpress effect adds subtle shading and highlights that give text a sense of depth — much like the text has been slightly pressed into the screen. To get that effect, you’ll use NSAttributedString
.
Open NotesListViewController.swift
and replace tableView(_ tableView:, :cellForRowAtIndexPath:)
with the following implementation:
override func tableView(_ tableView: UITableView,
                        cellForRowAt indexPath: IndexPath) -> UITableViewCell {
  let cell = tableView
    .dequeueReusableCell(withIdentifier: "Cell", for: indexPath) as UITableViewCell
  let note = notes[indexPath.row]

  let font = UIFont.preferredFont(forTextStyle: .headline)
  let textColor = UIColor(red: 0.175, green: 0.458, blue: 0.831, alpha: 1)
  let attributes: [NSAttributedString.Key: Any] = [
    .foregroundColor: textColor,
    .font: font,
    .textEffect: NSAttributedString.TextEffectStyle.letterpressStyle]
  let attributedString = NSAttributedString(string: note.title, attributes: attributes)
  cell.textLabel?.attributedText = attributedString
  return cell
}
This code creates an attributed string with a HeadLine style font, blue color and a letterpress text effect, and then assigns it to the text label in the cell.
Build and run your app. Now, the table view displays the text with a nice letterpress effect, as shown below:

Letterpress is a subtle effect, but that doesn’t mean you should overuse it. Visual effects may make your text more interesting, but they don’t always make your text more legible.
Creating Exclusion Paths
Flowing text around images and other objects is a commonly needed styling feature. Text Kit allows you to render text around complex paths and shapes with exclusion paths .
It would be handy to show the note’s creation date. You’re going to add a small curved view to the top right-hand corner of the note that shows this information. This view is already implemented for you in the starter project. You can have a look it at TimeIndicatorView.swift .
You’ll start by adding the view itself. Then you’ll create an exclusion path to make the text wrap around it.
Adding the View
Open NoteEditorViewController.swift and add the following property declaration for the time indicator subview to the class:
var timeView: TimeIndicatorView!
Next, add this code to the very end of viewDidLoad()
:
timeView = TimeIndicatorView(date: note.timestamp)
textView.addSubview(timeView)
This creates an instance of the new view and adds it as a subview.
TimeIndicatorView
calculates its own size, but it won’t automatically do this. You need a mechanism to change its size when the view controller lays out the subviews.
To do that, add the following two methods to the class:
override func viewDidLayoutSubviews() {
  updateTimeIndicatorFrame()
}

func updateTimeIndicatorFrame() {
  timeView.updateSize()
  timeView.frame = timeView.frame
    .offsetBy(dx: textView.frame.width - timeView.frame.width, dy: 0)
}
The system calls viewDidLayoutSubviews()
when the view dimensions change. When that happens, you call updateTimeIndicatorFrame()
, which then invokes updateSize()
to set the size of the subview and place it in the top right corner of the text view.
Build and run your project. Tap on a list item, and the time indicator view will display in the top right-hand corner of the item view, as shown below:

Modify the Text Size preferences, and the view will adjust to fit.
But something doesn’t look quite right. The text of the note renders behind the time indicator instead of flowing around it. This is the problem that exclusion paths solve.
Adding Exclusion Paths
Open TimeIndicatorView.swift
and take look at curvePathWithOrigin(_:)
. The time indicator view uses this code when filling its background. You can also use it to determine the path around which you’ll flow your text. That’s why the calculation of the Bezier curve is broken out into its own method.
Open NoteEditorViewController.swift
and add the following code to the very end of updateTimeIndicatorFrame()
:
let exclusionPath = timeView.curvePathWithOrigin(timeView.center)
textView.textContainer.exclusionPaths = [exclusionPath]
This code creates an exclusion path based on the Bezier path in your time indicator view, but with an origin and coordinates relative to the text view.
Build and run your project. Now, select an item from the list. The text now flows around the time indicator view.

This example only scratches the surface of the capabilities of exclusion paths. Notice that the exclusionPaths
property expects an array of paths, meaning each container can support multiple exclusion paths. Exclusion paths can be as simple or as complicated as you want. Need to render text in the shape of a star or a butterfly? As long as you can define the path, exclusion paths will handle it without problem.
Leveraging Dynamic Text Formatting and Storage
You’ve seen that Text Kit can dynamically adjust fonts based on the user’s text size preferences. Wouldn’t it be cool if fonts could update based on the text itself ?
For example, say you want to make this app automatically:
- Make any text surrounded by the tilde character (~) a fancy font.
- Make any text surrounded by the underscore character (_) italic.
- Make any text surrounded by the dash character (-) crossed out.
- Make any text in all caps colored red.

That’s exactly what you’ll do in this section by leveraging the power of the Text Kit framework!
To do this, you’ll need to understand how the text storage system in Text Kit works. Here’s a diagram that shows the “Text Kit stack” used to store, render and display text:

Behind the scenes, Apple automatically creates these classes for when you create a UITextView
, UILabel
or UITextField
. In your apps, you can either use these default implementations or customize any part to get your own behavior. Going over each class:
-
NSTextStoragestores the text it is to render as an attributed string, and it informs the layout manager of any changes to the text’s contents. You can subclassNSTextStoragein order to dynamically change the text attributes as the text updates (as you’ll see later in this tutorial). -
NSLayoutManagertakes the stored text and renders it on the screen. It serves as the layout ‘engine’ in your app. -
NSTextContainerdescribes the geometry of an area of the screen where the app renders text. Each text container is typically associated with aUITextView. You can subclassNSTextContainerto define a complex shape that you would like to render text within.
You’ll need to subclass NSTextStorage
in order to dynamically add text attributes as the user types in text. Once you’ve created your custom NSTextStorage
, you’ll replace UITextView
’s default text storage instance with your own implementation.
Subclassing NSTextStorage
Right-click on the SwiftTextKitNotepad group in the project navigator, select New File… , and choose iOS/Source/Cocoa Touch Class and click Next .
Name the class SyntaxHighlightTextStorage , make it a subclass of NSTextStorage , and confirm that the Language is set to Swift . Click Next , then Create .
Open SyntaxHighlightTextStorage.swift and add a new property inside the class declaration:
let backingStore = NSMutableAttributedString()
A text storage subclass must provide its own persistence, hence the use of a NSMutableAttributedString
backing store — more on this later.
Next, add the following code to the class:
override var string: String {
  return backingStore.string
}

override func attributes(
  at location: Int,
  effectiveRange range: NSRangePointer?
) -> [NSAttributedString.Key: Any] {
  return backingStore.attributes(at: location, effectiveRange: range)
}
The first of these two declarations overrides the string
computed property, deferring to the backing store. Likewise the attributes(at: location)
method also delegates to the backing store.
Finally, add the remaining mandatory overrides to the same file:
override func replaceCharacters(in range: NSRange, with str: String) {
  print("replaceCharactersInRange:\(range) withString:\(str)")

  beginEditing()
  backingStore.replaceCharacters(in: range, with:str)
  edited(.editedCharacters, range: range,
         changeInLength: (str as NSString).length - range.length)
  endEditing()
}

override func setAttributes(_ attrs: [NSAttributedString.Key: Any]?, range: NSRange) {
  print("setAttributes:\(String(describing: attrs)) range:\(range)")

  beginEditing()
  backingStore.setAttributes(attrs, range: range)
  edited(.editedAttributes, range: range, changeInLength: 0)
  endEditing()
}
Again, these methods delegate to the backing store. However, they also surround the edits with calls to beginEditing()
, edited()
and endEditing()
. The text storage class requires these three methods to notify its associated layout manager when making edits.
Now that you have a custom NSTextStorage
, you need to make a UITextView
that uses it.
Implementing UITextView With a Custom Text Kit Stack
Instantiating UITextView
from the storyboard editor automatically creates an instance of NSTextStorage
, NSLayoutManager
and NSTextContainer
(i.e., the Text Kit stack) and exposes all three instances as read-only properties.
There is no way to change these from the storyboard editor, but you can create the UITextView
and Text Kit stack programmatically.
Open Main.storyboard
and locate the note editor view by expanding Detail Scene ▸ Detail ▸ View
. Select Text View
and delete this UITextView
instance.
Next, open NoteEditorViewController.swift
, remove the UITextView
outlet from the class and replace it with the following property declarations:
var textView: UITextView!
var textStorage: SyntaxHighlightTextStorage!
These two properties are for your text view and the custom storage subclass.
Next, remove the following lines from viewDidLoad()
:
textView.text = note.contents
textView.font = UIFont.preferredFont(forTextStyle: .body)
Since you are no longer using the outlet for the text view and will be creating one manually instead, you can remove them safely.
Still working in NoteEditorViewController.swift , add the following method to the class:
func createTextView() {
  // 1
  let attrs = [NSAttributedString.Key.font: UIFont.preferredFont(forTextStyle: .body)]
  let attrString = NSAttributedString(string: note.contents, attributes: attrs)
  textStorage = SyntaxHighlightTextStorage()
  textStorage.append(attrString)

  let newTextViewRect = view.bounds

  // 2
  let layoutManager = NSLayoutManager()

  // 3
  let containerSize = CGSize(width: newTextViewRect.width,
                             height: .greatestFiniteMagnitude)
  let container = NSTextContainer(size: containerSize)
  container.widthTracksTextView = true
  layoutManager.addTextContainer(container)
  textStorage.addLayoutManager(layoutManager)

  // 4
  textView = UITextView(frame: newTextViewRect, textContainer: container)
  textView.delegate = self
  view.addSubview(textView)

  // 5
  textView.translatesAutoresizingMaskIntoConstraints = false
  NSLayoutConstraint.activate([
    textView.leadingAnchor.constraint(equalTo: view.leadingAnchor),
    textView.trailingAnchor.constraint(equalTo: view.trailingAnchor),
    textView.topAnchor.constraint(equalTo: view.topAnchor),
    textView.bottomAnchor.constraint(equalTo: view.bottomAnchor)
  ])
}
This is quite a lot of code. Consider each step in turn:
- Instantiate an instance of your custom text storage and initialize it with an attributed string holding the content of the note.
- Create a layout manager.
- Create a text container and associate it with the layout manager. Then, associate the layout manager with the text storage.
- Create the actual text view with your custom text container, set the delegate and add the text view as a subview.
- Set the Auto Layout constraints to make the text view the same size as the parent view.
At this point, the earlier diagram, and the relationship it shows between the four key classes (storage, layout manager, container and text view), should make more sense:
Note that the text container has a width that matches the view width, but has infinite height — or as close as .greatestFiniteMagnitude
can come to infinity. This is enough to allow the UITextView
to scroll and accommodate long passages of text.
Still working in NoteEditorViewController.swift
, add the line below directly after the super.viewDidLoad()
line in viewDidLoad()
:
createTextView()
Build and run your app. Open a note. Your custom text view is there and shows the text just like the original. Edit the text while keeping an eye on the Xcode console. You should see a flurry of log messages created as you type, as below:

This is the logging code from within SyntaxHighlightTextStorage
to give you an indicator that your custom text handling code is being called.
The basic foundation of your text parser seems solid. Now, you’ll add the dynamic formatting!
Adding Dynamic Formatting
In this next step, you are going to modify your custom text storage to embolden text *surrounded by asterisks* .
Open SyntaxHighlightTextStorage.swift and add the following method:
func applyStylesToRange(searchRange: NSRange) {
  // 1
  let fontDescriptor = UIFontDescriptor.preferredFontDescriptor(withTextStyle: .body)
  let boldFontDescriptor = fontDescriptor.withSymbolicTraits(.traitBold)
  let boldFont = UIFont(descriptor: boldFontDescriptor!, size: 0)
  let normalFont = UIFont.preferredFont(forTextStyle: .body)

  // 2
  let regexStr = "(\\*\\w+(\\s\\w+)*\\*)"
  let regex = try! NSRegularExpression(pattern: regexStr)
  let boldAttributes = [NSAttributedString.Key.font: boldFont]
  let normalAttributes = [NSAttributedString.Key.font: normalFont]

  // 3
  regex.enumerateMatches(in: backingStore.string, range: searchRange) {
    match, flags, stop in
    if let matchRange = match?.range(at: 1) {
      addAttributes(boldAttributes, range: matchRange)
      // 4
      let maxRange = matchRange.location + matchRange.length
      if maxRange + 1 < length {
        addAttributes(normalAttributes, range: NSMakeRange(maxRange, 1))
      }
    }
  }
}
Here's what's this does:
- Create a bold and a normal font to format the text using font descriptors . Font descriptors help you avoid the use of hard-coded font strings to set font types and styles.
-
Create a regular expression (or regex
) that locates any text surrounded by asterisks. For example, in the string “iOS 8 is *awesome* isn't it?”, the regular expression stored in
regexStrabove will match and return the text “*awesome*”. - Enumerate the matches returned by the regular expression and apply the bold attribute to each one.
- Reset the text style of the character that follows the final asterisk in the matched string to “normal”. This ensures that any text added after the closing asterisk is not rendered in bold type.
Note
: Font descriptors are a type of descriptor language that allows you to apply specific attributes to fonts or obtain details of font metrics, without the need to instantiate an instance of UIFont
.
Now, add the following method:
func performReplacementsForRange(changedRange: NSRange) {
  var extendedRange =
    NSUnionRange(changedRange,
    NSString(string: backingStore.string)
      .lineRange(for: NSMakeRange(changedRange.location, 0)))
  extendedRange =
    NSUnionRange(changedRange,
    NSString(string: backingStore.string)
      .lineRange(for: NSMakeRange(NSMaxRange(changedRange), 0)))
  applyStylesToRange(searchRange: extendedRange)
}
The code above expands the range that your code inspects when attempting to match your bold formatting pattern. This is required because changedRange
typically indicates a single character. lineRange(for:)
extends that range to the entire line of text.
Finally, add the following method right after the code above:
override func processEditing() {
  performReplacementsForRange(changedRange: editedRange)
  super.processEditing()
}
processEditing()
sends notifications to the layout manager when the text changes. It also serves as a convenient home for any post-editing logic.
Build and run your app. Type some text into a note and surround some of the text with asterisks. The text will be bold as shown in the screenshot below:

You’re likely thinking of all the other styles that you might add to your text.
Adding Further Styles
The basic principle of applying styles to delimited text is rather straightforward: Use a regex to find and replace the delimited string using applyStylesToRange(searchRange:)
to set the desired style of the text.
Open SyntaxHighlightTextStorage.swift and add the following method to the class:
func createAttributesForFontStyle(
  _ style: UIFont.TextStyle,
  withTrait trait: UIFontDescriptor.SymbolicTraits
) -> [NSAttributedString.Key: Any] {
  let fontDescriptor = UIFontDescriptor.preferredFontDescriptor(withTextStyle: style)
  let descriptorWithTrait = fontDescriptor.withSymbolicTraits(trait)
  let font = UIFont(descriptor: descriptorWithTrait!, size: 0)
  return [.font: font]
}
This method applies the supplied font style to the body font. It provides a zero size to the UIFont(descriptor:, size:)
constructor, which forces UIFont
to return a size that matches the user’s current font size preferences.
Next, add the following property at the top of the class:
private var replacements: [String: [NSAttributedString.Key: Any]] = [:]
Now, add the following function to the end of the class:
func createHighlightPatterns() {
  let scriptFontDescriptor = UIFontDescriptor(fontAttributes: [.family: "Zapfino"])

  // 1
  let bodyFontDescriptor = UIFontDescriptor.preferredFontDescriptor(withTextStyle: .body)
  let bodyFontSize = bodyFontDescriptor.fontAttributes[.size] as! NSNumber
  let scriptFont = UIFont(descriptor: scriptFontDescriptor,
                          size: CGFloat(bodyFontSize.floatValue))

  // 2
  let boldAttributes = createAttributesForFontStyle(.body,  withTrait:.traitBold)
  let italicAttributes = createAttributesForFontStyle(.body,
                                                      withTrait:.traitItalic)
  let strikeThroughAttributes =  [NSAttributedString.Key.strikethroughStyle: 1]
  let scriptAttributes = [NSAttributedString.Key.font: scriptFont]
  let redTextAttributes = [NSAttributedString.Key.foregroundColor: UIColor.red]

  // 3
  replacements = [
    "(\\*\\w+(\\s\\w+)*\\*)": boldAttributes,
    "(_\\w+(\\s\\w+)*_)": italicAttributes,
    "([0-9]+\\.)\\s": boldAttributes,
    "(-\\w+(\\s\\w+)*-)": strikeThroughAttributes,
    "(~\\w+(\\s\\w+)*~)": scriptAttributes,
    "\\s([A-Z]{2,})\\s": redTextAttributes
  ]
}
Here’s what’s going on in this method:
createAttributesForFontStyle(withTrait:)
If you’re not familiar with regular expressions, the dictionary above might look a bit strange. These expressions specify patterns that match the text you want to apply a style to. If you’d like to learn more about regular expressions, check out this NSRegularExpression tutorial and cheat sheet .
You'll also need to initialize the replacements dictionary. Add the following initializers to the SyntaxHighlightTextStorage
class:
override init() {
  super.init()
  createHighlightPatterns()
}

required init?(coder aDecoder: NSCoder) {
  super.init(coder: aDecoder)
}
You're calling the plain initializer with no arguments in the rest of your project. The init(coder:)
initializer is required to keep the compiler happy.
Finally, replace the implementation of applyStylesToRange(searchRange:)
with the following:
func applyStylesToRange(searchRange: NSRange) {
  let normalAttrs =
    [NSAttributedString.Key.font: UIFont.preferredFont(forTextStyle: .body)]
  addAttributes(normalAttrs, range: searchRange)

  // iterate over each replacement
  for (pattern, attributes) in replacements {
    do {
      let regex = try NSRegularExpression(pattern: pattern)
      regex.enumerateMatches(in: backingStore.string, range: searchRange) {
        match, flags, stop in
        // apply the style
        if let matchRange = match?.range(at: 1) {
          print("Matched pattern: \(pattern)")
          addAttributes(attributes, range: matchRange)

          // reset the style to the original
          let maxRange = matchRange.location + matchRange.length
          if maxRange + 1 < length {
            addAttributes(normalAttrs, range: NSMakeRange(maxRange, 1))
          }
        }
      }
    }
    catch {
      print("An error occurred attempting to locate pattern: " +
            "\(error.localizedDescription)")
    }
  }
}
This method previously performed one regex search for bold text. Now, it iterates over the dictionary of regex matches and attributes since there are many text styles to look for. For each regex, it runs the search and applies the specified style to the matched pattern.
Note that the initialization of the NSRegularExpression
can fail if the pattern has an error in it. You catch the resulting error from the failed compilation of the pattern and log it so that you can fix the pattern.
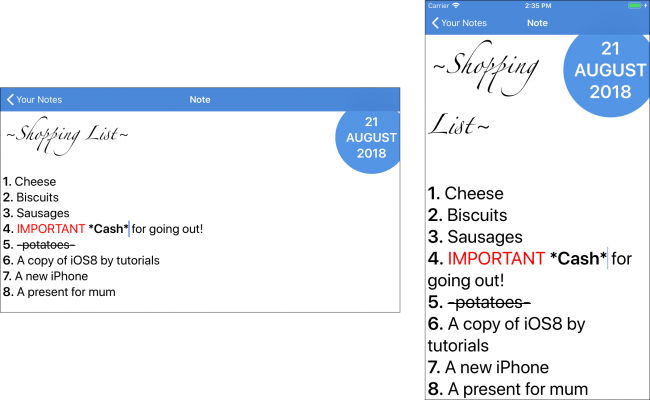
Build and run your app, and try out the new styles available to you:

Here's a slightly more challenging exercise. If you enter the text: "*This is not bold*" (without the quotes) into a note, you'll discover that it does not turn bold. In other words, if the selected text has multiple spaces between the words, there is no match.
Can you create a regular expression that will embolden that text? It's just a simple modification of the one already in the code.
[spoiler title=""](\\*\\w+(\\s+\\w+)*\\*) – try it out![/spoiler]
Your app is nearly complete, but there is one loose end to clean up.
If you try changing the Dynamic Type size after applying attributes, you’ll notice that the decorated strings don't respond to content size changed notifications since your custom implementation doesn’t yet support this action.
Reviving Dynamic Type
To correct the issue with dynamic type, your code should update the fonts used by the attributed string containing the text of the note when the content size change notification occurs.
Add the following function to the SyntaxHighlightTextStorage class:
func update() {
  let bodyFont = [NSAttributedString.Key.font: UIFont.preferredFont(forTextStyle: .body)]
  addAttributes(bodyFont, range: NSMakeRange(0, length))

  createHighlightPatterns()
  applyStylesToRange(searchRange: NSMakeRange(0, length))
}
The method above applies the body text style to the entire string, re-creates the highlight patterns based on the new font configuration and then re-applies the highlighting styles.
Finally, open NoteEditorViewController.swift
and add this line to viewDidLayoutSubviews()
to perform the update:
textStorage.update()
Build and run. Change your text size preferences, and the text should adjust accordingly:
Where to Go From Here?
Hopefully, this Text Kit tutorial has helped you understand the features of the library you'll no doubt find useful in practically every app that you write. You've implemented dynamic type support, learned to respond to changes in text sizes within your app, used exclusion paths, and dynamically applied styles to text.
You can download the completed version of the project using the Download Materials button at the top or bottom of this tutorial to view the final project.
If you'd like to learn more about Dynamic Type, check out our bookiOS 11 By Tutorials. The book has a chapter on using Dynamic Type in your app.
We hope you enjoyed this tutorial. If you have any questions or comments please join the forum discussion below!
Recommend
About Joyk
Aggregate valuable and interesting links.
Joyk means Joy of geeK