

Grand Central Dispatch Tutorial for Swift 4: Part 1/2
source link: https://www.tuicool.com/articles/hit/7vYjyyn
Go to the source link to view the article. You can view the picture content, updated content and better typesetting reading experience. If the link is broken, please click the button below to view the snapshot at that time.

Update note : Evan Dekhayser updated this tutorial to Swift 4.2. Christine Abernathy wrote the original.
Grand Central Dispatch (GCD) is a low-level API for managing concurrent operations. It can help you improve your app’s responsiveness by deferring computationally expensive tasks to the background. It’s an easier concurrency model to work with than locks and threads.
In this two-part Grand Central Dispatch tutorial, you’ll learn the ins and outs of GCD and its Swifty API. This first part will explain what GCD does and showcase several basic GCD functions. In the second part, you’ll learn about some advanced functions GCD has to offer.
You’ll build upon an existing application called GooglyPuff . GooglyPuff is a non-optimized, “thread-unsafe” app that overlays googly eyes on detected faces using Core Image’s face detection API. You can select images to receive this effect from your Photo Library or select images downloaded from the internet.
Your mission in this tutorial, if you choose to accept it, is to use GCD to optimize the app and ensure you can safely call code from different threads.
Getting Started
Use the Download Materials button at the top or bottom of this tutorial to download the starter project. Open it in Xcode and run it to see what you have to work with.
The home screen is initially empty. Tap + , then select Le Internet to download predefined images from the internet. Tap the first image and you’ll see googly eyes added to the face.

You’ll primarily be working with four classes in this tutorial:
-
PhotoCollectionViewController: The initial view controller. It displays the selected photos as thumbnails. -
PhotoDetailViewController: Displays a selected photo fromPhotoCollectionViewControllerand adds googly eyes to the image. -
Photo: This protocol describes the properties of a photo. It provides an image, a thumbnail and their corresponding statuses. The project includes two classes which implement the protocol:DownloadPhoto, which instantiates a photo from an instance ofURL, andAssetPhoto, which instantiates a photo from an instance ofPHAsset. -
PhotoManager: This manages all thePhotoobjects.
There are a few problems with the app. One that you may have noticed when running the app is that the download complete alert is premature. You’ll fix this in the second part of the series.
In this first part, you’ll work on a few improvements including optimizing the googly-fying process and making PhotoManager
thread safe.
GCD Concepts
To understand GCD, you need to be comfortable with several concepts related to concurrency and threading.
Concurrency
In iOS, a process or application consists of one or more threads. The operating system scheduler manages the threads independently of each other. Each thread can execute concurrently, but it’s up to the system to decide if this happens, when this happens, and how it happens.
Single-core devices achieve concurrency through a method called time-slicing . They run one thread, perform a context switch, then run another thread.

Multi-core devices, on the other hand, execute multiple threads at the same time via parallelism .
GCD is built on top of threads. Under the hood it manages a shared thread pool. With GCD you add blocks of code or work items to dispatch queues and GCD decides which thread to execute them on.
As you structure your code, you’ll find code blocks that can run simultaneously and some that should not. This then allows you to use GCD to take advantage of concurrent execution.
Note that GCD decides how much parallelism it requires based on the system and available system resources. It’s important to note that parallelism requires concurrency, but concurrency does not guarantee parallelism.
Basically, concurrency is about structure while parallelism is about execution .
Queues
As mentioned before, GCD operates on dispatch queues
through a class aptly named DispatchQueue
. You submit units of work to this queue and GCD will execute them in a FIFO order (First In, First Out), guaranteeing that the first task submitted is the first one started.
Dispatch queues are thread-safe which means that you can access them from multiple threads simultaneously. The benefits of GCD are apparent when you understand how dispatch queues provide thread safety to parts of your own code. The key to this is to choose the right kind of dispatch queue and the right dispatching function to submit your work to the queue.
Queues can be either serial or concurrent . Serial queues guarantee that only one task runs at any given time. GCD controls the execution timing. You won’t know the amount of time between one task ending and the next one beginning:

Concurrent queues allow multiple tasks to run at the same time. The queue guarantees tasks start in the order you add them. Tasks can finish in any order and you have no knowledge of the time it will take for the next task to start, nor the number of tasks that are running at any given time.
This is by design: your code shouldn’t rely on these implementation details.
See the sample task execution below:
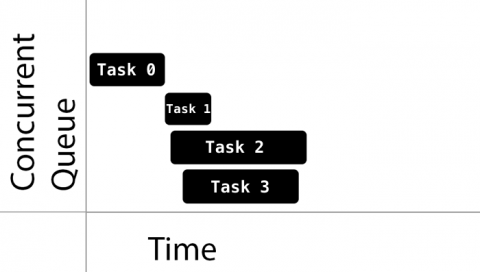
Notice how Task 1, Task 2, and Task 3 start quickly one after the other. On the other hand, Task 1 took a while to start after Task 0. Also notice that while Task 3 started after Task 2, it finished first.
The decision of when to start a task is entirely up to GCD. If the execution time of one task overlaps with another, it’s up to GCD to determine if it should run on a different core, if one is available, or instead to perform a context switch to run a different task.
GCD provides three main types of queues:
- Main queue : runs on the main thread and is a serial queue.
- Global queues : concurrent queues that are shared by the whole system. There are four such queues with different priorities : high, default, low, and background. The background priority queue has the lowest priority and is throttled in any I/O activity to minimize negative system impact.
- Custom queues : queues that you create which can be serial or concurrent. Requests in these queues actually end up in one of the global queues.
When sending tasks to the global concurrent queues, you don’t specify the priority directly. Instead, you specify a Quality of Service (QoS) class property. This indicates the task’s importance and guides GCD in determining the priority to give to the task.
The QoS classes are:
- User-interactive : This represents tasks that must complete immediately in order to provide a nice user experience. Use it for UI updates, event handling and small workloads that require low latency. The total amount of work done in this class during the execution of your app should be small. This should run on the main thread.
- User-initiated : The user initiates these asynchronous tasks from the UI. Use them when the user is waiting for immediate results and for tasks required to continue user interaction. They execute in the high priority global queue.
- Utility : This represents long-running tasks, typically with a user-visible progress indicator. Use it for computations, I/O, networking, continuous data feeds and similar tasks. This class is designed to be energy efficient. This will get mapped into the low priority global queue.
- Background : This represents tasks that the user is not directly aware of. Use it for prefetching, maintenance, and other tasks that don’t require user interaction and aren’t time-sensitive. This will get mapped into the background priority global queue.
Synchronous vs. Asynchronous
With GCD, you can dispatch a task either synchronously or asynchronously.
A synchronous
function returns control to the caller after the task completes. You can schedule a unit of work synchronously by calling DispatchQueue.sync(execute:)
.
An asynchronous
function returns immediately, ordering the task to start but not waiting for it to complete. Thus, an asynchronous function does not block the current thread of execution from proceeding on to the next function. You can schedule a unit of work asynchronously by calling DispatchQueue.async(execute:)
.
Managing Tasks
You’ve heard about tasks quite a bit by now. For the purposes of this tutorial you can consider a task to be a closure . Closures are self-contained, callable blocks of code you can store and pass around.
Each task you submit to a DispatchQueue
is a DispatchWorkItem
. You can configure the behavior of a DispatchWorkItem
such as its QoS class or whether to spawn a new detached thread.
Handling Background Tasks
With all this pent up GCD knowledge, it’s time for your first app improvement!
Head back to the app and add some photos from your Photo Library or use the Le Internet option to download a few. Tap on a photo. Notice how long it takes for the photo detail view to show up. The lag is more pronounced when viewing large images on slower devices.
Overloading a view controller’s viewDidLoad()
is easy to do, resulting in long waits before the view appears. It’s best to offload work to the background if it’s not absolutely essential at load time.
This sounds like a job for DispatchQueue
‘s async
!
Open PhotoDetailViewController.swift
. Modify viewDidLoad()
and replace these two lines:
let overlayImage = faceOverlayImageFrom(image)
fadeInNewImage(overlayImage)
With the following code:
// 1
DispatchQueue.global(qos: .userInitiated).async { [weak self] in
  guard let self = self else {
    return
  }
  let overlayImage = self.faceOverlayImageFrom(self.image)

  // 2
  DispatchQueue.main.async { [weak self] in
    // 3
    self?.fadeInNewImage(overlayImage)
  }
}
Here’s what the code’s doing step by step:
viewDidLoad()
UIImageView
fadeInNewImage(_:)
In two spots, you add [weak self]
to capture a weak reference to self
in each closure. If you aren’t familiar with capture lists, check out this tutorial on memory management
.
Build and run the app. Download photos through Le Internet option. Select a photo and you’ll notice that the view controller loads up noticeably faster and adds the googly eyes after a short delay:

This lends a nice before and after effect to the app as the googly eyes appear. Even if you’re trying to load an insanely huge image, your app won’t hang as the view controller loads.
In general, you want to use async
when you need to perform a network-based or CPU-intensive task in the background and not block the current thread.
Here’s a quick guide of how and when to use the various queues with async
:
-
Main Queue
: This is a common choice to update the UI after completing work in a task on a concurrent queue. To do this, you code one closure inside another. Targeting the main queue and calling
asyncguarantees that this new task will execute sometime after the current method finishes. - Global Queue : This is a common choice to perform non-UI work in the background.
-
Custom Serial Queue
: A good choice when you want to perform background work serially and track it. This eliminates resource contention and race conditions since you know only one task at a time is executing. Note that if you need the data from a method, you must declare another closure to retrieve it or consider using
sync.
Delaying Task Execution
DispatchQueue
allows you to delay task execution. Don’t use this to solve race conditions or other timing bugs through hacks like introducing delays. Instead, use this when you want a task to run at a specific time.
Consider the user experience of your app for a moment. It’s possible that users might be confused about what to do when they open the app for the first time — were you? :]
It would be a good idea to display a prompt to the user if there aren’t any photos. You should also consider how users’ eyes will navigate the home screen. If you display a prompt too quickly, they might miss it as their eyes linger on other parts of the view. A two-second delay should be enough to catch users’ attention and guide them.
Open PhotoCollectionViewController.swift
and fill in the implementation for showOrHideNavPrompt()
:
// 1
let delayInSeconds = 2.0

// 2
DispatchQueue.main.asyncAfter(deadline: .now() + delayInSeconds) { [weak self] in
  guard let self = self else {
    return
  }

  if PhotoManager.shared.photos.count > 0 {
    self.navigationItem.prompt = nil
  } else {
    self.navigationItem.prompt = "Add photos with faces to Googlyify them!"
  }

  // 3
  self.navigationController?.viewIfLoaded?.setNeedsLayout()
}
Here’s what’s going on above:
- You specify the amount of time to delay.
- You then wait for the specified time then asynchronously run the block which updates the photos count and updates the prompt.
- Force the navigation bar to lay out after setting the prompt to make sure it looks kosher.
showOrHideNavPrompt()
executes in viewDidLoad()
and any time your UICollectionView
reloads.
Build and run the app. There should be a slight delay before you see a prompt displayed:

Note : You can ignore the Auto Layout messages in the Xcode console. They all come from iOS and don’t indicate a mistake on your part.
Why not use Timer
? You could consider using it if you have repeated tasks which are easier to schedule with Timer
. Here are two reasons to stick with dispatch queue’s asyncAfter()
.
One is readability. To use Timer
you have to define a method, then create the timer with a selector or invocation to the defined method. With DispatchQueue
and asyncAfter()
, you simply add a closure.
Timer
is scheduled on run loops so you would also have to make sure you scheduled it on the correct run loop (and in some cases for the correct run loop modes). In this regard, working with dispatch queues is easier.
Managing Singletons
Singletons. Love them or hate them, they’re as popular in iOS as cat photos on the web. :]
One frequent concern with singletons is that often they’re not thread safe. This concern is justified given their use: singletons are often used from multiple controllers accessing the singleton instance at the same time. Your PhotoManager
class is a singleton, so you’ll need to consider this issue.
Thread safe code can be safely called from multiple threads or concurrent tasks without causing any problems such as data corruption or app crashes. Code that is not thread safe can only run in one context at a time.
There are two thread safety cases to consider: during initialization of the singleton instance and during reads and writes to the instance.
Initialization turns out to be the easy case because of how Swift initializes static variables. It initializes static variables when they are first accessed, and it guarantees initialization is atomic. That is, Swift treats the code performing initialization as a critical section and guarantees it completes before any other thread gets access to the static variable.
A critical section is a piece of code that must not execute concurrently, that is, from two threads at once. This is usually because the code manipulates a shared resource such as a variable that can become corrupt if it’s accessed by concurrent processes.
Open PhotoManager.swift to see how you initialize the singleton:
class PhotoManager {
  private init() {}
  static let shared = PhotoManager()
}
The private initializer makes sure that the only PhotoManager
is then one assigned to shared
. This way, you don’t have to worry about syncing changes to your photo store between different managers.
You still have to deal with thread safety when accessing code in the singleton that manipulates shared internal data. You can handle this through methods such as synchronizing data access. You’ll see one approach in the next section.
Handling the Readers-Writers Problem
In Swift, any variable declared with the let
keyword is a constant and, therefore, read-only and thread-safe. Declare the variable with the var
keyword however, and it becomes mutable and not thread-safe unless the data type is designed to be so. The Swift collection types like Array
and Dictionary
are not thread-safe when declared mutable.
Although many threads can read a mutable instance of Array
simultaneously without issue, it’s not safe to let one thread modify the array while another is reading it. Your singleton doesn’t prevent this condition from happening in its current state.
To see the problem, take a look at addPhoto(_:)
in PhotoManager.swift
, which is reproduced below:
func addPhoto(_ photo: Photo) {
  unsafePhotos.append(photo)
  DispatchQueue.main.async { [weak self] in
    self?.postContentAddedNotification()
  }
}
This is a write method as it modifies a mutable array object.
Now take a look at the photos
property, reproduced below:
private var unsafePhotos: [Photo] = []

var photos: [Photo] {
  return unsafePhotos
}
The getter for this property is termed a read
method as it’s reading the mutable array. The caller gets a copy of the array and is protected against mutating the original array inappropriately. However, this does not provide any protection against one thread calling the write method addPhoto(_:)
while simultaneously another thread calls the getter for the photos
property.
That’s why the backing variable is named unsafePhotos
– if it’s accessed on the wrong thread, you can get some wacky behavior!
photos
array? In Swift, parameters and return types of functions are either passed by reference or by value.
Passing by value results in a copy of the object, and changes to the copy will not affect the original. By default in Swift, class
instances are passed by reference and struct
s are passed by value. Swift’s built-in data types like Array
and Dictionary
, are implemented as struct
s.
It may look like there’s a lot of copying in your code when passing collections back and forth. Don’t worry about the memory usage implications of this. The Swift collection types are optimized to make copies only when necessary, for instance, when your app modifies an array passed by value for the first time.
This is the classic software development Readers-Writers Problem . GCD provides an elegant solution of creating a read/write lock using dispatch barriers . Dispatch barriers are a group of functions acting as a serial-style bottleneck when working with concurrent queues.
When you submit a DispatchWorkItem
to a dispatch queue you can set flags to indicate that it should be the only item executed on the specified queue for that particular time. This means that all items submitted to the queue prior to the dispatch barrier must complete before the DispatchWorkItem
will execute.
When the DispatchWorkItem
‘s turn arrives, the barrier executes it and ensures that the queue does not execute any other tasks during that time. Once finished, the queue returns to its default implementation.
The diagram below illustrates the effect of a barrier on various asynchronous tasks:

Notice how in normal operation the queue acts just like a normal concurrent queue. But when the barrier is executing, it essentially acts like a serial queue. That is, the barrier is the only thing executing. After the barrier finishes, the queue goes back to being a normal concurrent queue.
Use caution when using barriers in global background concurrent queues as these queues are shared resources. Using barriers in a custom serial queue is redundant as it already executes serially. Using barriers in custom concurrent queue is a great choice for handling thread safety in atomic or critical areas of code.
You’ll use a custom concurrent queue to handle your barrier function and separate the read and write functions. The concurrent queue will allow multiple read operations simultaneously.
Open PhotoManager.swift
and add a private property just above the unsafePhotos
declaration:
private let concurrentPhotoQueue =
  DispatchQueue(
    label: "com.raywenderlich.GooglyPuff.photoQueue",
    attributes: .concurrent)
This initializes concurrentPhotoQueue
as a concurrent queue. You set up label
with a descriptive name that is helpful during debugging. Typically, you use the reverse DNS style naming convention.
Next, replace addPhoto(_:)
with the following code:
func addPhoto(_ photo: Photo) {
  concurrentPhotoQueue.async(flags: .barrier) { [weak self] in
    // 1
    guard let self = self else {
      return
    }

    // 2
    self.unsafePhotos.append(photo)

    // 3
    DispatchQueue.main.async { [weak self] in
      self?.postContentAddedNotification()
    }
  }
}
Here’s how your new write method works:
- You dispatch the write operation asynchronously with a barrier. When it executes, it will be the only item in your queue.
- You add the object to the array.
- Finally you post a notification that you’ve added the photo. You must post this notification on the main thread because it will do UI work. So you dispatch another task asynchronously to the main queue to trigger the notification.
This takes care of the write, but you also need to implement the photos
read method.
To ensure thread safety with your writes, you need to perform reads on the concurrentPhotoQueue
queue. You need return data from the function call so an asynchronous dispatch won’t cut it. In this case, sync
would be an excellent candidate.
Use sync
to keep track of your work with dispatch barriers, or when you need to wait for the operation to finish before you can use the data processed by the closure.
You need to be careful though. Imagine if you call sync
and target the current queue you’re already running on. This will result in a deadlock
situation.
Two (or sometimes more) items — in most cases, threads — deadlock if they all get stuck waiting for each other to complete or perform another action. The first can’t finish because it’s waiting for the second to finish. But the second can’t finish because it’s waiting for the first to finish.
In your case, the sync
call will wait until the closure finishes, but the closure can’t finish (or start!) until the currently executing closure finishes, which it can’t! This should force you to be conscious of which queue you’re calling from — as well as which queue you’re passing in.
Here’s a quick overview of when and where to use sync
:
- Main Queue : Be VERY careful for the same reasons as above; this situation also has potential for a deadlock condition. This is especially bad on the main queue because the whole app will become unresponsive.
- Global Queue : This is a good candidate to sync work through dispatch barriers or when waiting for a task to complete so you can perform further processing.
-
Custom Serial Queue
: Be VERY careful in this situation; if you’re running in a queue and call
synctargeting the same queue, you’ll definitely create a deadlock.
Still in PhotoManager.swift
modify the photos
property getter:
var photos: [Photo] {
  var photosCopy: [Photo]!

  // 1
  concurrentPhotoQueue.sync {

    // 2
    photosCopy = self.unsafePhotos
  }
  return photosCopy
}
Here’s what’s going on step-by-step:
concurrentPhotoQueue
photosCopy
Build and run the app. Download photos through Le Internet option. It should behave as before but underneath the hood, you have some very happy threads.

Congratulations — your PhotoManager
singleton is now thread safe! No matter where or how you read or write photos, you can be confident that it will happen in a safe manner with no surprises.
Where to Go From Here?
In this Grand Central Dispatch tutorial, you learned how to make your code thread safe and how to maintain the responsiveness of the main thread while performing CPU intensive tasks.
You can download the completed version of the project using the Download Materials button at the top or bottom of this tutorial. It contains all the improvements made in this tutorial so far. In the second part of this tutorial you’ll continue to improve upon this project.
If you plan on optimizing your own apps, you really should be profiling your work with Xcode’s built-in Time Profiler . Using this instrument is outside the scope of this tutorial, so check out How to Use Instruments for a excellent overview.
You may also want to check out this excellent talk by Rob Pike on Concurrency vs Parallelism.
Our iOS Concurrency with GCD and Operations video tutorial series also covers a lot of the same topics that we’ve covered in this tutorial.
In thenext part of this tutorial you’ll dive even deeper into GCD’s API to do even more cool stuff.
If you have any questions or comments, feel free to join the discussion below!
Recommend
About Joyk
Aggregate valuable and interesting links.
Joyk means Joy of geeK